 Copyright
©1996, Que Corporation. All rights reserved. No part of this book
may be used or reproduced in any form or by any means, or stored in a database
or retrieval system without prior written permission of the publisher except
in the case of brief quotations embodied in critical articles and reviews.
Making copies of any part of this book for any purpose other than your
own personal use is a violation of United States copyright laws. For information,
address Que Corporation, 201 West 103rd Street, Indianapolis,
IN 46290 or at support@mcp .com.
Copyright
©1996, Que Corporation. All rights reserved. No part of this book
may be used or reproduced in any form or by any means, or stored in a database
or retrieval system without prior written permission of the publisher except
in the case of brief quotations embodied in critical articles and reviews.
Making copies of any part of this book for any purpose other than your
own personal use is a violation of United States copyright laws. For information,
address Que Corporation, 201 West 103rd Street, Indianapolis,
IN 46290 or at support@mcp .com.
Notice: This material is excerpted from Special Edition Using Microsoft Exchange Server, ISBN: 0-7897-0687-3. The electronic version of this material has not been through the final proof reading stage that the book goes through before being published in printed form. Some errors may exist here that are corrected before the book is published. This material is provided "as is" without any warranty of any kind.
After you plan and layout your Exchange organization, the next step will be to establish the maintenance strategy for your organization. No matter how solid your design and implementation of the Exchange architecture, some tasks must be performed daily to maintain optimum performance and smooth operation.
This section will assist you in performing the routine tasks that will prevent messaging errors, help you fine-tune performance, and recover lost data when the worst happens.
In this chapter, we will discuss the following:
Creating Different Server Recipients
During normal Exchange organization operation, there will be times when recipients created on one Exchange server need to be transferred to different machines.
Some common circumstances for relocating recipients are these:
Distribution lists and custom recipients are server-independent objects. They belong to a site as a whole, not to a specific Exchange server, and therefore do not need to be transferred among servers in a site.
Moving Exchange Mailboxes
Mailboxes are the most common type of recipients. Moving a mailbox will also transfer its entire private information store contents (including attachments) to the destination server.
Because the Exchange information store uses intelligent storage for handling attachments addressed to multiple recipients on the same server, keep in mind that additional space is required to split these files. Consider the following example.
User A and User B on server BOSTON01 both receive a message with a 1 megabyte sound file attachment. The total storage space used on BOSTON01 to hold this sound is 1 megabyte. Both users are referencing the same instance of the file.
Suppose you transfer User A to server BOSTON05. The user's entire mailbox message contents and attachments are moved to BOSTON05's private information store. This means the 1 megabyte sound file now exists on both servers.
To move mailboxes to another server on the same site:
1. Use the Exchange administrator program and first select the site and then the server within that site where the mailboxes currently reside.
2. Select the mailboxes you wish to relocate. You can select a series of them by using Shift+click or a scattered assortment by using Ctrl+click.
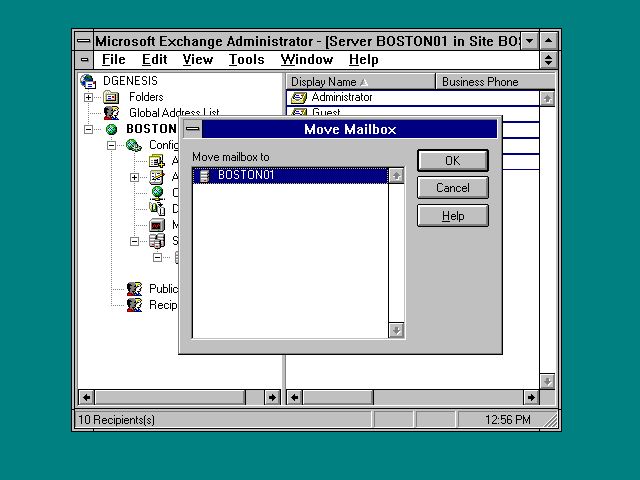
3. When all desired mailboxes are highlighted, select Move mailbox from the administrator program's Tools menu. The following dialog box shown in figure 23.1 will appear.
Select the destination server in the Move Mailbox dialog box.
4. Select the destination server from the Move mailbox to server list. Click OK.
5. The mailboxes will be transferred immediately.
6. View the destination server's recipient container to confirm that the mailboxes now exist on the new server.
Messages in transit to a mailbox when it is moved to another server will be delayed until the appropriate routing information is properly updated.
To transfer a mailbox to a different site, you must use the Import/Export utility provided in the Exchange administrator program's Tools menu.
Moving Public Folders
Normally you will accommodate a wide number of public folder users by creating replicas of the folder across your organization. Then, according to the replication schedule, the folders will update each other with changes.
To creating a public folder replica:
1. Using the Exchange administrator program, select the site where the public folders reside.
2. Select the Recipients container for that site.
![]()
Select Hidden Recipients from the View menu if your public folders are hidden in the administrator program display window.
![]()
3. Select the public folder you wish to replicate and open its property pages.
For more information, see Chapter 14, "Information Store Configuration."
Chapter 15, "Creating and Configuring Recipients," goes into more detail about configuring all aspects of the public folder recipient type. This section describes the Replicas property page for a public folder.
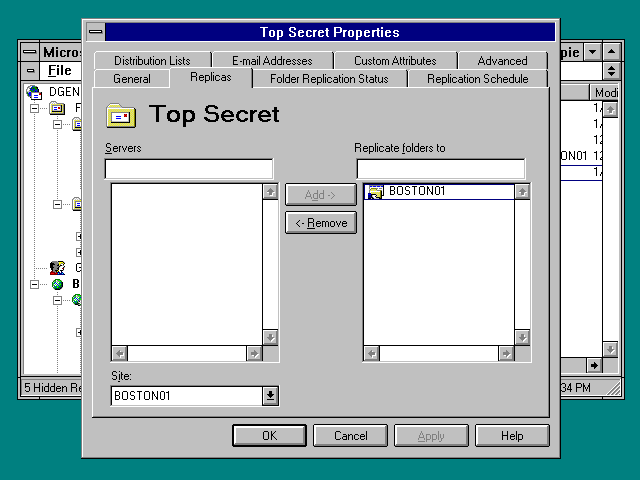
1. Select the Replicas tab of the public folder's property pages. The property page shown in figure 23.2 appears.
Select the destination server for this public folder.
2. The Servers display window lists all Exchange servers is the site selected in the Site pull-down menu.
3. The Replicate folders to display window lists the Exchange servers currently selected as destinations for folder replicas.
4. Select a Site from your organization with the pull-down menu.
5. Select or type the name of the destination Exchange server within that site. Click Add.
6. To remove a destination server, select it from the right display window and click Remove.
7. Click Apply to set these properties and continue with other properties. If you are done with all settings, click OK to return to the administrator program.
![]()
Do not replicate the Offline address book public folder to any other server in your site. There must only be one instance of that folder in each in a site.
![]()
The Exchange Client (on Windows or Windows NT) can also be used to move public folders. You must have sufficient permissions on a the specific folder in order to move it to a new location. Assuming you have the necessary permissions, to move a public folder with the Exchange Client software, do the following:
1. Expand the Public Folders object from the Exchange Client display window.
2. Locate the public folder you wish to move.
3. Click and drag it to its new location. You will see a progress box as the information store data is relocated.
Creating Mailbox Templates
A principal part of Exchange maintenance will be adding and deleting mailbox users. When adding a large group of recipients, you can avoid having to enter similar information (such as department or address) by using a mailbox template. You create a template mailbox by creating a dummy mailbox account (one not intended to receive messages) that will be copied when creating new users.
To create a mailbox template, do the following:
1. Using the Exchange administrator program, select a home site for this template mailbox in your organization.
2. Select New mailbox from the administrator program File menu, and the new mailbox property pages appear.
3. Give the new mailbox a Display name that will help you identify it as a template.
4. Enter all additional mailbox attributes that you want to include in the new group of mailboxes.
![]()
Check the Hide From Address Book setting on the mailbox template's Advanced property page to prevent it from receiving mail. Then, temporarily make it visible when using it to import new users (unless you want all your newly created mailboxes to be to hidden as well).
![]()
To use your template when creating a new user mailbox, follow this procedure:
1. Using the Exchange administrator program, select a home server for the new mailbox.
2. If the template mailbox is hidden, select Hidden Recipients from the administrator program View menu. Then select the Mailbox Template.
3. Select Duplicate from the Exchange administrator program File menu.
4. Enter the relevant user information for the new mailbox.
Performing Information Store Maintenance
The information store is the central storage facility for all Exchange messaging data. An information store can consume considerable disk space, depending on the size of your organization and the distribution of users per Exchange server.
The following property pages are important to maintaining the information stores:
The Private Information Store property page allows you to view the physical resources used by each mailbox on a particular server. This property page lets you evaluate hard disk space usage and determine storage limits.
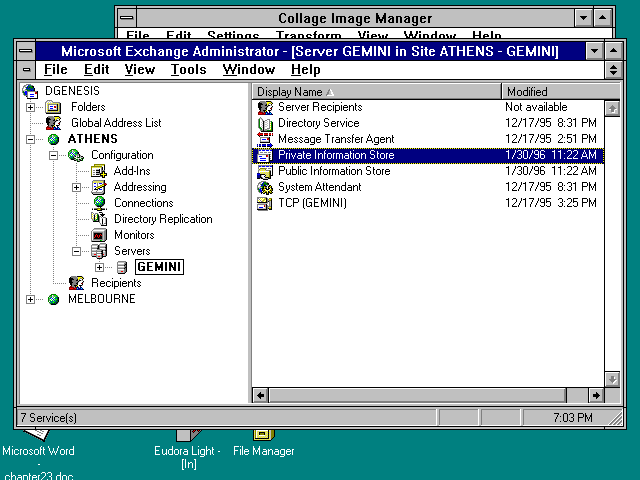
First, you must select the Private Information Store from a server within your site:
1. Navigate to your desired site with the Exchange administrator program.
2. Click on the Configuration container of the selected site. All the site configuration objects appear in the administrator program's right window.
3. Open the Servers container. A list of Exchange servers in your site will be listed.
4. Click the server name on which is the Private Information Store your want to configure. The list of server objects is visible on the right display window of the Microsoft Exchange Administrator Program (see figure 23.3).
Select the Private Information Store object from among all the other server objects.
5. Click on the Private Information Store object. Open its property pages.
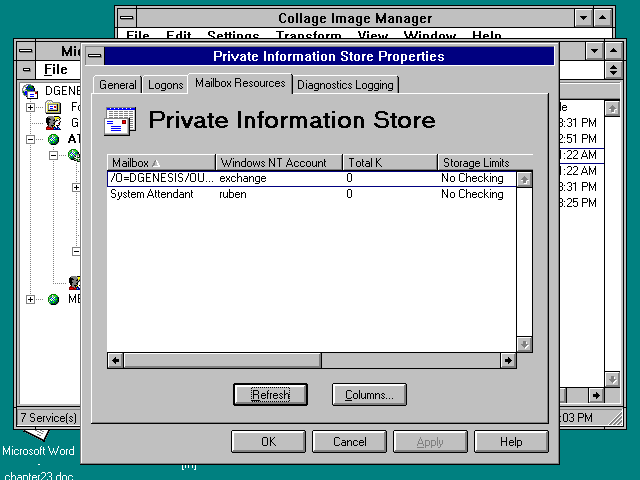
The Mailbox Resources property page allows you to view the physical resources (e.g., hard disk storage space) used by the Exchange mailboxes on a server. It consists of one main display window that shows the mailboxes on the current server. The window is divided into columns of information. The specific columns displayed are customizable both by information presented and width on the screen.
![]()
A mailbox will only be displayed in this window after the first time a user logs on to it. If the mailbox has never been used, it will not appear on Mailbox Resources property page.
![]()
To viewing Mailbox Resources information, do the following:
1. Select the Mailbox Resources tab of the Private Information Store property pages. The following property page shown in figure 23.4 appears.
Monitor mailbox storage requirements.
2. The display window shows all the mailboxes on this server that have been used at least once.
![]()
The Microsoft Exchange System Attendant and the Exchange account itself is always listed in this window as well.
![]()
1. Click the Refresh button to update the display window with the latest information.
2. Click the Columns button to edit which columns are displayed and their width in pixels. (See below for a description of each column heading and what type of information it can display.)
3. Click Apply to set these properties and continue with other properties. When you are done with all settings, click OK to return to the administrator program.
Columns define what type of information is displayed in the standard dialog box. Default columns are preconfigured to display the most commonly needed information. Optional columns provide more detailed information that may be useful in troubleshooting errors. The folllowing is list of default columns:
This following is a list of the optional columns to display in the dialog box.
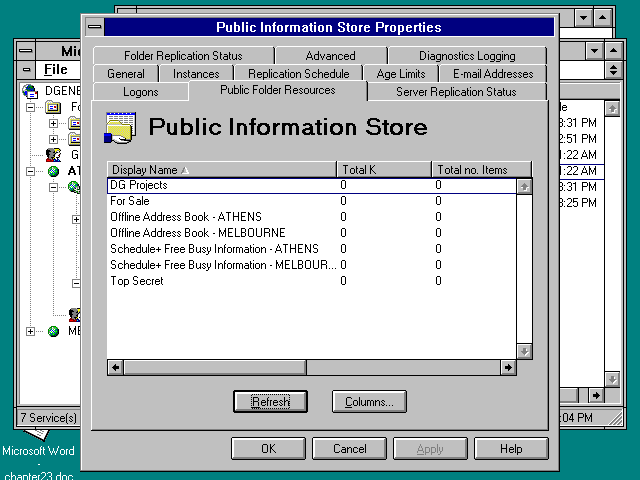
The Public Information Store property page allows you to view the physical resources (e.g., hard disk storage space) used by the folders held on an Exchange public information store. It consists of one main display window that shows the public folders on the current server. The window is subdivided into various columns of information. The specific columns displayed are customizable both by information presented and width on the screen.
The Schedule+ Free Busy Information and the Offline address book are in essence public folders as well and are listed in the public folder resources property page.
The public resources page allows you to monitor what quantity of system resources are exhausted by the use of public folders on your system.
1. Select the Public Folder Resources tab of the Private Information Store property pages. The following property page shown in figure 23.5 appears.
View resources utilized by each public folder on this server.
2. The display window shows all the public folders on this server, including those replicated from other servers.
3. Click the Refresh button to update the display window with the latest information.
4. Click the Columns button to edit which columns are displayed and their width in pixels. See below for a description of each column heading and what type of information it can display.
5. Click Apply to set these properties and continue with other properties. If you are done with all settings, click OK to return to the administrator program.
Columns define what type of information is displayed in the standard dialog box. Default columns are preconfigured to display the most commonly needed information. Optional columns provide more detailed information that may be useful in troubleshooting errors. The folllowing is a list of default columns:
The following is a list of optional columns that can be used to display additional information about server resources.
Compacting Information Stores Offline
Periodically you will want to perform a type of maintenance called offline information store compacting. This involves using the Windows NT compact command to optimize disk space allocation for an information store. It is important that you schedule this procedure at a time when message traffic is low or even nonexistent, because it involves stopping the information store service entirely.
The following command-line entry will compact the expriv.eis file (Exchange Private Information Store) and back up the original to a file named expriv.bak. The backup file is optional, but it is a good idea to create one every time you compact an information store for safety.
Here is an example command:
compact /s /b c:\exchsrvr\mdbdata\expriv.eis expriv.bak
where EXPRIV.EIS is the filename for the private information store and where EXPUB.EIS is the filename for the public information store.
The procedure for information store compacting is as follows:
1. Open the Windows NT services control panel and stop the Microsoft Exchange Information Store service (MSEXCHANGEIS).
2. Open a Windows NT command line window (or use the Run command from the Program Manager File menu).
3. Enter the compact command using the following syntax
4. Compact [/s [/b] path\store [temporary_backup_file ]
5. where /s specifies the file to compact
6. where /b signals that a backup is to be made
7. Press Enter (or click OK if using the Run command from Program Manager) to start compacting.
![]()
Compacting a large information store could take a reasonable amount of time, so make sure to plan accordingly.
![]()
8. After the compacting process finishes, restart the information store service.
9. Test the information store for proper functioning by logging into it with an Exchange client and trying to view messages or connect to a public folder.
10. If the information store is functional, you may remove the backup (.bak) file.
![]()
While the information store service is stopped, all message transfer attempts to the store are refused. Also, server mailbox users will not be able to open the store through their client.
![]()
Maintaining Message Transfer Agents
The routing table is used by the Message Transfer Agent (MTA) to calculate delivery paths for each message. Whenever a change is made that affects routing (e.g., modifying address spaces for a connector), it will not take effect until the routing table has been rebuilt.
Normally, the routing table is rebuilt once per day. However you will be prompted to rebuild it whenever making a change that affects message routing.
You can also opt to rebuild the table manually, this way:
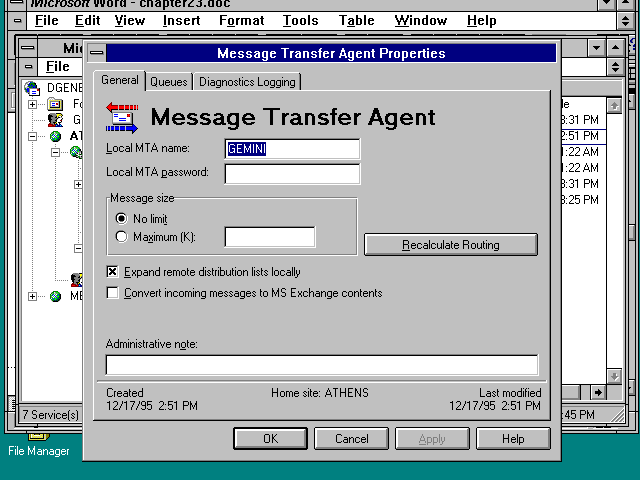
1. Select the General property page of the Message Transfer Agent property pages. The following property page shown in figure 23.6 appears.
Use the General Message Transfer Agent Properties page to recalculate MTA routing.
2. Click the Recalculate Routing button to begin rebuilding the routing table.
3. Click OK to return to the administrator program.
The MTA retrieves updated routing information from the routing table every 15 minutes. Therefore, it could take up to 15 minutes for routing updates to be utilized by the MTA.
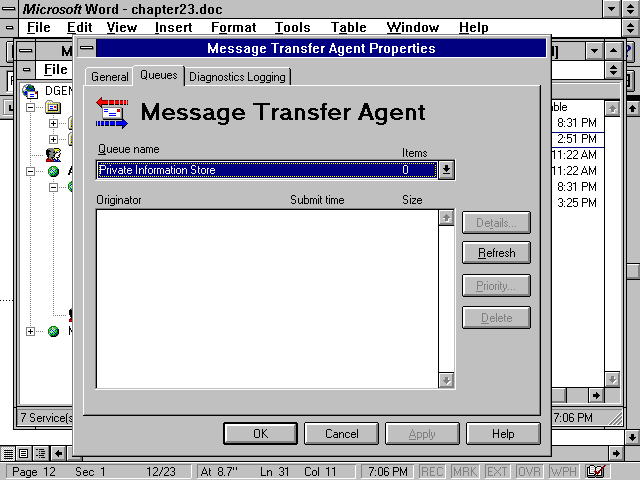
The Queues property page lists messages awaiting delivery by the MTA. There are two primary windows in this property page. The Queue name window shows which queue you are currently viewing and the Message list box display the messages in that queue. From this, you can view details about a specific message in the queue, change its priority for delivery, or delete it entirely.
Within the Message list window, there are three columns that contain information about a particular message:
To configure the Queues property page, do this:
1. Select the Queues property page from the Message Transfer Agent property pages. The following Queues property page shown in figure 23.7 appears.
The message queue. It is blank because all pending messages have been delivered..
2. Use the Queue name pull-down menu to select which message queue to display. There are queues for the private and public information stores and any installed gateways.
![]()
The Internet Mail connector and Microsoft Mail connector have separate queues that can also be accessed through their respective property pages.
![]()
3. Select a message and click Details to view additional information about it.
4. The additional message information includes message originator, submit time, message size, and priority. This button is dimmed if no messages are in the queue. Other Message information includes the following:
5. Next Retry Time: The next scheduled submission attempt
6. Expiration: The time after which this MTA will no longer attempt to send this message and it will be returned as nondeliverable
7. Click the Refresh button to update the message list window with the latest list of message in the MTA queue.
8. Click Priority to display the message's priority.
9. Change the priority of message if desired. It can be low, medium, or high. Messages are sent in order of this priority. A message's priority is set when a message is created.
10. Select a message and click Delete to remove a message from the MTA queue.
11. Click Apply to set these properties and continue with other properties. If you are done with all settings, click OK to return to the administrator program.
When dealing with MTA queue dialog boxes (or any other Exchange queue box), the messages you see on the list are a freeze frame of all queued messages at one point in time. To get a more dynamic view or to "catch" a message as it passes through the queue, you must continually press the Refresh button to get the latest updates.
Logging falls mainly in the realm of troubleshooting and is discussed in chapter 26. MTA logs can be used for other purposes, such as billing and accounting for number of messages transferred.
Maintaining Microsoft Mail Connector
The Microsoft Mail Connector has its own temporary message store called MS Mail Connector post office. This gives the MS Mail Connector it own message queue property page on which to monitor messages queue status.
To open the MS Mail Connector message queue window, do the following:
1. Open the MS Mail Connector property pages.
2. Select the Connections tab.
3. Select the MS Mail Connection to Monitor Message Traffic on.
4. Click Queue. The MS Mail Connector message queue property page appears.
5. Select a sort order for the messages by click one of the categories on the top line of the Queued Messages window.
6. Information displayed in the queue.
7. From the original message sender
Subject the data on the message's subject line
Message ID the message identifier
Date/Time the time when the messaged entered the queue
8. To remove a message, select it and then click Delete.
9. If Send Non-Delivery Reports when messages deleted is checked, the original sender will be notified if their message was deleted from the queue. If it is clear, no notification will be sent when a message is deleted.
10. To return a message to its original sender, select it and then click Return.
11. Click Close to return to the MS Mail Connector Connections property page. Then, click OK to return to the administrator program.
![]()
As in the MTA queues property page, the view of queued messages is static. To update the display you must click the Refresh button.
![]()
Maintaining Directories
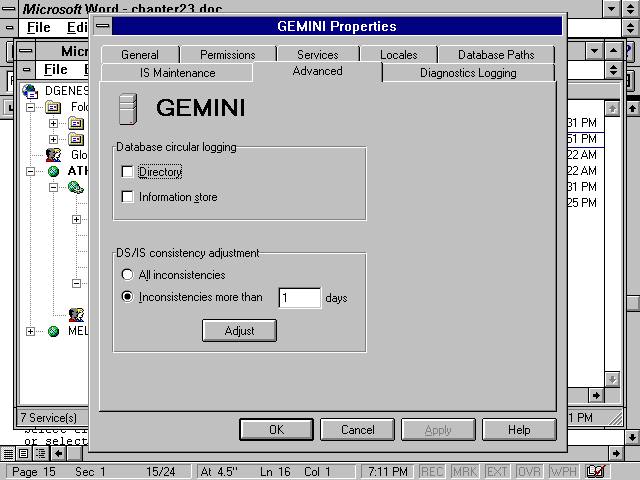
There are two components to each directory object saved in an server's information store: the object itself and a corresponding entry in the directory. Consistency adjustment corrects errors arising by mismatched directory information. This feature will either add or delete a directory entry to match the existence or absence of information store information.
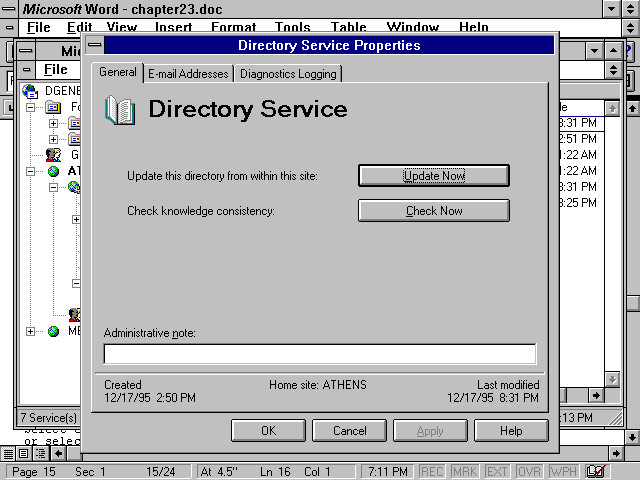
The property page allows you control at what point these inconsistencies are to be corrected. Figure 23.8 shows Advanced tab of the GEMINI Properties page where you configure directory inconsistency adjustment.
This property page lets you adjust directory inconsistencies.
Select either the All inconsistencies to correct them immediately or select Inconsistencies more than � days and enter the time an inconsistency can exist before it is automatically corrected.
Knowledge consistency for the local server is its awareness of other Exchange servers within a site and at other sites within your organization. The knowledge consistency operation is run automatically once daily, but if Exchange servers or sites were added and the local was not aware of those changes servers (e.g., the local server was down during that time), then you may not want to wait for the automatic checking and do it manually.
Suppose Exchange server BOSTON01 is brought down for 2 hours for a memory upgrade. During the time of the upgrade, a new server, BOSTON08, is added to the site. When BOSTON01 is restored to proper functioning, it will not be aware of the existence of the new server until the knowledge consistency cycle is run at the end of the day. Knowing this, the administrator for BOSTON01 runs the knowledge consistency cycle manually from the Directory Service property pages to make BOSTON01 aware of the new server's existence.
If a directory inconsistency is detected when checking manually, it is a good idea to manually execute all processes related to correcting inconsistencies. Use this sequence:
1. Check knowledge consistency from the directory service property pages and detect the error.
2. Manually update directory replication within the site by running Update Now also from the Directory Service property pages.
3. Open the Message Transfer Agent properties for this server and click Recalculate Routing from the General property page.
Although this sequence is optional and will be automatically executed within a 24-hour period, performing the tasks immediately will reduce the possibility of conflicts or errors.
When you have the Exchange MS Mail Connector configured as a Dir-Sync server, you must delete all the remote directory synchronization requestors that are part of the Dir-Sync server. More importantly, you must make sure that any Dir-Sync requestors on the remote MS Mail post offices are stopped or otherwise reconfigured to connect to a different Dir-Sync server.
![]()
Make sure to stop or redirect any MS Mail directory synchronization requestors relying on the local Exchange Dir-Sync server before you delete it. Otherwise, there will be messaging failures and possibly data loss resulting from the broken connectivity.
![]()
To delete an MS Mail connector Dir-Sync server, do the following:
1. Stop or redirect any MS Mail directory synchronization requestors that connect to the Exchange Dir-Sync server.
2. In the Exchange administrator program, select the site and the Directory Synchronization container that holds the Dir-Sync server.
3. Select each instance of a remote directory synchronization requestor and then select Delete from the Edit menu.
4. Select the Directory Synchronization container itself and then select Delete from the Edit menu.
In order to disengage Directory Synchronization between Exchange and a remote MS Mail Dir-Sync server, you must delete the Dir-Sync requestor on the Exchange server.
Follow this procedure:
1. In the Exchange administrator program, select the site and the Directory Synchronization container that holds the Directory Synchronization requestors.
2. Select the desired requestor to remove, then select Delete from the Edit menu.
You can manually direct the Macintosh Dir-Sync requestor to request directory update and bypass its scheduled synchronization cycle:
1. On your MS Mail (AppleTalk) server, open the folder that contains the Microsoft Exchange Connection files.
2. Open the Exchange Connection DER file.
3. Select Import Directory from the Macintosh File menu. The dialog box shown in figure 23.9 appears.
Select how to request a director update from the Dir-Sync server.
4. Select the Changes since last update only radio button to request only the address that have changed since the last synchronization cycle. Select the Complete directory radio button to request the all directory information (more time intensive) from the Exchange Dir-Sync server.
5. Click OK to execute the request.
You can direct your MS Mail (AppleTalk) server to send directory updates to an Exchange Dir-Sync server. Do this when you want to bypass the requestor export schedule:
1. On your MS Mail (AppleTalk) server, open the folder that contains the Microsoft Exchange Connection files.
2. Open the Exchange Connection DER file.
3. Select Export Directory from the Macintosh File menu.
4. Select the Changes since last update only radio button to export only the address that have changed since the last synchronization cycle. Select the Complete directory radio button to export all local directory information (more time intensive) to the Exchange Dir-Sync server.
5. Click OK to execute the export command.
If an error is detected in the Dir-Sync cycle, you can manually reset and execute a complete cycle. The MS Mail (AppleTalk) Network Manager receives confirmation messages on the Dir-Sync cycle. If notified that the server has not properly completed a cycle, you can manually force a synchronization adjustment with the Apple DER administrator program.
You can also check the Directory Exchange Requestor Log (in the Macintosh preferences folder) to verify that the synchronization process is functioning properly.
Do the following steps to restart a directory synchronization cycle between an Exhchnage server and a connected MS Mail (Appletalk) server.
1. On your MS Mail (AppleTalk) server, open the folder that contains the Microsoft Exchange Connection files.
2. Open the Exchange Connection DER file.
3. Select Resync Cycle from the Macintosh File menu.
Compacting Directory Information
Much like the information store, the Exchange directory can benefit greatly from offline compacting. The Microsoft Exchange directory service continually performs online compacting during its normal operation, but a dedicated, periodic, offline compacting will provide a more significant increase in performance. Not only will directory accessing speed improve after compacting, but hard disk space wasted through inefficient storage will be freed for use. Offline directory compacting requires stopping the Exchange Directory and Directory Synchronization services.
The following command-line entry will compact the exdir.dsa file (Exchange Directory service) and back up the original to a file named exdirdsa.bak. The backup file is optional, but it is a good idea to create one every time you compact an information store.
Here is an example command:
compact /s /b c:\exchsrvr\dsadata\exdir.dsa exdirdsa.bak
where EXDIR.DSA is the filename for replicated directory information and where EXDIR.DXA is the filename for synchronized directory information.
The procedure for compacting a directory is as follows:
1. Open the Windows NT services control panel and stop the Microsoft Exchange Directory service(MSEXCHANGEDSA) and the Directory Synchronization service (MSEXCHANGEDXA).
2. Open a Windows NT command line window (or use the Run command from the Program Manager File menu).
3. Enter the compact command using the following syntax:
4. Compact [/s [/b] path\directory [temporary_backup_file ]
5. where /s specifies the file to compact
6. where /b signals that a backup is to be made
7. Press Enter (or click OK if using the Run command from the Program Manager) to start compacting.
![]()
Compacting a large directory file could take a large amount of time, so make sure to plan accordingly. For a thousand users, for example, this processs will take a couple of hours.
![]()
8. After the compacting process finishes, restart the Exchange Directory and Directory Synchronization services.
9. Test the directory for proper functioning by accessing into the local address list with an Exchange client.
10. If the directory is functional, you may proceed to remove the backup (.bak) files.
Working with Directory Event Logs
Part of maintaining a healthy Exchange Organization is working with the Windows NT Event Log. It important to keep track of Event Log sizes (to set upper size limits and expiration dates for log entries) so as to not let the Event Log become too large. The two Directory Services to watch are these:
Logging levels for each service are set in the Diagnostic Logging property page. See Chapter 26, "Troubleshooting Exchange's Directory Services," for tips on using the Diagnostic Logging property pages for each service.
Backing Up Your Exchange Server
Probably the most important maintenance procedure for Microsoft Exchange organization is backup of information store and directory information. Few things on a user's computer are as important to them as their e-mail. Implementing a good backup strategy is well worth the effort. This section will provide a general conceptual guide to Exchange backup. For more detail in using the Exchange Backup utility, refer to your Microsoft Exchange server documentation.
Windows NT provides built-in tape backup and restore utilities that are supplemented by extensions installed with Exchange server. These utilities provide the basics for an adequate Exchange backup, but a full-featured backup software package would provide additional functionality and versatility. See Chapter 31, "Implementing Third-Party Integration Tools," on third-party integration for information about some forthcoming products that will facilitate backup beyond what comes with the basic Exchange and NT package.
This section describes backup and restore procedures directly relevant to maintaining Exchange information. For full NT server backups, refer to your Windows NT or third-party backup software documentation.
The version of Backup included with Microsoft Exchange is aware of the servers in your organization allowing you do backups for a single server, server group, sites, or even an entire organization if necessary.
The main Exchange information you will want to back up is located in following paths:
\EXCHSRVR\MDBDATA
and
\EXCHSRVR\DSADATA
Important Exchange files to be backed up are these:
When restoring lost data, the log files are played back to reconstitute the databases to the point of the last backup.
From Here . . .
For technical support for our books and software contact support@mcp.com
Copyright ©1996, Que Corporation