 Copyright
©1996, Que Corporation. All rights reserved. No part of this book
may be used or reproduced in any form or by any means, or stored in a database
or retrieval system without prior written permission of the publisher except
in the case of brief quotations embodied in critical articles and reviews.
Making copies of any part of this book for any purpose other than your
own personal use is a violation of United States copyright laws. For information,
address Que Corporation, 201 West 103rd Street, Indianapolis,
IN 46290 or at support@mcp .com.
Copyright
©1996, Que Corporation. All rights reserved. No part of this book
may be used or reproduced in any form or by any means, or stored in a database
or retrieval system without prior written permission of the publisher except
in the case of brief quotations embodied in critical articles and reviews.
Making copies of any part of this book for any purpose other than your
own personal use is a violation of United States copyright laws. For information,
address Que Corporation, 201 West 103rd Street, Indianapolis,
IN 46290 or at support@mcp .com.
Notice: This material is excerpted from Special Edition Using Microsoft Exchange Server, ISBN: 0-7897-0687-3. The electronic version of this material has not been through the final proof reading stage that the book goes through before being published in printed form. Some errors may exist here that are corrected before the book is published. This material is provided "as is" without any warranty of any kind.
This chapter is the first in this book that is dedicated to the specifics of linking two or more Microsoft Exchange sites. By now, you should have learned enough to be able to select the most appropriate connector between the Exchange servers in your organization. This chapter deals with the two connectors designed only to link Microsoft Exchange severs. Other connectors, such as X.400 or Internet Mail Connector, can be used both to link Exchange servers and to provide a gateway to foreign mail systems. The two connectors used only between Exchange servers are:
This chapter covers the basics of setting up a Site Connector and a Dynamic RAS Connector. Because a site can have any combination of connectors to a remote site, or even multiple connectors of a certain type, you will need to repeat the same steps outlined in this chapter each time you set up a new connector.
In this chapter, you learn the following:
Understanding Site Connectors
The Microsoft Exchange Site Connector provides the most direct link between sites. Communication is handled through Remote Procedure Calls between servers in each site. Messages do not need to be converted to a different format (such as X.400) to be transmitted to a different site.
You should be familiar with the following concepts before you attempt to set up and configure a Microsoft Exchange site connector:
Installing a site connector to exchange messages between sites is a two-step process. First, you must set up a connector in the local site. The connector enables message traffic to the target site. Second, to receive messages from the remote site, you must install a corresponding site connector in the remote site. When you set up a new connection between sites, the Exchange Administrator program automatically prompts you to create the second site connector in the remote site. If you do not create a remote site(or cannot, due to access restriction in that site), you must coordinate your efforts with the remote site administrator to negotiate a successful connection between sites. The remote administrator must create a corresponding connector that link to your site.
Before you install a new site connector, make certain that the following conditions are met:
To create a new Site Connector, follow these steps:
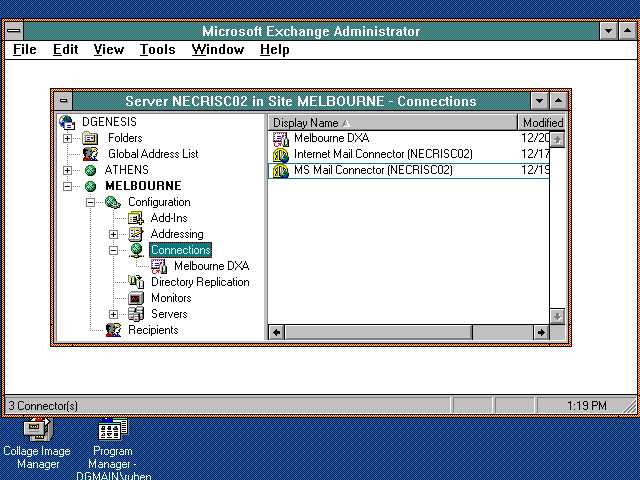
1. Navigate through the Exchange administrator program's hierarchy, and click the Connections object (see fig. 16.1). The right display window shows all the connections currently running within this site.
The Exchange Administrator program's display window shows all current site connections.
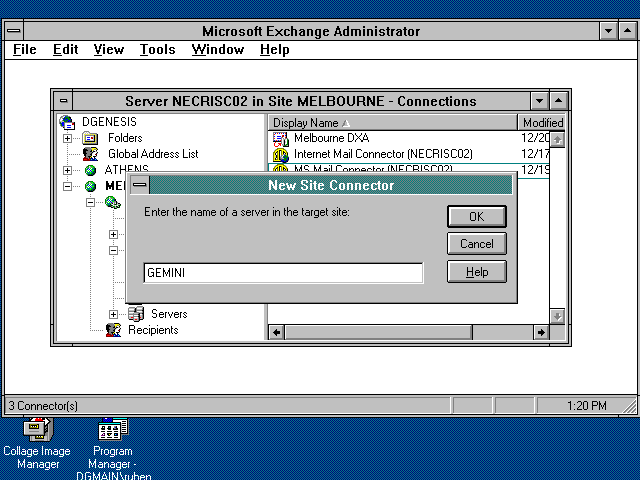
2. Pull down the File menu and choose New Other; then choose Site Connector from the New Other menu. The New Site Connector dialog box appears (see fig. 16.2).
Enter the name of an Exchange server at the remote site.
3. In the text box, type the name of a specific Microsoft Exchange server at the remote site.
![]()
The server name that you enter is used to identify the remote site and does not necessarily mean that this server is the machine that will handle message traffic between sites. Conceptually, a Site Connector resides at the site, not on any particular Exchange server.
![]()
4. Click OK. The Administrator program attempts to locate and access that server on the network.
If you attempt to create a site connector to a site where such a connector already exists, you will be notified of the situation and will not be allowed to create another connector.
After creating a new Site Connector you will need to configure its properties.
The property pages for the Exchange Site Connector are as follows:
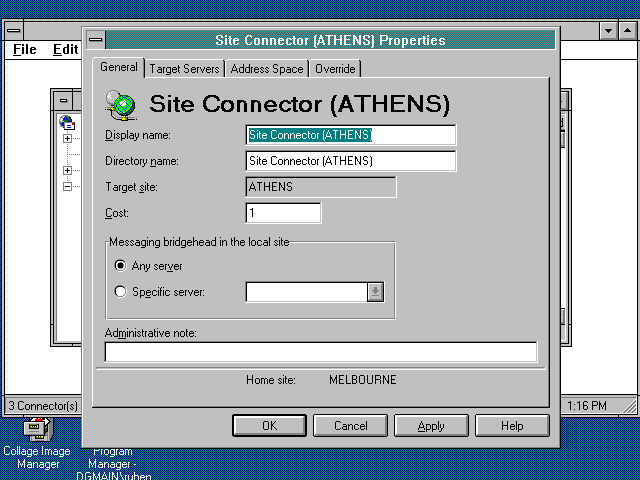
The General tab is where you set Site Connector communication options. Primarily, you will define which site you are connecting to and which servers specifically will handle that connection. The following steps guide you through configuring the General Tab.
1. Click the General tab of the Site Connector property pages (see fig. 16.3).
Use the General Site Connector property page primarily to define the site to which your are linking.
2. If you want, type a new name for this site connector in the Display Name box. The default display name is in the format Site Connector (site name).
3. If you want, type a different directory name for this site connector in the Directory Name box. The default directory name is in the format Site Connector (site name).
4. The Target Site box shows the name of the remote site to which you are connecting. This data is provided for your information only. To change the target site at this point, you must click Cancel to exit the property pages and create a new site connector.
5. In the Cost box, enter a routing Cost for the site connector. An Exchange server uses this cost to determine whether to use this connection over other available connections. By default, a new site connector has a routing cost of 1.
6. If you want, specify a bridgehead server that will handle communication with the remote site. By default, the Any Server option is selected, and communication will be handled by the combination of target servers specified in the remote site's connector. If you select a specific server, that one machine will process all message transfer through the site connector.
7. If you want, make an entry in the Administrative Note box.
8. Click Apply to set these properties and continue setting other properties.
9. When you finish making settings, click OK to return to the Administrator program.
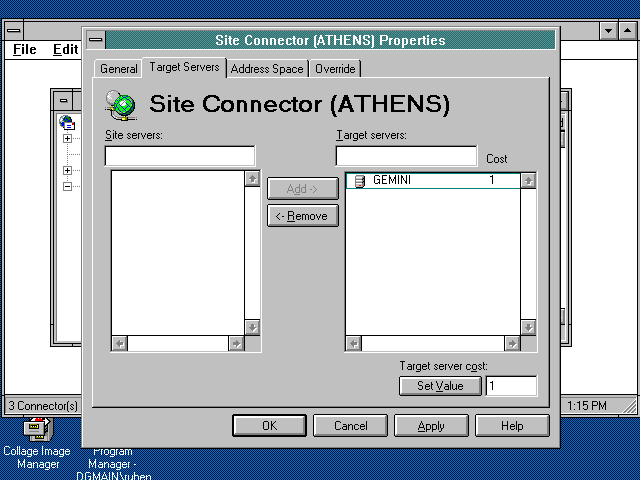
Use the Target Servers tab to set which remote Exchange servers will receive messages through this Site Connector. Servers that do not get listed are excluded form communication with the local site.
1. Click the Target Servers tab of the Site Connector property pages (see fig. 16.4).
2. The Site Servers list on the left side of the dialog box shows all the available servers at the remote site. The Target Servers list on the right side of the dialog box shows the which Exchange servers at the remote site communicate to the local site through this site connector.
Select the servers in the remote site to link through this Site Connector.
3. Select a server from the Site Servers list and then click Add to make it a target server for this site connector.
4. To remove a server from the Target Servers list, select it and then click Remove.
5. The Target Server Cost section displays the routing costs for the selected target server. In the text box, type the desired routing cost for each server; then click Set Value to store that value.
6. Click Apply to set these properties and continue setting other properties.
7. When you finish making settings, click OK to return to the Administrator program.
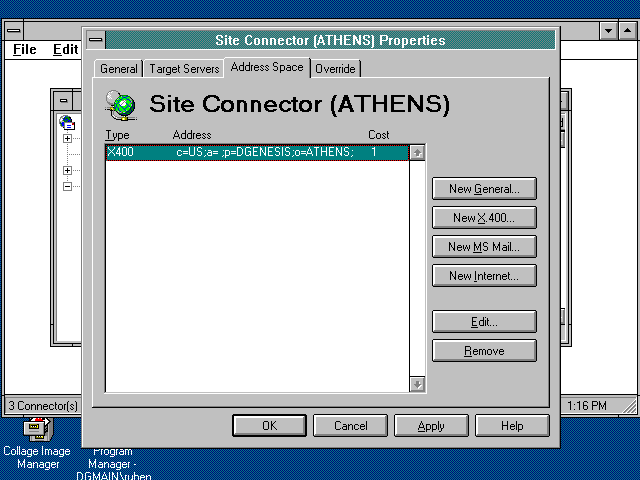
The Address Space tab is where you tell Exchange which messages are routed through this Site Connector. Without an appropriate entry, messages will not find their way to the remote site.
1. Click the Address Space tab of the Site Connector property pages (see fig. 16.5).
Add or modify address-space entries to define message routing for this connector.
2. Click on one of the New address types (General, X.400, MS Mail, Internet) to add an address space entry for this connector. Select an existing address spece entry and click Edit to modify it or click Remove to delete it.
3. Click Apply to set these properties and continue settingother properties.
4. When you finish making settings, click OK to return to the Administrator program.
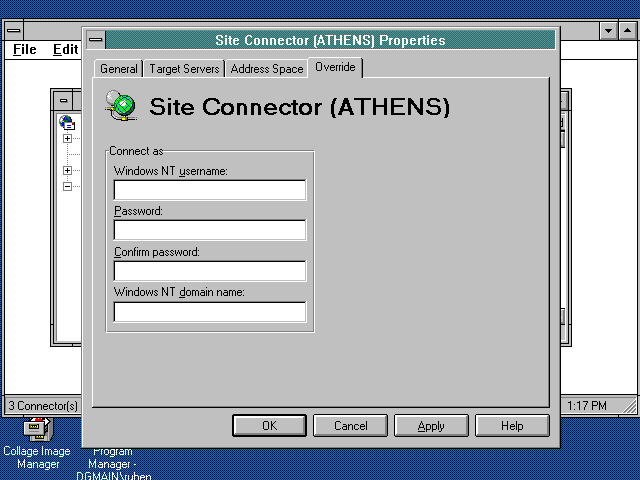
If the site to which you want to connect is not within the same Windows NT domain (or within a trusted domain), you must specify logon information for this site connector. This property page allows you to enter such data. Use the following steps:
1. Click the Override tab of the site connector property pages (see fig. 16.6).
Configure connector logon information to a remote Windows NT domain.
2. In the Windows NT Username box, type the name of the account that you want to use to log on.
3. In the Password box, type the password that is associated with that account.
4. In the Confirm Password box, type the password again.
5. In the Windows NT Domain Name box, type the domain in which the remote site resides.
6. Click Apply to set these properties and continue setting other properties.
7. When you finish making settings, click OK to return to the administrator program.
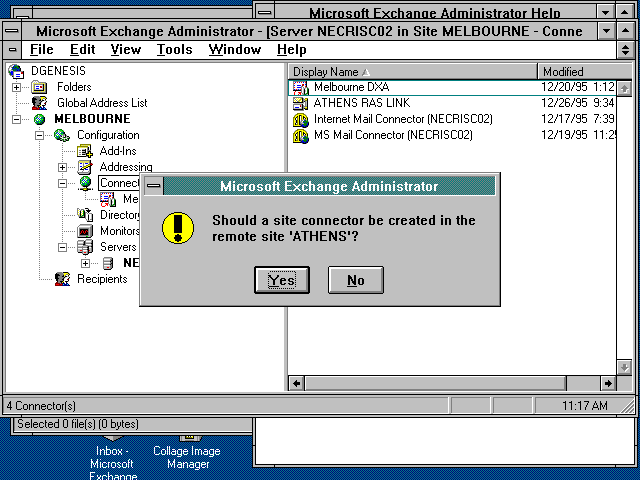
If a Site Connector is not set up in the remote site., the dialog box shown in figure 16.7 appears. It prompts you to create one.
Specify whether to create a corresponding site connector at the remote site.
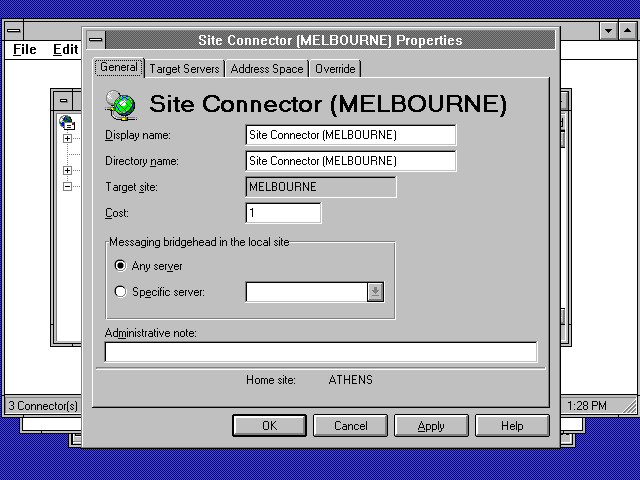
Click No if you do not want to create and configure the remote site connector at this time. If you do click No, realize that message transfer will not occur until you set up that remote Site Connector at some late time. Click Yes to create and configure a site connector for the remote site at this time. The property page for the second site connector appears (see fig. 16.8).
General property page for the corresponding site connector at the remote site.
Configure this site connector, following the procedure that you use to configure a local site connector. Keep in mind that the target servers now are Microsoft Exchange Servers that were the local servers in the previous connector configuration.
After you create and configure a site connector between two sites, the remote site appears in your Exchange Administrator program's hierarchy view. You can view all the Exchange objects at the remote site, but you cannot make any changes unless you log on directly to a Exchange server at that site. To share address lists with the connected site, for example, you must set up a directory replication connector to that site. See chapter 17 for setting up directory replication between sites.
If you want to remove a site connector that services message traffic between two sites, you first must determine what other services depend on the existence of that site connector. If other connections (such as a directory replication connector) rely on the site connector as the only link for message transport, you cannot delete that site connector; you first must delete any other dependent connections and then delete the site connector. If you do not want to delete the other connections, you must supply another link between sites that can service the other connections.
To delete a site connector, follow these steps:
1. Navigate through the Administrator Program�s site display, and click on the Connections object.
2. Select the Site Connector that you want to delete.
3. Pull down the Edit menu and choose Delete, or press the Delete key on the keyboard.
![]()
To disable all message transfers between sites, you must remove connectors from both the local and the remote site. Log on to the remote Exchange server and then remove the site connectors, using the process described in this section.
![]()
Using the Dynamic Remote Access (RAS) Connector
The Microsoft Exchange Dynamic RAS Connector uses existing Windows NT Remote Access Services to facilitate temporary, low-bandwidth messaging links. The Dynamic RAS Connector establishes a temporary scheduled link to a remote Exchange site via a modem or any other RAS-compatible transport (e.g., ISDN or X.25), transfers messaging data, and then disconnects. This section cover installing and configuring the Dynamic RAS Connector to link your messaging sites.
Before installing a Dynamic RAS Connector, you must do the following things:
You add the RAS MTA Transport Stack from within the Administrator program. Follow these steps:
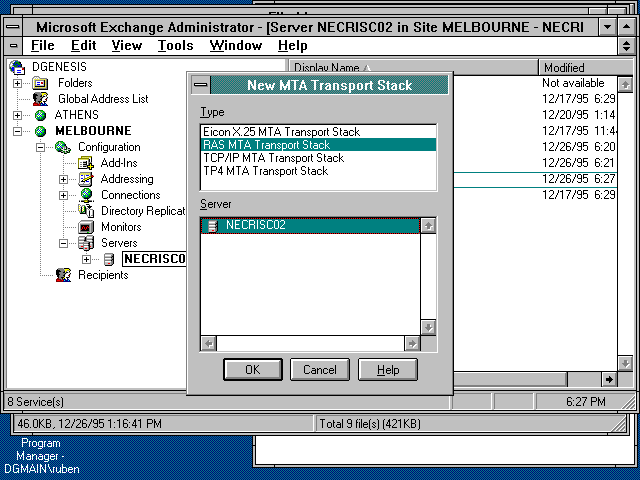
1. From the Administrator program, select New Other from the File menu, then select MTA Transport Stack from the sub-menu. The New MTA Transport Stack dialog box appears (see fig. 16.9).
2. The Type section of the dialog box lists the available MTA transport stacks on this Exchange server.
![]()
Only the RAS MTA Transport Stack is used for the Dynamic RAS Connector.
![]()
3. The Server section of the dialog box lists all the servers at the current site.
The New MTA Transport Stack window is used by the Dynamic RAS Connector (and the X.400 connector) to select an underlying transport for message transfer.
4. Select RAS MTA Transport Stack from the list of available transports.
5. Select the server in your local site that will handle the remote-access connection. The transport stack will be installed on that server.
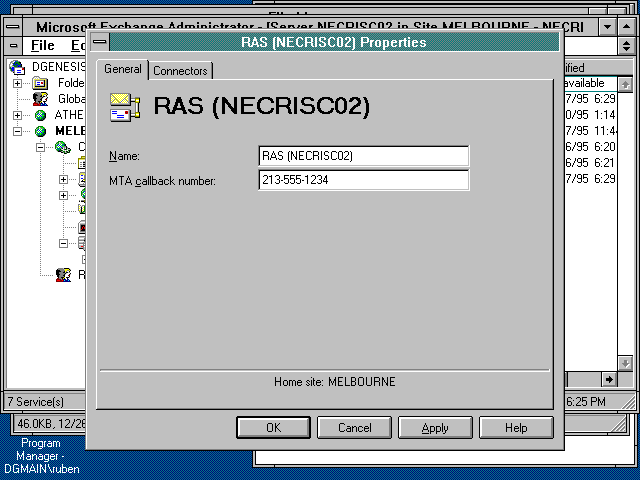
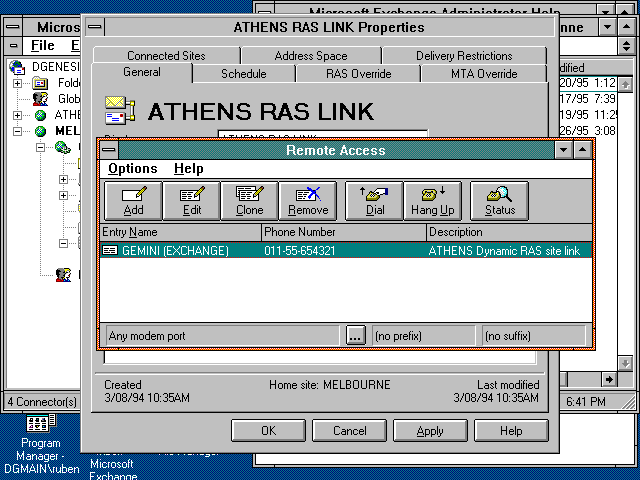
6. Click OK to accept the transport stack and Exchange server settings. The General tab appears of a new Dynamic RAS Connector appears. (see fig. 16.10).
7. The MTA Transport Stack has only two property pages to configure: General and Connectors. Configuration usually is a one-time process unless you change the local MTA callback number. Refer to the Connector property page to view the Dynamic RAS Connectors that use this MTA Transport Stack.
The RAS MTA Transport Stack property pages.
Settings in the MTA Transport Stack pages affect all Dynamic RAS Connectors that use it. The following section guides you through configuring the RAS Transport Stack. The process is similar to configuring MTA Transport Stack for X.25, TCP/IP, or TP4 connections as well.
The General tab lets you configure a display name and callback number for this RAS MTA Transport Stack.
1. In the Name box, type the name under which you want this transport stack to appear in the Exchange Administrator object display window. You cannot modify this name after you create it. By default, the stack is named in the format: RAS (server name).
2. In the MTA Callback Number box, enter the phone (or other device) number of the local Microsoft Exchange server.
![]()
The Windows NT Remote Access service uses a callback number as a means of authentication. The remote server receives a call, gets the callback number, hangs up, and dials the originator to establish a RAS link.
![]()
1. Click Apply to set these properties and continue setting other properties.
2. When you finish making settings, click OK to return to the Administrator program.
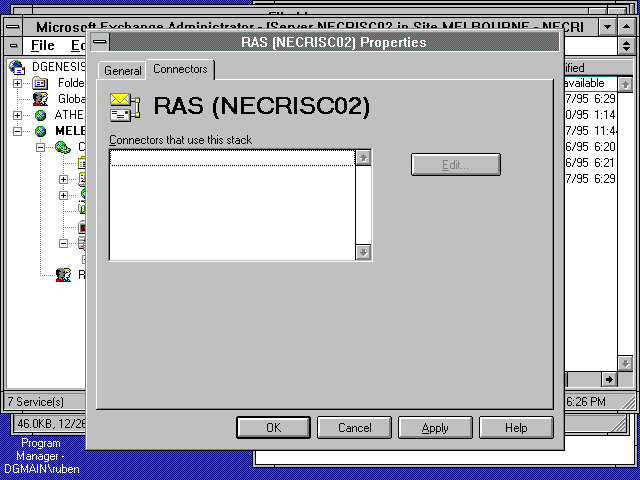
3. Click the Connectors tab of the RAS MTA Transport Stack dialog box (see fig. 16.11).
4. The Connectors tab lists all the Dynamic RAS Connectors that use this transport stack. If you have set up the RAS MTA Transport Stack for the first time, the list is blank. After you set up at least one Dynamic RAS Connector, that connector is displayed in this tab; you can select it and then click Edit to modify its properties.
The RAS MTA Transport Stack Connections tab lists all current Dynamic RAS Connectors.
1. Click Apply to set these properties and continue settingother properties.
2. When you finish making settings, click OK to return to the Administrator program.
Installing and Configuring a Dynamic RAS Connector
You create a new Dynamic RAS Connector from the Microsoft Exchange Administrator program. If you have not yet installed the RAS MTA Transport Stack, you must do so before proceeding with the following sections.
Installing a New Dynamic RAS Connector
Use the following step to install a new Dynamic RAS Connector.
Pull down the Exchange Administrator File menu and choose New Other; then choose Dynamic RAS Connector from the sub-menu. The tabs for the new connector appear.
Following are the tabs that you use to configure a Dynamic RAS Connector:
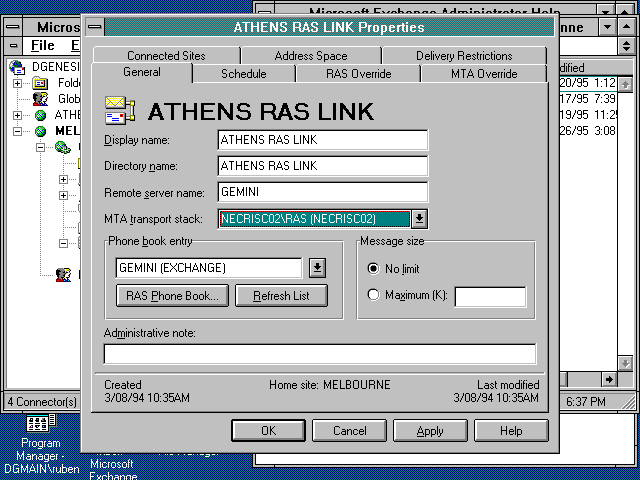
The General tab lets you set the communication methods for this Dynamic RAS Conector. Part of this configuration will be to enter the telephone number data for the remote site, so have that information available when configuring the following options.
1. Click the General tab of the Dynamic RAS Connector property pages (see fig. 16.12).
Set general Dynamic RAS properties.
2. In the Display Name box, type the name that you want to appear in the Microsoft Exchange Administrator display window.
3. When you create a Dynamic RAS Connector, enter a name for it in the Directory Name box.
4. In the Remote Server Name box, type the name of the Microsoft Exchange server to which you are establishing a link.
5. From the MTA Transport Stack drop-down list, select the local Exchange server that will handle the remote access connection.
6. From the Phone Book Entry drop-down list, select the entry that dials into the remote server.
7. If you have not yet created an appropriate entry, click RAS Phone Book to open the local Exchange server�s phone book. In our example connector (see fig. 16.13), this brings up the Windows NT RAS phone book for NECRISC02.
The Widows NT remote access service phone book shows an entry set to dial into a remote Exchange server.
8. If you have not yet done so, create a RAS phone-book entry, then close the RAS phone-book window. Click the Refresh List button to update the list with your new RAS phone-book entry.
![]()
Setting an upper limit for message sizes often is a good idea. Particularly with a low-bandwidth link (e.g., a 28.8-Kbps modem), several large messages that have attachments could easily create a bottleneck through this connector.
![]()
9. If you want to set an upper limit for the size of messages that pass through this connector, click the Maximum (K) radio button, and in the text box, type the size limit (in kilobytes). A message that exceeds this maximum size will be returned as undeliverable. By default, the No Limit option is selected, and messages of any size can pass through the connector.
10. Make an entry in the Administrative Note box, if you want.
11. Click Apply to set these properties and continue setting with other properties.
12. When you finish making settings, click OK to return to the Administrator program.
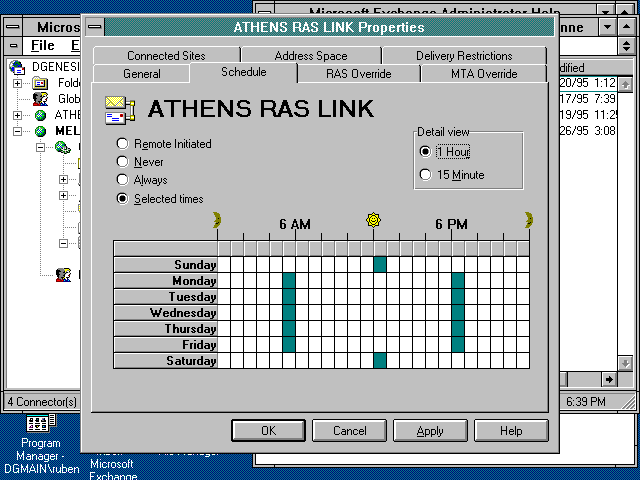
Use the Schedule tab to control how often the Dynamic RAS Connector becomes active and initiates a connection. Follow these steps:
1. Click the Schedule tab of the Dynamic RAS Connector property pages (see fig. 16.14).
Set connection times for this Dynamic RAS Connector.
2. Click one of the four options that determine when this Dynamic RAS Connector connects:
![]()
Only one MTA can be configured to be remote-initiated. Otherwise, if both MTAs are waiting for the other to initiate the connection, the messages will never be delivered.
![]()
3. If you chose Selected Times in step 2, the Detail View radio buttons become available. Choose either 1 Hour or 15 Minute; the time grid changes its scale accordingly.
4. If you chose Selected Times in step 2, choose the time blocks that you want to use for the connection. In figure 16.4, the Dynamic RAS Connector is set to initiate connections at 6 a.m. and 6 p.m. on weekdays, and at noon on weekends.
5. Click Apply to set these properties and continue setting other properties.
6. When you finish making settings, click OK to return to the Administrator program.
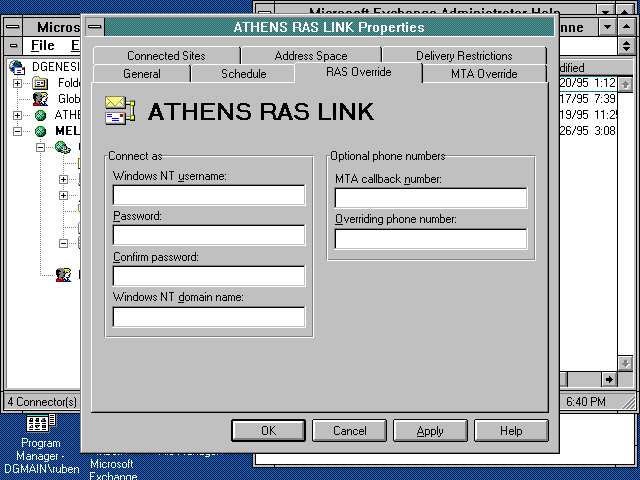
The RAS Override tab is designed to supersede RAS settings for both logon information and callback numbers. The following step guide you through these settings.
1. Click the RAS Override tab of the Dynamic RAS Connector property pages (see fig. 16.15).
RAS Override allows you to configure custom logon information from this tab.
2. In the Windows NT Username box, type the name that you want to use to authenticate this Dynamic RAS Connector.
3. In the Password box, type the password.
4. In the Confirm Password box, type the password again.
5. In the Windows NT Domain Name box, type the name of the domain in which the remote server resides.
6. In the Optional Phone Numbers section, type a phone number in the MTA Callback Number box.
7. Enter a different phone number in the Overriding Phone Number box.
8. Click Apply to set these properties and continue setting other properties.
9. When you finish making settings, click OK to return to the Administrator program.
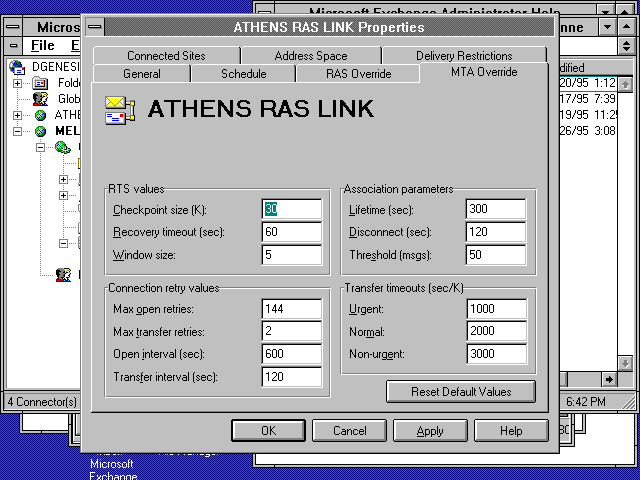
Because of the typically low-bandwidth links associated with a remote access connection, it often is a good idea to set a different MTA configuration specifically for messages transmitted through this Dynamic RAS Connector. You set the MTA default configuration through the Site MTA property pages. Any setting in the MTA Override property page supersedes default MTA settings when the Dynamic RAS Connector negotiates a connection.
Set specific override properties for the Message Transfer Agent.
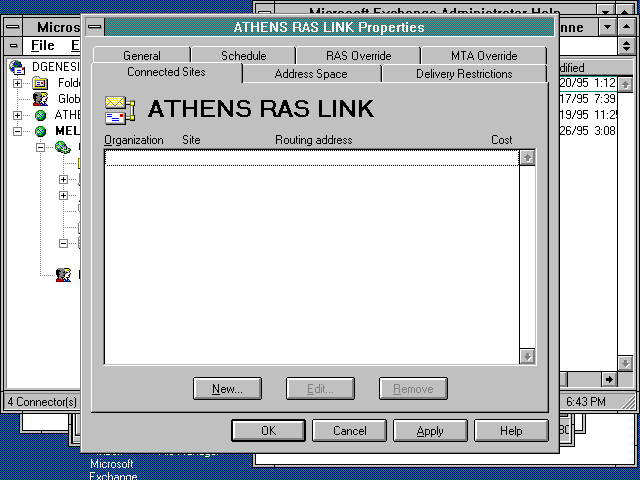
This property page lets you view which sites are linked via the current RAS Connector. Figure 16.17 a Connected Sites property page listing linked sites (blank if none).
View directly and indirectly connected Exchange sites.
Sites listed in the Connected Sites tab can receive messages from the local site via the current connector. If a site is not listed it may be availble view other links established via other connectors.
The Address Space tab (see fig. 16.18) defines which recipients can be reached through this connector. Only enough addressing data is provided to distinguish messages that should be sent through this connector.
Routing costs are entered along with each Address Space entry.
Identify routes to this connector by using Address Space entries.
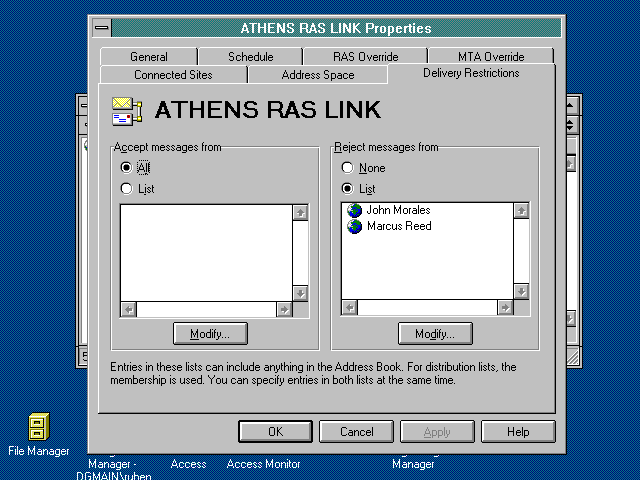
The Delivery Restrictions tab specifies which users can and cannot send messages through this connector.
To set delivery restrictions, follow these steps:
1. Click the Delivery Restrictions tab of the Dynamic RAS Connector property pages (see fig. 16.19).
Delivery restrictions allow you to specify who can access the Dynamic RAS Connector.
2. In the Accept Messages From or Reject Messages From section, click the List radio button.
3. Click the Modify button below each list to display the Microsoft Exchange address list.
4. Select the desired senders to include or exclude as per the above lists; then click OK.
5. Click Apply to set these properties and continue settting other properties.
6. When you finish making settings, click OK to return to the Administrator program.
From Here...
For technical support for our books and software contact support@mcp.com
Copyright ©1996, Que Corporation