 Copyright
©1996, Que Corporation. All rights reserved. No part of this book
may be used or reproduced in any form or by any means, or stored in a database
or retrieval system without prior written permission of the publisher except
in the case of brief quotations embodied in critical articles and reviews.
Making copies of any part of this book for any purpose other than your
own personal use is a violation of United States copyright laws. For information,
address Que Corporation, 201 West 103rd Street, Indianapolis,
IN 46290 or at support@mcp .com.
Copyright
©1996, Que Corporation. All rights reserved. No part of this book
may be used or reproduced in any form or by any means, or stored in a database
or retrieval system without prior written permission of the publisher except
in the case of brief quotations embodied in critical articles and reviews.
Making copies of any part of this book for any purpose other than your
own personal use is a violation of United States copyright laws. For information,
address Que Corporation, 201 West 103rd Street, Indianapolis,
IN 46290 or at support@mcp .com.
Notice: This material is excerpted from Special Edition Using Microsoft Exchange Server, ISBN: 0-7897-0687-3. The electronic version of this material has not been through the final proof reading stage that the book goes through before being published in printed form. Some errors may exist here that are corrected before the book is published. This material is provided "as is" without any warranty of any kind.
As discussed earlier, MS Mail is a shared file system e-mail application. It relies on a series of flat configuration files to transfer data between the users on the post office.
In this chapter, you will learn about the following:
Understanding the MS Mail Connector
The connection from Exchange to MS Mail requires several components. As discussed in Chapter 8, "Planning and Migrating to External Systems," Exchange can co-exist or provide backbone support for MS Mail networks. The MS Mail connector is the message transfer component included in the Exchange server. It provides the MS Mail External and post office functionality to Exchange. External is a message transfer application, which runs in single threaded mode on DOS or as a multitasking application on OS/2. In the recent release of MS Mail v3.5, a set of Multitasking MTAs were ported to run on windows NT.
Figures 18.1 and 18.2 illustrate a visual comparison of the two message transfer agents.
The External application running on DOS.
The Exchange MS Mail Connector.
![]()
The Exchange MS Mail Connector has a rich GUI interface that provides many new features.
![]()
In order to connect to an MS mail post office on the same WAN/LAN, you must configure an MTA to do the following:
In Exchange, you configure the MS Mail Connector to receive messages from the Exchange MTA and then convert the messages into the MS Mail format, and then deliver them to the target post office diagrammed in figure 18.3.
Fig. 18.3
The Exchange to MS Mail Architecture.
Exchange creates a local or "virtual" post office on the Exchange server. This post office models the MS Mail 3.x post office architecture. This post office becomes a shared file systems post office under the Exchange hierarchy. On the Exchange server, you have the information store, directory services, system attendant, and mail transfer agents. The Message Transfer Agent (MTA) communicates between the information stores and the different mail connectors. This includes the Internet Connector, the x.400 Connector and the MS Mail Connector.
The core component of the connection from Exchange to MS Mail (PC) is the MS Mail Connector. It is used for the information transfer between Exchange and MS Mail sites and post offices. Once the Exchange server processes the data interchange, the Ms Mail (PC) MTA can route the information to the MS Mail downstream post offices. Exchange serves as the hub post office for several clusters or spokes of MS Mail post offices.
Steps to connect Exchange to MS Mail:
1. Define a connection to the directly connected downstream Ms Mail post office.
2. Set up a single MS Mail Connector (PC) MTA service for the network service.
3. Configure message routing to Exchange on each MS Mail post office.
4. Add the network and post office names of each of the downstream MS Mail post office to the Exchange address space of the direct connection MS Mail post office.
5. Configure Directory Synchronization for the MS Mail post offices with the Exchange Directory Synchronization server.
![]()
Once you migrate the hub and spoke architecture of MS Mail to Exchange, the Exchange servers become the mail hubs. The key benefit is that the same server that is processes local mail or the information store, can be the MTA for the existing MS Mail post offices. Exchange can easily incorporate into existing mail architectures. This includes existing MS Mail post offices running on Novell Netware file servers.
![]()
Exchange MS Mail Connector marries the functionality of a hub or gateway post office and the External application. The MS Mail Connector (PC) MTA component of the MS Mail Connector provides the functions of the MS Mail External and Multitasking MTA application. These include the following:
As you migrate from existing MS Mail shared file post offices, you may need to continue operating MS External and/or the Multitasking MTAs at the same time as the MS Mail Connector of Exchange. These older MTA applications do not provide the same rich feature set as the MS Mail Connector. The MS Mail Connector will allow you to integrate Exchange into any MS Mail environment using existing External or Multitasking MTA applications.
This example applies to all MTA connections including asynchronous modem connections and/or x.25 service.
![]()
With the Exchange server running on Windows NT, you can take advantage of the build in remote access services of the operating system. This way you can create a WAN environment without separate asynchronous connections. All the servers are networked together via a WAN/LAN.
![]()
The MS Mail Connector contains the following Exchange components:
The message route from Exchange to MS Mail (PC) is as follows:
1. Exchnage user creates a message addressed to an MS Mail (PC) recipient and submits it.
2. Exchange information store forwards message to Exchange MTA
3. Exchange MS Mail interchange converts message to MS Mail format and drops the message into the Connector post office.
4. Attachments, OLE objects, and rich text formatting are saved and converted onto the Connector post office.
5. The Connector (PC) MTA delivers message to the destination MS Mail post office.
Setting Up the MS Mail Connector
As previously mentioned, the MS Mail Connector transfers information from Exchange and existing MS Mail (PC) post offices.
![]()
Each server in the organization can only run one instance of the MS Mail Connector. This instance can service more than one connection to MS Mail post offices and/or MS Mail gateways.
![]()
There are six key steps to setting up the MS Mail Connector:
1. Define the MS Mail Connector administrator mailbox
2. Configure the general MS Mail Connector settings
3. Connect to each MS Mail post office
4. Configure the MS Mail Connector (PC) MTA for each post office communication protocol; asynchronous, LAN, or x.25.
5. Launch the MS Mail Connector services.
6. Configure the directory services to include MS Mail post office recipients.
![]()
This chapter assumes that the connectivity exists between Exchange and the MS Mail post offices. If you need more information on connectivity between post offices, please see Chapter 9, "Installing Exchange Server."
![]()
There are two primary ways to connect to existing MS Mail post offices; LAN connectivity or remote connectivity, which includes asynchronous and x.25 connections shown in figures 18.4 and 18.5.
Fig. 18.4
Exchange to MS Mail post office via LAN.
Fig. 18.5
Exchange to MS Mail post office via asynchronous or x.25 connections.
The main difference between connection methods is that with the remote connection, an additional instance of External must be running in order for the remote post office to transfer messages. This addition will require extra overhead for administration.
![]()
If you have remote post offices with this configuration, you may want to either use NT Remote Access service to perform LAN based connections or migrate these post offices to Exchange ahead of other post offices.
![]()
The following are steps to configure the MS Mail Connector Interchange service:
1. Open the Exchange Administrator Application. This can be performed from the console on the Exchange server or from a workstation with connectivity to both the Exchange server and the MS Mail post office.
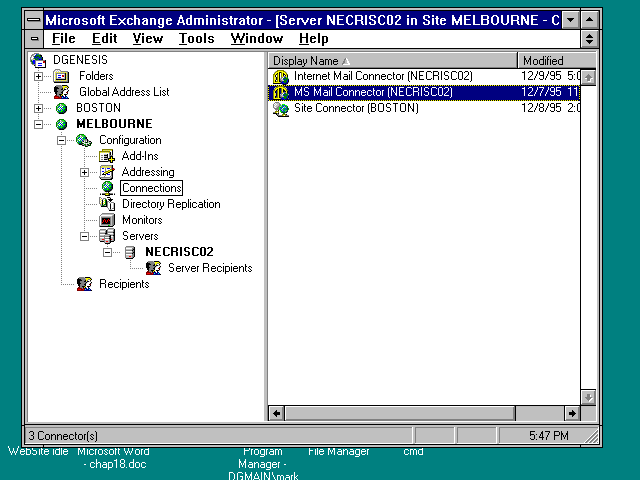
2. Choose the site from the organization list, the server name from the site, and the MS Mail Connector from the Connections list(see figure 18.6).
Select the MS Mail Connector.
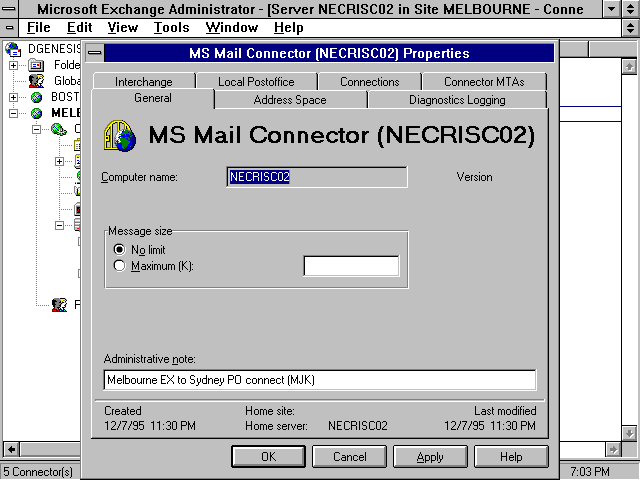
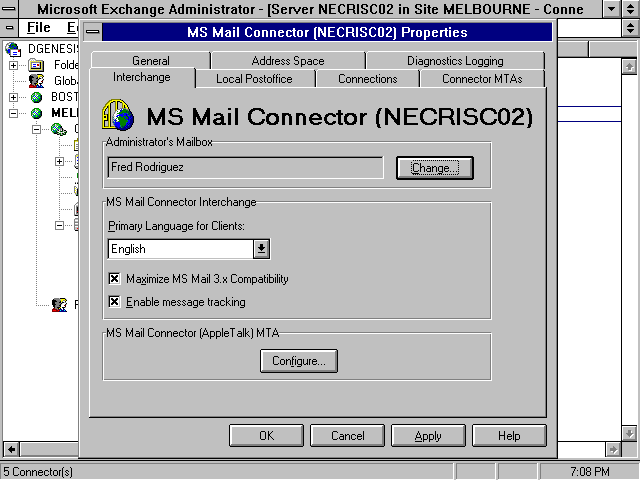
3. Open the Ms Mail Connector to configure the properties for the initial post office connection (see figure 18.7).
The MS Mail Connector dialog box for (NECRISC02) with the Interchange tab selected.
4. The Interchange tab allows you to select the "Administrator's Mailbox" which will receive system informational and alert messages from the Connector. These messages are typically due to nondelivery of mail (bounced mail) and failed messages.
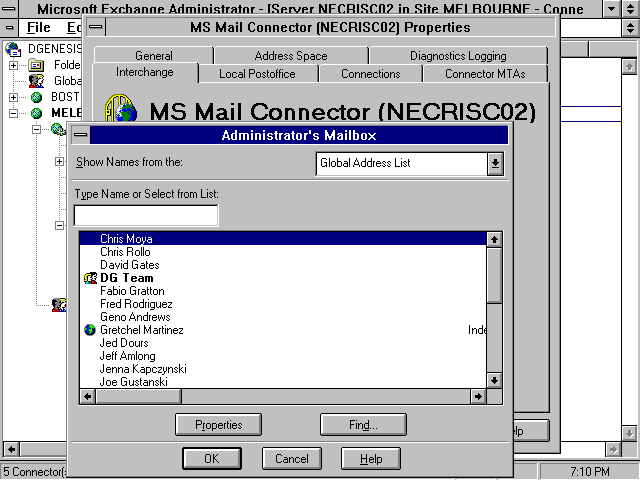
5. Select the Administrator Account. This account can be a user, group, distribution list, or public folder (see figure 18.8).
Configuring the Administrator Account for the Connector.
6. Select OK to return to the Interchange tab.
7. From the Interchange tab, select the primary language for the recipients. The selected primary language is used for interoperability with MS Mail clients using an alternate language. This is useful for International users of Exchange. The default value is prompted from the Exchange server.
8. Select the "Maximize MS Mail 3.x Compatibility" check box. This option is used for OLE compatibility in messages transferred between the older version used in MS Mail clients and the new version of Exchange Clients.
9. By selecting "Maximize MS Mail 3.x Compatibility," two versions of each OLE object are created. This option will increase or double the size of any OLE messages. If this option is not selected , MS Mail 3.x clients will not be able to view or save embedded objects originating from an Exchange client.
10. If you want to enable "Message Tracking" for the MS Mail Connector, select "Enable Message Tracking." This option will record message information into the tracking logs. It can also debug problems when messages do not appear to be routing properly or it can be used to locate potential lost messages. The default for this option is "disabled." For more information on message tracking, see Chapter 25, "Monitoring Exchange Sites."
11. Click "Apply" to set these properties prior to defining the additional properties off the remaining tab menus.
![]()
The AppleTalk MTA Connector portion is discussed in Chapter 19, "Setting Up Microsoft Mail for Appletalk Networks"
![]()
The following are steps to configure the MS Mail Connector Interchange service:
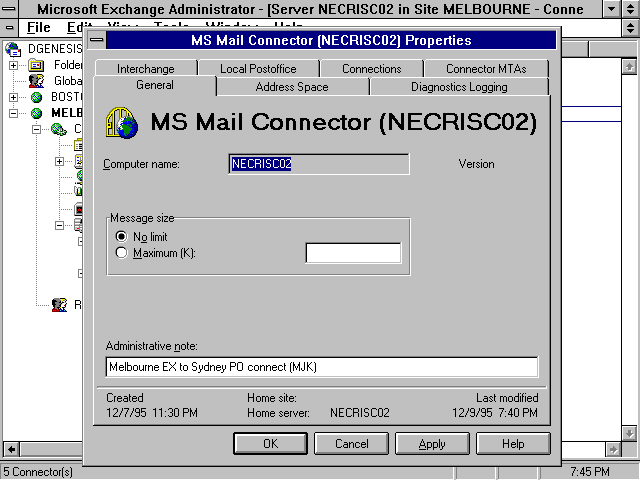
1. Select the General tab.
2. This tab shows the server name (NECRISC02). The server name cannot be modified (see figure. 18.9).
3. Use the General tab to set basic properties of the MS Mail Connector.
4. Define "Maximum Message Size."
5. You can define an upper limit for messages transferred through the Connector or accept the default value of "No Limit." This option is useful if you want to restrict the size of the attachment transferred between systems. Attachments can easily reach megabytes of data in size.
6. To limit the size, enter a maximum value between 0 and 9999999 kilobytes.
7. Type an administrative note or comment with respect to the MS Mail Connector. Include the initials of the technician working on the service. This comment can only be viewed from this Property page.
8. Click "Apply" to set the properties and configure the remaining Property pages.
![]()
You must first enter a value in the "Address Space" tab menu in order to define the MS Mail connection and close the connection property window.
![]()
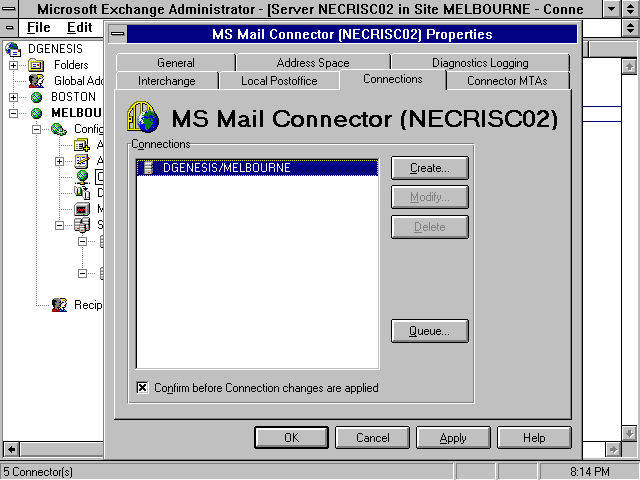
The following steps are used to set up the connections for MS Mail (PC) post offices over LAN, asynchronous, or x.25 connections. Each connection method will be described individually.
Use the Connections tab and Property page to create a LAN connection from Exchange to an MS Mail post office.
The following are steps to perform a LAN connection to an MS Mail post office:
1. Select the Connections tab.
![]()
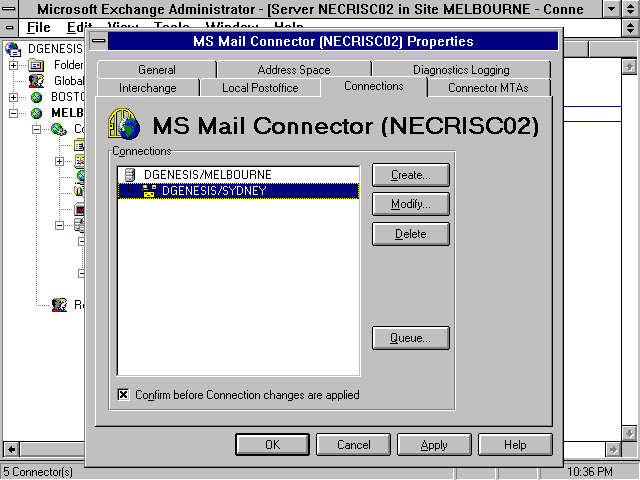
You may want to clear the "Confirm Before Connection Changes Are Applied" check box, if you do not want to have additional confirmation messages displayed before changes are set.
![]()
2. This tab shows the organization and site name which is actively being configured (see figure 18.10).
Connection tab is used to define LAN connections.
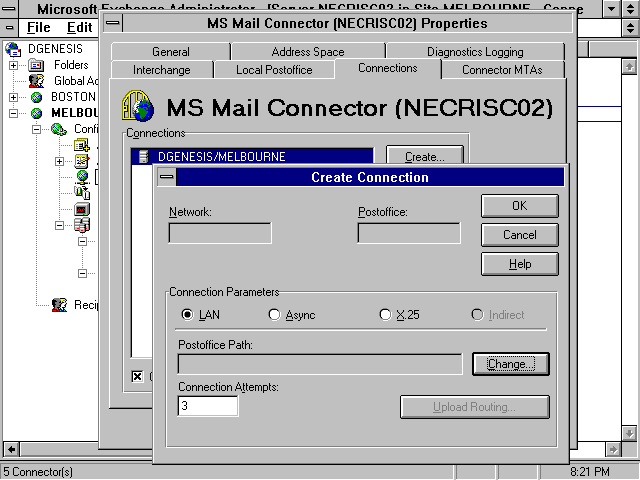
3. Click the "Create" button to configure a new LAN connection post office (see fig. 18.11).
Create connection to MS Mail post office.
4. Select "LAN" under the Connection Parameters window.
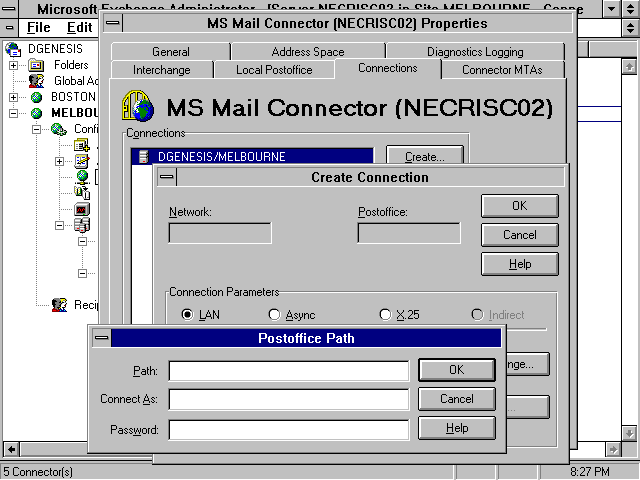
5. Click the "Change" button to specify the path to the LAN-based MS Mail post office.
6. In the Post Office Path dialog box, enter the complete path to the server, file share, and directory containing the MS Mail post office in the "Path" box.
7. Use the following format:
8. Microsoft Networking: \\server\share\path
9. Novell Networking: \\server\volume\path
10. Specify a Network or Domain logon name and password in the "Connect As" and "Password" fields. You only need to complete these entries if any of the following are true:
11. Click "OK" to confirm entries. If the connection is valid, the network and post office names will be entered into the appropriate fields on the Create Connection dialog box.
12. Define the number of connections retries for messages being sent to this post office. If this value is exceeded, the message is returned to the sender with an undelivered notification. The default value is 3.
13. An optional setting is to configure the routing information about the downstream post office from the one created. To import this information, follow these steps:
![]()
The information upload from this selection does not affect the configuration of the external options on the MS Mail post offices.
![]()
14. Click "OK" and return to the Connections Property page.
15. Click "Apply" to set the changes for the connection.
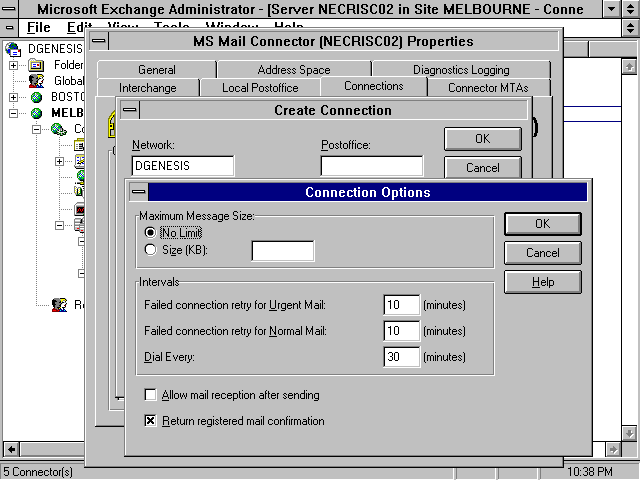
Use the Connections tab and Property page to create an asynchronous connection from Exchange to an External MTA for an MS Mail post office (see fig. 18.12).
Do the following to perform an asynchronous connection to a MS Mail post office:
1. Select the Connections tab.
2. Click the "Create" button to configure a new asynchronous connection (see figure 18.13).
Connections tab is used to define asynchronous connections.
New Connections dialog box with Asynchronous selected.Select the "Asynchronous" radio button (see figure 18.14)
3. Type in the Network name and post office in the respective field for the Asynchronous connection post office.
![]()
Unlike the LAN connection, you must enter the information for these values.
![]()
4. In the Sign on ID field, enter the serial number for the remote post office. The Sign on ID format is: ##-#####.
5. Enter the remote post office site password in the Password field.
6. Enter a value for the "Connections Attempts" box. The range is from 0 to 99. This value determines how many connection attempts Exchange will make to try to communicate with the remote post office, before returning the message to the original sender. The default value is 3.
7. Enter a phone number in the respective field. Make sure to add area code and any additional dialing prefixes. If you must dial a 9 to get an outside line, this must be included in the configuration. The phone number entered is the phone number for the remote post office MTA running the External application.
![]()
Make sure that the phone number you enter contains all prefixes. In addition, this number should direct Exchange to the remote MTA running the External application.
![]()
8. Click the "Options" button to enter additional configurations for asynchronous connections.
9. Enter a value for "Maximum Message Size." The default is set to "No limit" (see figure 18.14). If you want to limit the message size to be transferred over an asynchronous connection, enter a value between 0 and 9999 kilobytes in the respective field. This limits the size of attachment data, without limiting routing data.
Advanced options for the asynchronous connections.
10. Enter a value for "Failed Connection Retry For Urgent Mail." The value ranges from 1 to 99 minutes between connection attempts for messages defined as urgent. The default value is 10 minutes.
11. Enter a value for "Failed Connection Retry for Normal Mail." This value ranges from 1 to 999 minutes between attempts to reconnect for messages defined as normal. The default is 10 minutes.
12. Enter a value for "Dial Every." This value ranges from 1 to 999 minutes between connections for regular calls.
13. Check the box in order to select "Allow Mail Reception after Sending." This allows messages to be transferred in a bi-directional single connection. This option offers faster and more efficient message delivery. If this selection is not made, connections are made on an individual basis for "Sending" and "Receiving" messages.
14. Check the box to select "Return Registered Mail Confirmation." This will allow message confirmations to be transferred over the connection and between mail systems.
15. Click "OK" to set changes.
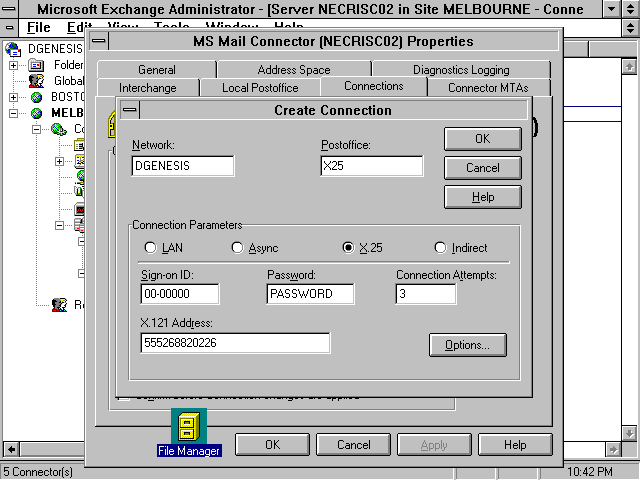
Use the Connections tab and Property page to create a x.25 connection from Exchange to an External MTA for an MS Mail post office. This connection is very similar to the Asynchronous connection. This section assumes that the x.25 protocol is already configured and running on this Windows NT server.
Do the following steps to perform an x.25 connection to an MS Mail post office:
1. Select the Connections tab (see figure 18.15).
Connections tab is used to define x.25 connections.
2. Click the "Create" button to configure a new x.25 connection (see figure 18.16).
New Connection dialog box with x.25 selected.
3. Select the "x.25" radio button. This brings up the additional configuration for the x.25 parameters.
4. Enter the Network and Post Office names in their respective fields.
5. Enter the sign on serial ID in the format ##-#####.
6. Enter the remote post office password.
7. Define the number of connection attempts. The default is 3.
8. Define the x.121 address. This value should include the entire x.121 address, consisting of up to 16 digits. The format should be as follows:
9. For more information on Exchange and x.25 support, refer to Chapter 20, "Configuring X.400 Connections."
10. Click "Apply" to set the specifications.
![]()
The "Options" dialog box for x.25 is identical to that for the Asynchronous connection.
![]()
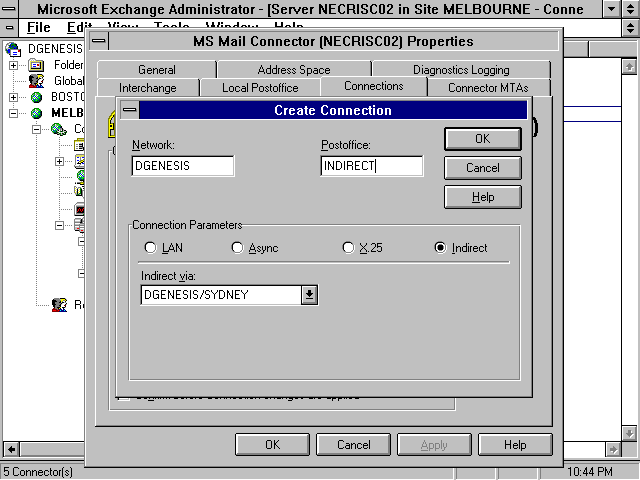
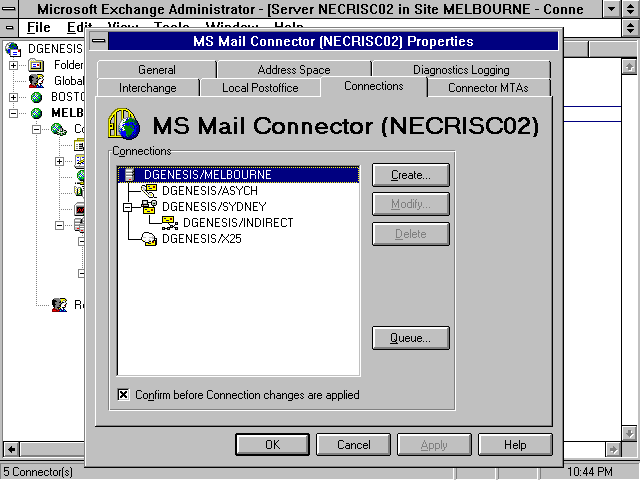
You can use the MS Mail Connector to act as a hub post office. The hub post office can be specified to feed various spokes, or indirect post offices.
Indirect connections are supported over the LAN or asynchronous or x.25 connections. They can be used to replace the External application running to service multiple downstream post offices.
Do the following steps to perform and indirect connection to an MS Mail post office:
1. Select the Connections tab.
2. Select the hub post office and then click Create to configure the indirect post office.
3. From the Connection Configuration dialog box, select the hub post office from the "Indirect Via" drop-down list (see fig. 18.17).
Connection tab is used to define indirect connections.
4. Click "OK" to set the configuration.
These are the four options for MS Mail connections provided with Exchange.
The message queue is the final component of the Connections tab menu. The queue lists messages awaiting delivery by the MS Mail Connector. Figure 18.18 shows an empty queue after all pending messages were delevered. Normally, you would use the queue window to monitor the message load passing through your MS Mail Connector.
MS Mail Connector message queue.
The following steps are used to create the Message Transfer Agent services for connections over LAN, Asynchronous, or x.25. Each connection method will be described individually.
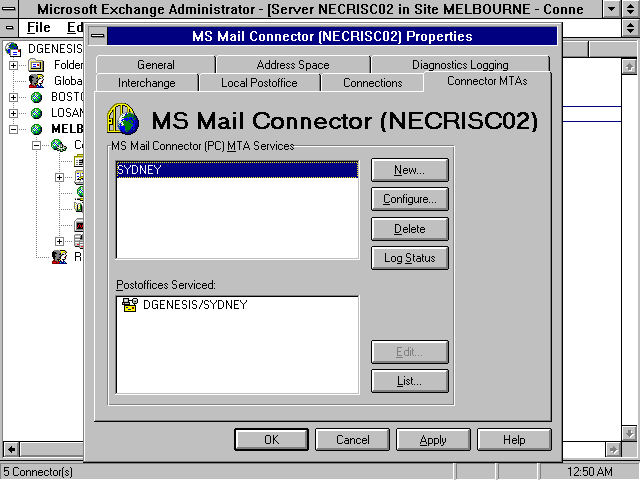
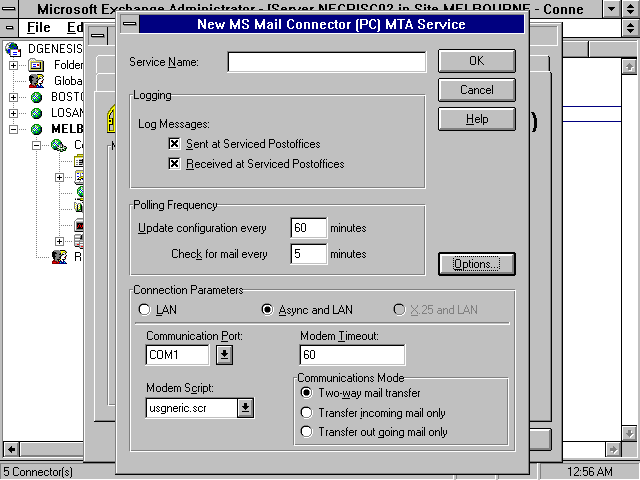
Use the Connector MTA's tab and Property page to create the MTA services to transfer messages from Exchange to an MS Mail post office. Follow these steps:
1. Select the Connector MTA's tab (see figure 18.19).
MS Mail Connector MTAs tab menu.
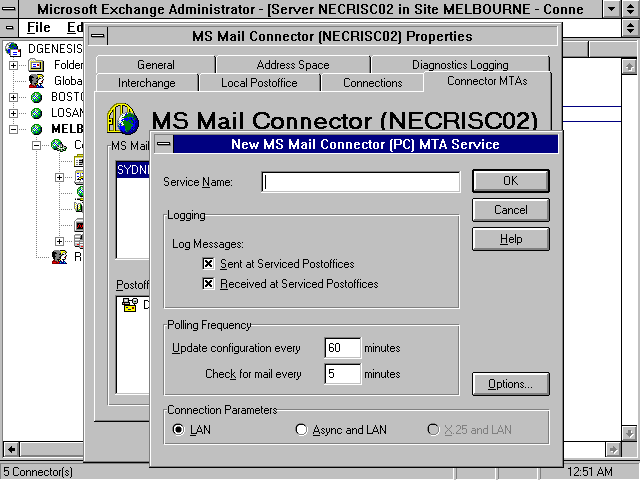
2. Click "New" to create a new MTA service (see figure 18.19).
MS Mail Connector MTA's tab menu�New Service.
3. Enter a name for the MTA service. This name is used by the Windows NT operating system to register the MTA Connector as a system service. Once the service is defined, you cannot modify the name. You would have to remove the service and re-create it.
4. Because the MTA runs as a system service, there are several character string limitations:
5. If you use any other character string, the service will not be able to register with the operating system.
![]()
Naming the convention is important with services. If you preface the MTAs with "MS Mail Connector," they will interfere with the integrated Exchange Mail Windows NT services listed in the Control Panel�Services.
![]()
6. Select the "Log Messages Sent At Serviced Post Offices" check box. This option will set up logging in order to record each message transferred to the MS Mail post office environment.
7. Select the "Log Messages Received At Serviced Post Offices" check box. This option will set up logging in order to record each message transferred from the MS Mail post office environment.
8. Enter values for the "Update Configuration" field in minutes. This checks for updated information based on the interval minutes entered into this field. The default is 60 minutes.
![]()
If you enter a 0 in this field, you will stop the configuration from checking for messages.
![]()
9. Enter a value for the "Check for Mail Every" field. This field accepts values from 0 to 999 minutes. This is the polling interval for how long the MTA waits before rechecking for mail coming to the MS Mail Connector post office. The default value is 5 minutes.
10. If you have multiple instances of the MTA service to service multiple MS Mail post offices and gateways, you may want to stagger this time interval so that each instance does not overlap. One service would check for mail every five minutes and the next service would every six minutes.
11. Select the LAN option in the "Connection Parameters" section.
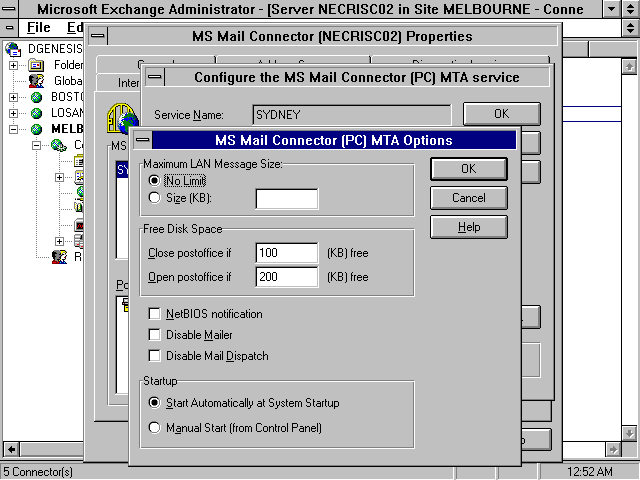
12. Define the MTA Connector options by clicking the "Options" button (see figure 18.19).
13. These options apply to both the LAN and the Asynchronous connection methods (see figure 18.20). The first selection is for "Maximum Message Size." You can set an upper limit for the size of messages transferred through this MTA. The values range from 0 to 9999999 kilobytes and the default is "No Limit."
MS Mail Connector MTA's tab menu�New Service, Options dialog box.
14. The next entry is used to define the "Close Post Office If" value. This value is used to close the destination post office connection when disk space utilization has reached whichever threshold point you designate from 0 to 999999999 kilobytes. Messages will queue up on the MTA until they are timed out or additional disk space is added on the destination post office.
15. In addition to closing the connection, you can set a value for "Open Post Office If" disk space has been added or made available. This value ranges from 0 to 999999999 kilobytes. Disk-space availability must rise above this value in order for message transfer to re-start.
16. The next three check boxes are used for administrative notifications to the MS Mail LAN post office users. These have no impact for Exchange users. The first option is to check the "NetBios Notification" in order to have the MTA send a NetBios broadcast message.
17. The NetBios Broadcast will only work if the server and clients are running the NetBios protocol. In addition, you must start all the NT service MTAs prior to launching the External application on the destination post office for NetBios broadcasts to function properly. For more information, see the user manuals for the respective operating system to learn how to install NetBios.
18. Select "Disable Mailer" and "Disable Mail Dispatch" to stop mail notifications from being distributed via the External and Dispatch applications associated with the destination MS Mail post offices. These do not impact the Exchange users. For more information on the application, refer to your MS Mail Administrator Guide.
19. Select the "Startup" box to define the method that this NT MTA service will launch. The options are to have the MTA start automatically or manually.
20. Click "OK" to set these configurations.
21. Click "OK" followed by "Apply" to set all the configurations for this MTA service. If you modify these options for this service at a later point, you will need to stop and start the NT service in order to have the changes take effect.
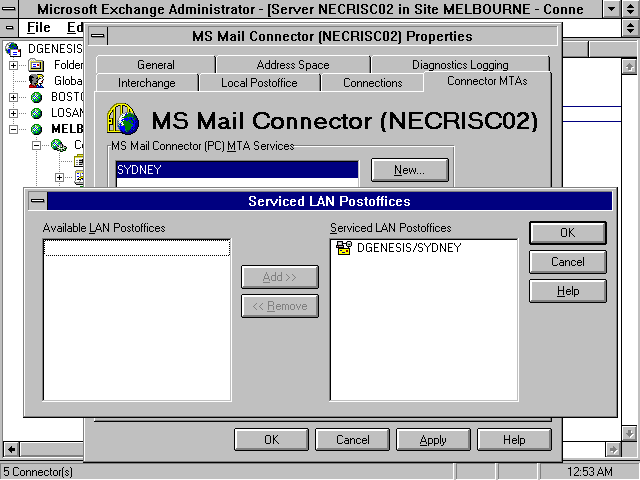
To complete the MTA service, you need to define the post offices service by the MTA services.
1. From the MS Mail Connector property sheet, click the "List" button. The Serviced LAN Post Offices dialog box appears.
2. In the "Serviced LAN Post Offices" dialog box, select the post office to be serviced from the right panel of "Available LAN Post offices."
3. Click the "Add" button in the middle and the selection becomes a "Serviced LAN Post office."
4. Click "OK" to set the configurations.
If you need an additional service for an Asynchronous connection, you will need to modify an existing MTA or create a new service. The follow are the configuration differences for the Asynchronous connection:
1. Click "Create" to create a new MTA service or click "Edit" to modify an existing MTA.
2. On the Property page, select the "asynchronous and LAN" option (see figure 18.21).
MS Mail Connector MTAs tab menu�New Service via Asynchronous or x.25 connection.
3. Enter the appropriate values for the following:
4. Communication Port�This is the server communication port to be used for the MTA service. The default value is "COM1."
5. Modem Script�This is used to define the initialization string for your particular modem.
![]()
If you have an existing modem that requires a customized script file, you can copy this script to the following path on the Exchange server:
� %Exchangeroot%\connect\msmcom\maildata\glb
![]()
6. Modem Time-out�This is the value for the number of minutes the MTA will wait for a connection with the destination post office.
7. Communication Mode�This value defines whether the MTA will send and receive messages or only handle one way message transfers.
8. Click "OK" to set the configuration settings.
9. If this MTA has been modified, it will need to be stopped and restarted from the services control panel.
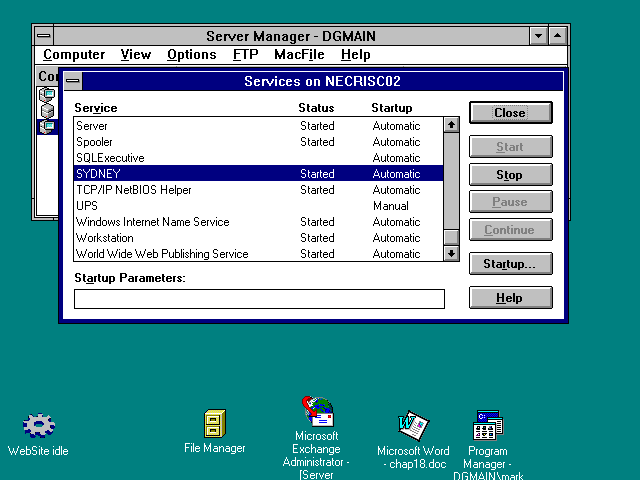
After you have configured all your MTA services and defined which post offices are serviced, you need to start the MTA NT services in order to begin message transfer. Do the folowing steps to start these services:
1. Open the control panel for the server services.
2. Locate the MTA service to be started, select the service, and click "Start." (See figure 18.22.)The service will start and you can begin transferring messages between mail systems.
MS Mail Connector MTA Windows NT service.
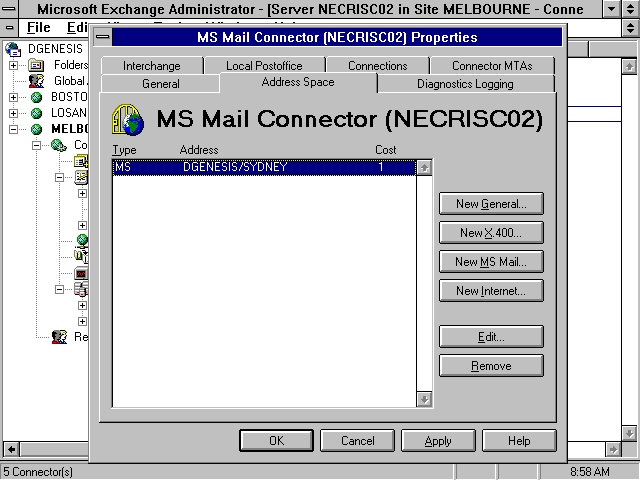
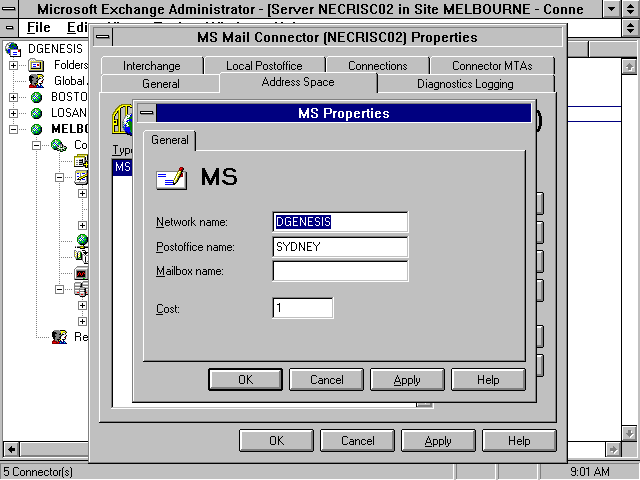
The following steps are used to create the address space for the Ms Mail post offices serviced by this MS Mail Connector.
Address space is used to properly route messages throughout the organization. If you have additional gateways installed, address space is important to ensure the proper message route.
1. Select the Address Space tab (see figure 18.23).
MS Mail Address Space tab menu.
2. Select the address space to be created. Your choice will depend on the type of gateway used to receive these message transfers. The address spaces are associated with a specific template for each connector. The template assists with entering the destination mail address. The options are:
3. New General�A blank template for creating a destination address when a template is not available. Typically each connector will provide an address template.
4. New Internet�A blank template to enter SMTP or Internet message routes.
5. New X.400�A blank template for creating an x.400 message route.
6. New MS Mail�A blank template to create an MS Mail message route. After the MS Mail Connector is configured to transfer messages through the associated MTA service, a message route is automatically generated in the MS Mail address space.
7. To create or edit the MS Mail address space, select the address space in the connection window.
8. In the Property page for the MS Mail address space, you must enter the network and post office of the destination MS Mail post office.
![]()
When you enter values for the address spaces, you can use wildcards. For example,
MS:DGENESIS\SYDNEY\*
This address routes messages to all users on the destination post office.
![]()
9. All the address spaces will create a message route from this MS Mail Connector to the destination or foreign mail system. For more information on routing and addressing, see Chapter 23, "Exchange Maintenance."
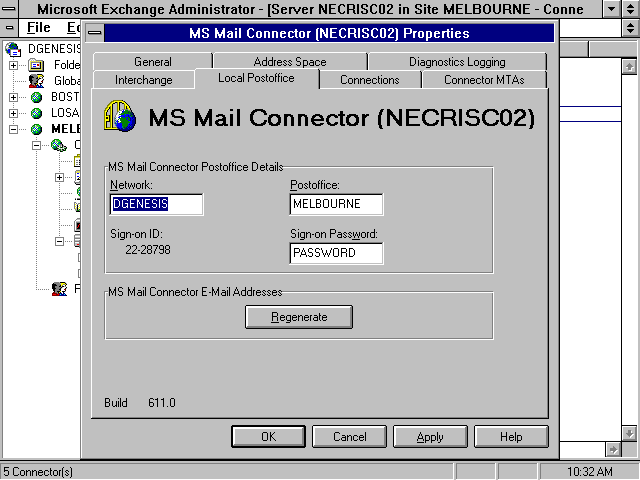
When you use the MS Mail Connector for MS Mail (PC), Exchange must create a local or "virtual" MS Mail post office. This is known as the local post office, which was created automatically when you installed the MS Mail Connector. It was first configured when you set up the MS Mail post office interchange in the first part of this chapter.
The local post office is a working MS Mail post office. Exchange uses this post office to transfer messages to MS Mail post offices. The message first goes into the MTA and then gets transferred and converted into the local post office before being transferred out to the destination post office.
To configure the local post office, follow these steps:
1. Select the Local Postoffice tab (see figure 18.24).
MS Mail Connector local postoffice configuration.
2. Enter the network and post office name for the local Exchange MS Mail post office interchange. These values can be changed. By default, Exchange enters the organization and site name into these fields.
3. Enter the password to be used by External MTA applications when you are connecting to and signing on to this local post office to transfer messages.
![]()
This is a good time to note the local post office Sign on Serial ID. You will need this information when you are configuring External to communicate with this local post office.
![]()
4. Click the "Regenerate" button under the MS Mail Connector Addresses heading. This selection will generate the proper addressing scheme to be used in routing messages through this local post office.
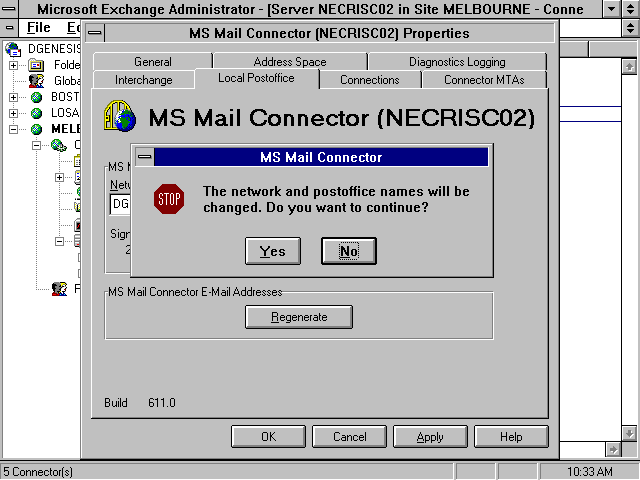
5. If any changes are made to this local post office, you must execute the address regeneration. As well, you will need to update the information on the remote External MTA, gateway, or post office. Additionally, if you change this information, you must stop and restart the NT MTA service and Connector interchange.
6. A warning will appear to force you to confirm this action.
7. Click "OK" to accept configuration settings and apply them to the Connector.
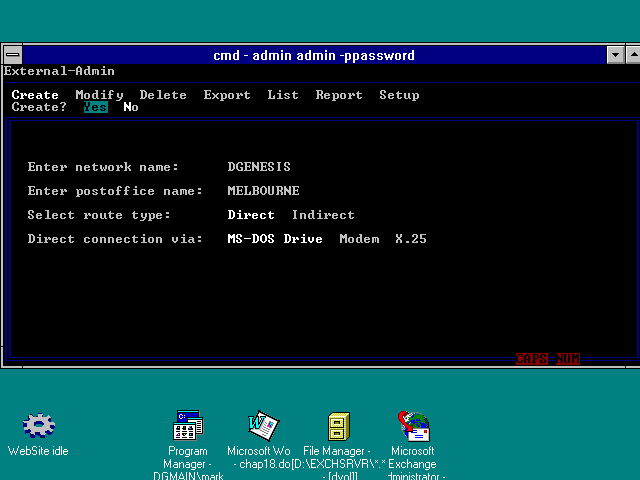
Once you have finished configuring the Exchange MS Mail Connector, you must configure each MS Mail PC post office to work with the settings in Exchange. Refer to the MS Mail Connector's local post office settings to create an External post office site in MS Mail3.x.
To configure the MS Mail post office, follow these steps:
1. Attach you Exchange server to the MS Mail post office with a network connection.
2. Launch the MS Mail Administration utility to configure the post office settings.
![]()
Once you have used the Exchange GUI interface, you will not want to have to go back to using the DOS character-based administration utility of MS Mail v3.x.
![]()
3. Toggle to the External-Admin Configuration menu item (see figure 18.25).
Use the MS Mail Administration utility to configure the post office.
4. Select "Create" and define the network, post office, and route for the Exchange MS Mail Connector local post office.
5. In this example, the MS Mail post office is called Sydney on the DGENESIS network. An External route has been added to the Exchange local post office called MELBOURNE on the same DGNESIS network. The connection type is direct. The only time you would use indirect is if you were routing MS Mail through another MS Mail hub post office prior to transferring the message to Exchange.
6. Select "Yes" to create the route and then exit the Admininstration application.
Once you have modified the settings for the post offices, if you have any MS Mail 3.x gateways, you will have to modify those as well. Because there are many different types of MS Mail gateways, you will be unable to describe the process for each one. The key components to modify are the network and post office names, sign on ID, and post office password. Refer to your user's manual for more information on configuring the gateway.
Now that the MS Mail Connector is completely configured, you must start the connection service to begin transferring messages between Exchange and MS Mail.
To start the MS Mail connection services, follow these steps:
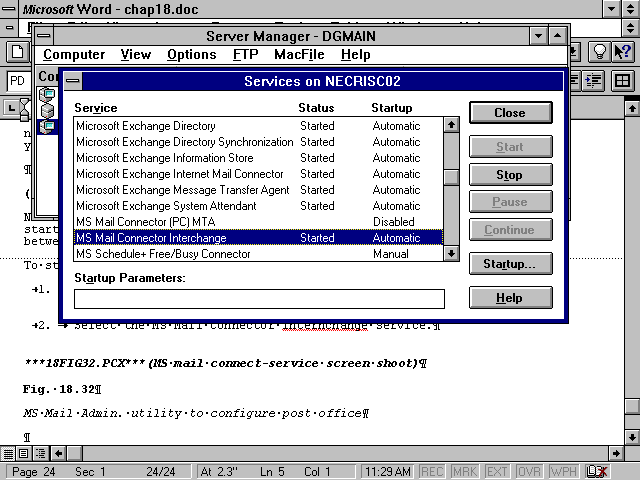
1. Open the Windows NT control panel or Windows NT Server Manager and select the "Services" option.
2. Select the MS Mail Connector Interchange service (see figure 18.26).
Use the MS Mail Admininstration utility to configure the post office.
3. Click "Start" to launch the service.
![]()
The MS Mail Connector (PC) MTA is set to "disabled" because it is only used in the configuration of individual MS Mail MTA services. This service cannot be started.
![]()
4. Close the services window.
Now that all the services are running and messages are configured to route between Exchange and MS Mail, you should test the connection.
To test the message routing between Exchange and MS Mail, follow these steps:
5. Using the MS Exchange client software, create and send a message to a recipient with a destination on the MS Mail post office.
6. Verify in the MS Mail 3.x client software that the message has arrived.
7. Repeat this process in reverse to verify MS Mail to Exchange message routing.
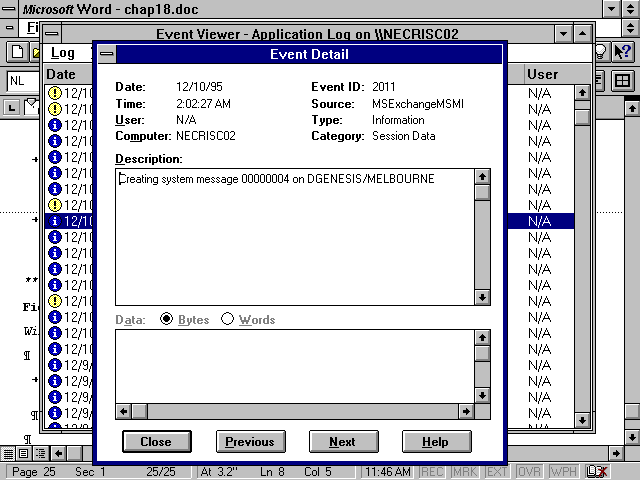
8. If the messages do not arrive, the first place to begin diagnosis is in the Windows NT Server Event log for the Exchange server.
The MS Mail Connector interchange events is logged as "MSExchangeMSMI" for mail transfer between the Exchange information store and the MS Mail Connector local post office.
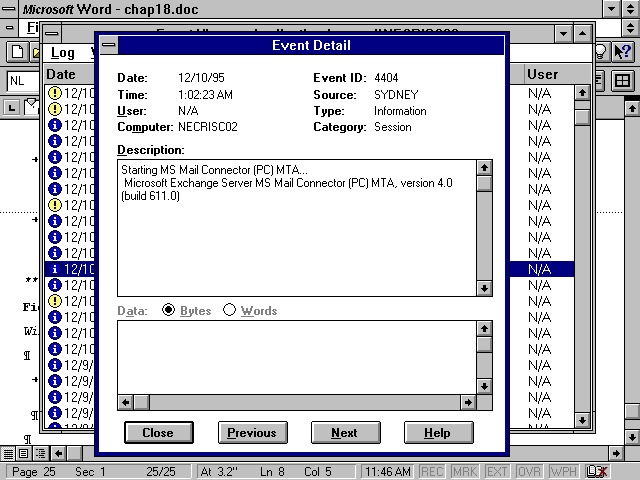
The MS Mail Connector (PC) MTA events are logged under the associated MS Mail MTA services names.
In this figure, you can see that the MTA has created a system message on the Exchange local post office with the respective name (see fig. 18.27).
Windows NT event log for MS Mail Connector entries.
In this example, the MTA service is called "Sydney" and the event would be logged with this name (see fig. 18.28).
Windows NT event log for the MS Mail Connector SYDNEY MTA entries.
As you can see in figure 18.29, the MTA service, Sydney, has successfully started.
The Windows NT event log will store a significant amount of events from the Exchange server. Each process has a unique service ID.
As you can see, Exchange provides numerous messages to the event log. If you have trouble with communication between Exchange and the MS Mail post office, you can adjust the sensitivity of the auditing levels.
To assist with debugging and routing problems between Exchange and MS Mail, you may want to increase the level of auditing for the MS Mail Connector.
To adjust audit levels, follow these steps:
1. Open the MS Mail Connector Property page and select the tab for "Diagnostics Logging." (See figure 18.30.)
The MS Mail Connector tab menu for adjusting system auditing levels.
2. On the left panel are the services to be monitored and on the right are the category and logging levels. The service is the MS Mail Interchange Connector. The categories to adjust are: MS Mail Interchange Connector, the MS Mail PC MTA, and the MS Mail AppleTalk MTA. (Note that the AppleTalk MTA will be discussed in the next chapter).
3. The levels indicate the level of granularity of information that you would like logged into the event viewer. The levels for the MS Mail Connector are: None, Minimum, Medium, and Maximum. Typically you will have Minimum selected for the categories of the service that you are using. If you are not going to use the AppleTalk MTA, there is no need to turn logging on.
4. If problems do arise with the connections between Exchange and MS Mail, you can increase the logging levels while you are in the debug mode. Realize that increasing the logging levels can potentially overload your event logs with an abundance of information. The increase in logging should only be set while you are debugging a problem. Once the connection has stabilized, it is a good idea to reduce the logging levels.
If you are still having problems with MS Mail message routing and the event logs are not providing the information necessary to solve the problem, try the following:
1. Delete and then re-add the MS Mail Connector, including all the MTA services.
2. See Chapter 26, "Troubleshooting Exchange's Directory Services."
3. Contact Microsoft Product Support Services.
Directory Synchronization
The final component to configure is the Directory Synchronization between the Exchange and MS Mail.
This section will assume that the Directory Synchronization server is already set up and running on Exchange. Each site can only run Directory Synchronization server. However, each server can support numerous directory requesters and remote directory requesters. In addition, this section will assume that Exchange and the MS Mail post office can both send and receive messages via the Interchange Connector and the PC MTA. Directory Synchronization was explained in detail in Chapter 17, "Using Directory Replication and Synchronization."
Once the Directory Synchronization server is set up and configured on the Exchange server, there are few steps needed to ensure the MS Mail post offices are included in the synchronization process.
1. Make sure that the Exchange Site Directory Synchronization service is installed and running (see figure 18.31). Check you Windows NT system service list confirm this.
The Exchange Directory Synchronization server properties.
2. Install and configure a remote directory requester to synchronize the Exchange Global Address List (GAL) with the GAL on the MS Mail 3.x post office network (see figure 18.32).
The Exchange remote directory requester used to synchronize with foreign systems, including MS Mail 3.x.
3. The remote directory requester has all the information needed to communicate with the Exchange local post office prior to synchronizing with the connected MS Mail post office.
4. Open the MS Mail 3.x administration application and select the post office configuration options (see figure. 18.33).
Configuration options in the MS Mail administration program.
5. From this panel you can configure the directory synchronization options, as well as the use of the global address for the local post office.
6. From the "Dir-sync" menu, toggle to the "registration" menu to configure the Directory Synchronization server information.
7. The information for the Directory Synchronization server will be the same as the Exchange MS Mail local post office. From this panel, enter the network, post office, and password for the server (see figure 18.34).
Creating a Directory Synchronization requester in MS Mail.
8. From the "Global Address" menu in the post office configuration options, you will need to specify for the MS Mail 3.x post office to use the global address list.
Once the MS Mail administration is completed, you should stop and restart the Exchange Directory Synchronization Server service. As well, stop and restart the MS Mail Connector Interchange.
As you can see, there are many components required to connect Exchange with MS Mail (PC) post offices. The message route includes the Exchange information store transferring messages to the Interchange Connector which converts the message to the local MS Mail post office, before the Exchange MTA transfers the message to the remote MS Mail Post office via a LAN connection or over an asynchronous or x.25 link.
From Here...
This chapter has explained the connection between Exchange and MS Mail (PC) post offices. For more information, see the following chapters:
For technical support for our books and software contact support@mcp.com
Copyright ©1996, Que Corporation