
Day 5
WYSIWYG HTML Editing with FrontPage
In yesterday's lesson, you created your first Visual InterDev project, using the HTML Source Editor to construct your Web page. In today's lesson, you learn about another HTML editor included with Visual InterDev. The FrontPage Editor for Visual InterDev is very intuitive and powerful and provides a visual alternative to the HTML Source Editor.
The first part of today's lesson introduces you to the FrontPage Editor for Visual InterDev. You then receive an overview of the benefits of a visual development environment. Toward the middle of the day, you will take a guided tour of the features of the FrontPage Editor. You will learn about all of the powerful features and how to use them to construct your web pages. Afterwards, you will learn how to use the FrontPage Editor and its features to create a web page. The end of the day covers the different team members and roles involved in a web development project. This part of the lesson focuses specifically on the different contributions to the development of a web site and how Visual InterDev and FrontPage can facilitate this process.
FrontPage Editor for Visual InterDev
Most HTML editors focus on supporting different HTML specification levels without providing an easy-to-use interface. Developers have faced the challenge of programming cryptic codes to format their web pages. After they create this code with an editor like Notepad, they hope and pray that the web page that's displayed in the browser is the one they envisioned. What they see in their mind is not always what they get.
Microsoft FrontPage provides an answer to this dilemma. FrontPage is a very robust and powerful HTML editor, combining the latest in HTML specification and browser extensions support with an interface that's intuitive and easy-to-use. The FrontPage Editor enables you to visually construct your HTML. Hard-core programmers, who are from the old school of HTML development, can still manipulate the generated code and add their own custom enhancements and modifications. FrontPage is a WYSIWYG editor.
New Term: WYSIWYG stands for what you see is what you get. In the context of constructing web pages, WYSIWYG means that the web document's formatting that you see in the editor mirrors how the browser displays the web page.
The web page that you create and view within the editor is the same page that you see in the browser. This reduces a lot of guesswork when you design a web page. Visual InterDev provides an implementation of the FrontPage Editor that is completely compatible with the commercial version of FrontPage. The FrontPage Editor for Visual InterDev provides the same robust features and user-friendly interface as the commercial version of the product.
As stated before, the FrontPage Editor provides a WYSIWYG authoring environment with the same powerful features as the commercial version of FrontPage. If you have used FrontPage, you're familiar with its features. The FrontPage Editor for Visual InterDev provides basically the same robust features for constructing your web site.
The WYSIWYG authoring environment enhances your productivity by enabling you to construct your interface through a graphical tool. The FrontPage Editor enables you to visually choose the options and formats that you want for your web page. Then, based on the design formats that you select, the FrontPage Editor generates the proper HTML code to produce the desired web page. You have access to this code to make changes and extend its capabilities.
You might feel like you're giving up control of your design when you use a tool like FrontPage. On the contrary, by using the FrontPage Editor, you're gaining control of your design. By enabling the editor to generate the basic HTML for you, you have more time to focus on the overall design and look and feel of the web site. You also have more time to develop the more difficult application logic.
The FrontPage Editor provides support for all of the basic HTML features as well as some more advanced browser extensions. You can publish basic information using the editor. Also, you can create HTML forms and objects to elicit user input. One of the more robust features for constructing a web page is the Page Wizard. This wizard provides a step-by-step guide to construct several types of designs, including frames and tables. WebBots also greatly augment your productivity. A WebBot is a program that is a part of the web page and performs certain tasks as needed. The FrontPage Editor comes with several WebBots that are covered later in the day. WebBots provide a way to combine scripts with your HTML code to create a dynamic web page.
You can use images to enhance your web pages using the FrontPage Editor. The FrontPage Editor supports the standard GIF and JPEG file formats as well as other image formats. For these other image formats, the FrontPage Editor prompts you to convert them to either the GIF or JPEG file format. You can view your images as they will be displayed in the web page using the FrontPage Editor.
Once you begin to visualize the power of the FrontPage Editor, you will want to use this tool as your basic editor of choice. The good thing about Visual InterDev is that you don't have to decide between one tool or the other. You can combine many tools under one roof to meet all of your web and application development needs.
The Benefits of a Visual Environment
The pages that you design using the FrontPage Editor exemplify the final product. The visual editor is analogous to using Microsoft Word to format a document. You set the font type, font size, and character formatting such as bold and italics. When you print the document, the formats that you designed are printed exactly as you designed them. Likewise, when you design a web page using the FrontPage Editor, what you see is what you get. You don't have to guess about the layout or positioning of objects.
Also, the FrontPage Editor reduces the very iterative process of character formatting. With other non-visual editors, you have to code the format of your text and then test the results in the browser. For example, you specify your HTML code to format text to be bold and a certain font, then view the page in your browser to ensure that you used the right codes to produce the desired effect. With the FrontPage Editor, you can visually choose the proper formatting as you would in Microsoft Word. You also can see the results within the same environment.
The FrontPage Editor provides instant feedback about your design, saving valuable development and testing time. The benefit of a visual editor like the FrontPage Editor is that you select the choices and FrontPage does the work. If you want to insert a table, you select the Insert Table option from the Table menu. You then can design the layout of the table, including the number of rows and columns. You don't have to code a series of HTML tags like <TH>, <TR>, and <TD>. The FrontPage Editor generates these tags for you.
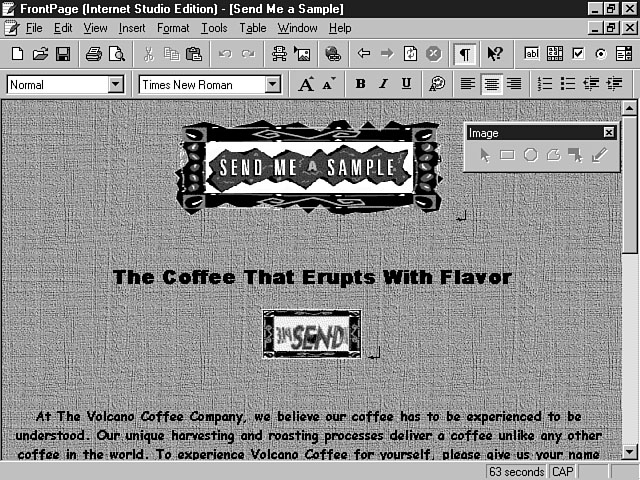
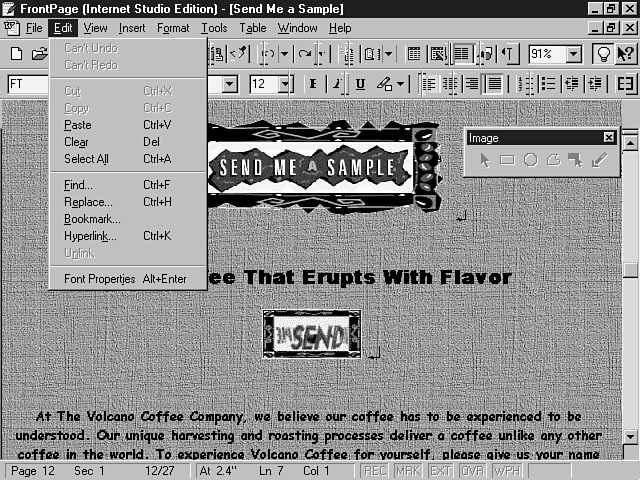
Figure 5.1 illustrates the power of a visual environment to view your web pages.
The FrontPage Editor.
This figure shows the Volcano Coffee Company sample web site that's included with the Internet Information Server. This page enables you to order a sample of coffee. As you can see in this figure, the FrontPage Editor displays the images as well as formatted text and graphical controls. Try to use Notepad to rapidly construct this web page! The FrontPage Editor definitely provides the visual tool to construct graphical web pages. The need for this kind of tool becomes imperative as the industry continues to migrate from document publishing and move towards dynamic, interactive, and graphical web pages.
Now that the benefits of using a visual environment have been introduced, it's time to take a look at some of the specific features of the FrontPage Editor.
FrontPage Editor Features
The FrontPage Editor for Visual InterDev contains most of the same features of the released version of FrontPage. Some of the more pertinent features include the following:
- Basic character formatting
- Tables
- Forms
- Templates
- Images
- Advanced Controls
- WebBots
Basic Character Formatting
The FrontPage Editor supports all of your basic editing needs. You can visually set the font type and font size for your text as well as format the layout and style of your paragraphs. You also can easily create bulleted and numbered lists. The FrontPage Editor uses the same user interface method as Microsoft Word, making the process very intuitive. In fact, both tools use the same menu and menu items to accomplish these basic editing features.
The Format menu enables you to insert bullets and numbers and select options for the fonts of your text. You can format different types of headings in your document, as well as designate paragraph styles. This process is easy and enables you to focus on the page layout without worrying about the underlying HTML. You also can use the toolbar option to format your web page. The Format menu provides an option for setting the properties for the web page, including background color and images. You also can define the visual display and color of hyperlinks and text.
Tables
You can use the FrontPage Editor to create tables for your web page. Tables are very effective at displaying lists of data like rows from a database. FrontPage generates all of the underlying HTML to produce your table. To create a table, you select the Table menu and choose the Insert Table option. This action displays the Insert Table dialog window, which enables you to design the table layout. From this window, you can specify the number of rows and columns for your table. Also, you can indicate layout parameters, including the text alignment, border size, cell padding, and cell spacing. The FrontPage Editor supports many of the new HTML extensions and features, including the ability to include background colors and images for the table and individual cells. Figure 5.2 demonstrates the various attributes that you can set to enliven the look of your table.
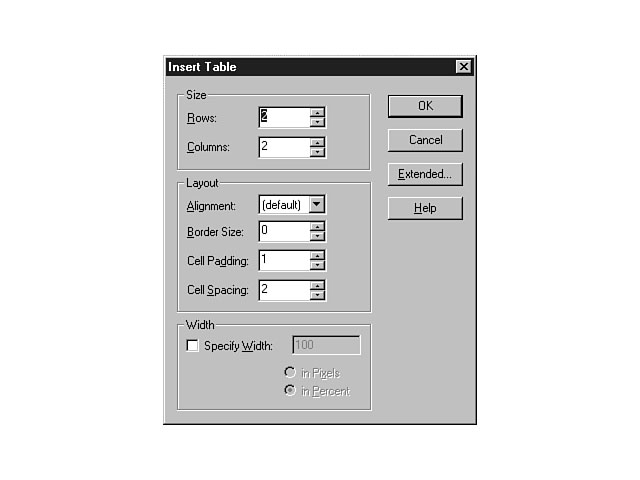
Creating a table.
You can enter data directly into the table or use the variable names to represent data that will build the table's contents from another source, such as a database. When designing the table, you can enter data into the table just as you would enter information into a Word table.
Forms
The FrontPage Editor supports the use of HTML forms and provides a mechanism for constructing these forms for your web pages. You can choose the Form Field sub-menu option from the Insert menu to insert a control for your web page at the spot of your cursor. When you select the desired control, the FrontPage Editor creates a form containing the new control at the indicated spot. You can set properties for both the form and its controls. You also can choose several different types of event handlers to control your application logic for the form. The FrontPage Editor supports the following types of event handlers:
- ISAPI, NSAPI, or CGI script
- Internet Database Connector (IDC)
- WebBot programs
All of these event handlers provide a method for you to process user interaction between the client and the server. For example, you might use an API or CGI script program to gather input from a user and then store this information in a database. The lesson on Day 1, "Introducing Visual InterDev and the World Wide Web," talked about APIs and CGI script and the differences between the methods and their advantages. The Internet Database Connector (IDC) provides database connectivity to any ODBC-compliant database. The WebBot programs provide some specific solutions for unique forms, for example, a form and logic to handle user registration to your web site. Forms and form processing are discussed in more detail on Day 12, "Using Basic and Advanced HTML Form Controls."
Templates
The FrontPage Editor enables you to create standard templates for constructing your web pages. Templates can dramatically save you time during the design and development phases of your project. Also, templates ensure a common look and feel across the application. You can use templates to provide a consistent interface for the user.
The FrontPage Editor enables you to create templates for your web pages. Page templates provide standard design for an individual web page. You can construct a new page to be used as a template. You also can convert existing pages to serve as the templates for your web pages.
Images
Images are a big part of any dynamic web page. You can import a variety of them into your web pages using the FrontPage Editor.
To include images on your web page, simply place the mouse at the desired spot and select Image from the Insert menu. You can then choose to insert an image file located on your machine or a network. The image is imported into your web. In a sense, the image becomes a part of the project, enabling you to work with the original file. You also can insert an image from the Web. When you specify an image from the World Wide Web, you are referencing a URL for the location of the file. For this reason, these types of images can't be imported into your web page.
The FrontPage Editor supports the use of the standard GIF and JPEG Web file types as well as many other common image file types. The FrontPage Editor prompts you to convert any file that is not a .gif or .jpg to that format. The FrontPage Editor converts any image that uses up to 256 colors to the GIF format, and converts any image using more than 256 colors to the JPEG format.
Advanced Controls
The FrontPage Editor supports the use of advanced objects and features like ActiveX controls, Java applets, and plug-ins. These advanced features promote dynamic interaction with the user, and are very easy to include on your web page. Each of these control types are located on the Other Components sub-menu within the Insert menu. Figure 5.3 shows the components that you have available to enliven your web page.
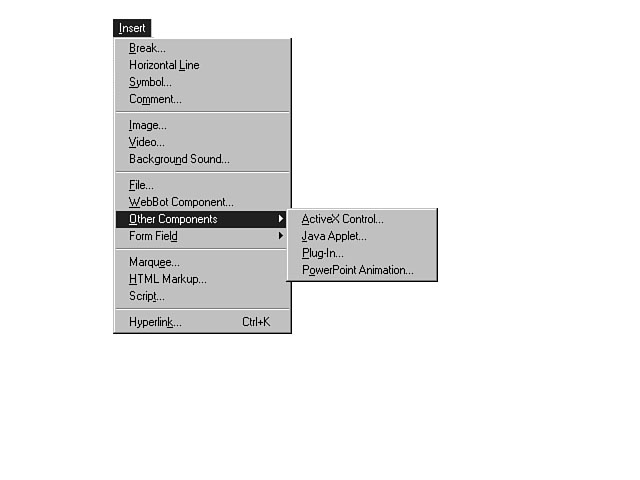
Inserting other components.
Once you choose the type of control that you want, a dialog window specific to that control is displayed. Figure 5.4 shows the results of selecting an ActiveX control.
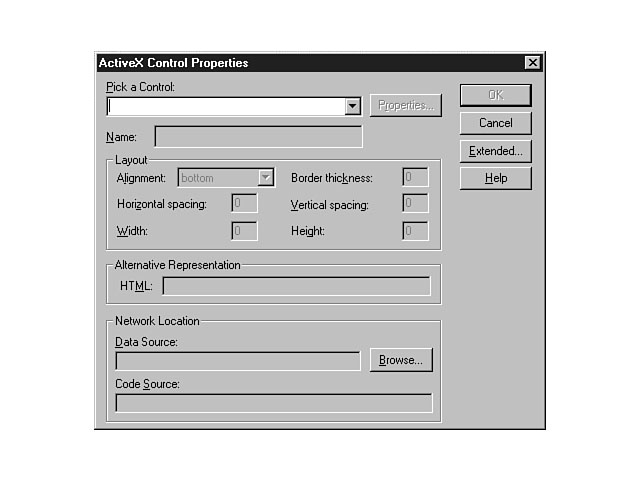
The ActiveX Control Properties dialog window.
This dialog window enables you to set the properties for an ActiveX control. Once you pick the ActiveX control you want to insert, the other property fields become enabled, allowing you to further define the attributes of this control. These properties help you design the layout of the control relative to the web page. Also, you can establish properties that are specific to that control by pressing the Properties push button.
Java Applets
The process to insert a Java applet is basically the same as inserting an ActiveX control. Choose Java Applet from the Other Components sub-menu to insert a Java applet into your web page, and the Java Applet Properties dialog window is then displayed. This dialog window is more generic than the ActiveX Control Properties dialog, because Java doesn't inherently support a visual method for setting properties like ActiveX controls. You can set the properties for the applet and then press OK. Figure 5.5 displays the properties that you can configure for a Java applet.
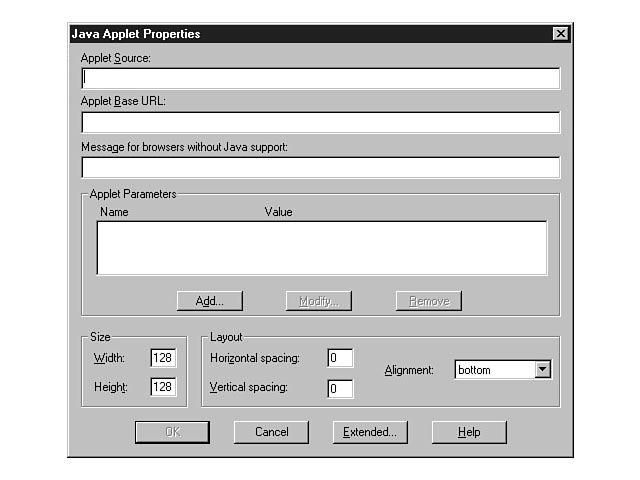
The Java Applet Properties dialog window.
Plug-Ins
Plug-ins also enable you to extend the functionality of your web page. You can use plug-ins to view embedded files within the context of the browser. For example, you can use a plug-in to embed a video clip for the user to view within your web page. The FrontPage Editor supports the use of plug-ins with your web pages. The process of inserting a plug-in is similar to the process for the aforementioned objects. You choose the Other Components sub-menu from the Insert menu and select the Plug-In option and the Plug-in Properties dialog window is displayed. To complete the insertion process, set the properties for the plug-in and press the OK button.
PowerPoint Animation
You can use the FrontPage Editor to insert an animated Microsoft PowerPoint object into your web page. You have the option of inserting the object as an ActiveX control or a plug-in.
WebBots
WebBots are programs that combine HTML and script to perform routine administrative functions. These programs execute as needed and enable you to automate functions and reduce your custom development time. WebBot examples include gathering user results from a form and automating the user registration process for a web site.
To insert a WebBot, place your cursor at the desired location in your web page and choose the WebBot Component option from the Insert menu. The Insert WebBot Component dialog window is then displayed. From this window, you can choose a WebBot from the list and press OK. Based on the WebBot you choose, another dialog is displayed so that you can further set some properties for the WebBot program. After you select the properties and press OK, the WebBot program is inserted at the specified location on the page.
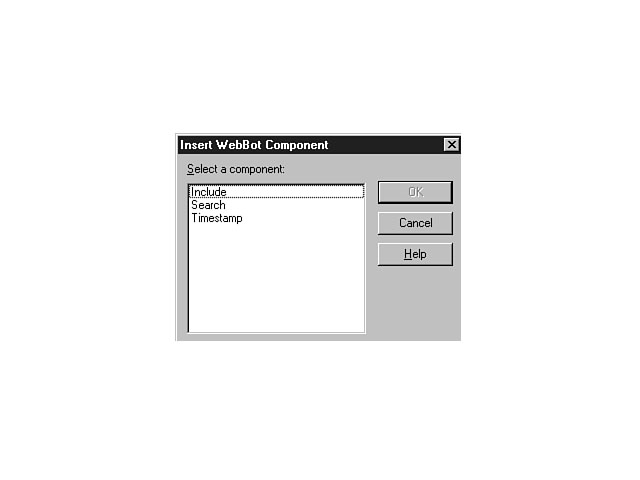
A WebBot program is visually denoted on your page by a distinct mouse indicator. Whenever your mouse encounters a WebBot program, the mouse pointer changes to a robot, indicating that this area includes a WebBot program. To change the WebBot component properties, place your mouse over the WebBot program and right-click the mouse. From the shortcut menu, select the WebBot Component Properties menu item. This option then displays the properties dialog window for the selected component, enabling you to change any of the settings for the WebBot. Figure 5.6 shows the available WebBot components included with the FrontPage Editor for Visual InterDev.
The Insert WebBot Component dialog window.
NOTE: This book is based on the Technical Beta 2 Release of Visual InterDev. In this release, the FrontPage Editor included the WebBot components that are pictured in Figure 5.6. More WebBots may be included in the final release.
Using the FrontPage Editor to Create Your Web Page
You have now learned about some of the more relevant features of the FrontPage Editor for Visual InterDev. This section guides you through the process of using the FrontPage Editor to create your web pages. Along the way, you will see the functions of the Editor and how to use them effectively for your Visual InterDev projects.
Visual InterDev Projects and the FrontPage Editor
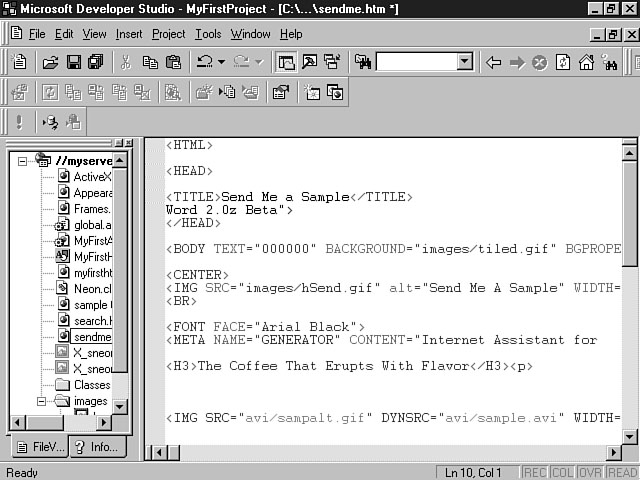
When you use Visual InterDev to construct an HTML file, the newly created file is opened by the HTML Source Editor by default. As mentioned in yesterday's lesson, you can change the editor for the HTML file by selecting the Open With command from the shortcut menu. Once the Open With dialog window is displayed, you can open the file with an editor from the list as well as change the default editor for the file. You will probably want to change the default editor to FrontPage and use this editor for most of your initial HTML web page creation. This method enables you to quickly construct your web pages using the power of the FrontPage Editor. You can always switch back to the HTML Source Editor or another editor during the development process. Figures 5.7 and 5.8 illustrate the difference between viewing a page in the HTML Source Editor and working with that same page using the FrontPage Editor for Visual InterDev.
Using the HTML Source Editor.
Using the FrontPage Editor for Visual InterDev.
You may want to divide up your team into roles that take advantage of each environment. I will be talking more about these roles at the end of today's lesson. The point I want to make now is that Visual InterDev supports the use of both FrontPage as well as other editors to build your HTML web pages and include these pages in your Visual InterDev project. Whether people use the FrontPage Editor for Visual InterDev or the commercial release of FrontPage, the files will be compatible. Content developers can use either product to author their web pages. You can easily integrate these files into your Visual InterDev project.
There are two ways to integrate web pages into your project using the FrontPage Editor for Visual InterDev. The first method involves creating the web page using the New option from the File menu within Visual InterDev. This approach is the safest and most straightforward method for including HTML files into your project. Using this method, you create the new HTML file and then select the Open With command to open it using the FrontPage Editor.
After you press the Open push button, Visual InterDev activates the FrontPage Editor and opens the selected HTML file within the editor's environment.
NOTE: The FrontPage Editor isn't contained within the Visual InterDev environment. In other words, the FrontPage Editor is a separate executable program that can be called from within the Visual InterDev environment. While working on your web page, you operate within the FrontPage Editor's distinct environment. You can switch back and forth between the Visual InterDev and FrontPage environments.
The second approach to using the FrontPage Editor involves using FrontPage to create the HTML web page and then including the file in your project. Under this approach, you first create the HTML page using the FrontPage Editor. Next, you open Visual InterDev and add the HTML file to your project. To accomplish this task, right-click the mouse in the project workspace area to display the shortcut menu.
NOTE: Remember, the project workspace is defined as the pane on the right-hand side of the Visual InterDev workspace. The project workspace displays the list of files in your project.
Once the shortcut menu is displayed, you can select the Add Files menu item. This action displays the Insert Files into Project dialog window. This window enables you to insert the HTML file into your current Visual InterDev project.
NOTE: This dialog window also enables you to insert other types of files including images, Active Server Pages, Java CLASS files, and so on.
Now that you have seen the relationship between Visual InterDev and the FrontPage Editor, it's time to explore the FrontPage Editor in more detail. You have learned how to open HTML files with the FrontPage Editor. The next section focuses on how to use the FrontPage Editor features to construct your web page.
Exploring the File Menu
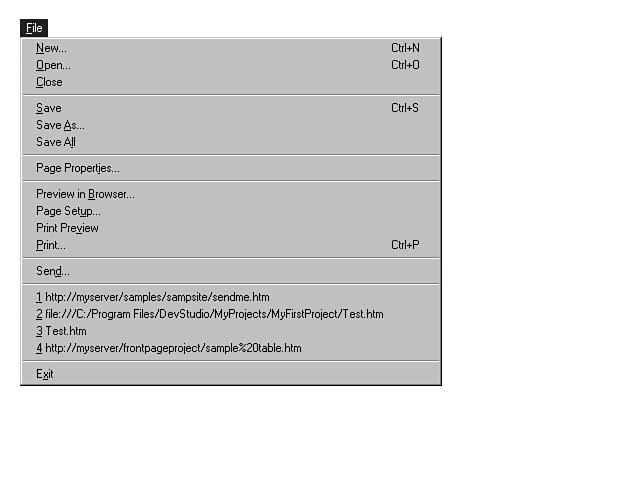
The File menu enables you to open, save, close, and print files. You also can distribute an HTML file via electronic mail. The File menu contains three options for saving files. The Save menu item saves the current file. The Save As option enables you to save the file under a different name or file type. The Save All menu item saves all of the files that are currently open within the FrontPage Editor. When you save a file that is a part of your Visual InterDev project, you are saving it within the context of that project. In other words, you use the FrontPage Editor to save the HTML page. You don't have to re-save it using Visual InterDev. You also can establish page properties, like specifying a background image and background sound for your web page from the File menu.
TIP: You also can access the properties for a web page by placing your mouse anywhere within the page and pressing the right mouse button. This action displays the shortcut menu for the page. Choose the Page Properties menu item to display the Page Properties dialog window.
You can use these same steps for any object, control, or character format. When you select the object and right-click the mouse, a properties menu item that pertains to that particular object is displayed in the list of menu items.
Another way to display the properties dialog window is to select the object and press Alt+Enter.
You can print your web page as well as preview the page in a browser. Selecting the Preview in Browser option from the File menu displays the Preview in Browser dialog window. From this window, you can indicate the browser that you would like to use to preview the page. If a browser that you want to use is not in the list, you can add the desired browser to the list. You also can designate the window size. This feature enables you to test what the page will look like on different size monitors. This type of testing is very important before you deploy your web site. You must be able to accommodate users with different monitor displays and sizes. This feature can help you in that testing effort. Figure 5.9 displays the various options from the File menu.
The FrontPage Editor File menu.
Exploring the Edit Menu
The Edit menu is very similar to the Edit menu in Microsoft Word and other word processing packages. This menu enables you to execute basic editing commands on the page. You can Cut, Copy, and Paste text as well as carry out other editing functions. You also can add bookmarks and hyperlinks to your web pages. Finally, this menu enables you to set the properties for WebBot components. Figure 5.10 shows the available options on the Edit menu.
The Edit menu.
WebBots and hyperlinks are discussed in a later section, but I did want to briefly cover bookmarks here. You can use the FrontPage Editor to create bookmarks for different parts of your web page. Bookmarks enable the user to easily navigate and find different parts of your document. In the same way that you use bookmarks to navigate to your favorite web sites, a user can easily traverse your web sites through the creation of web page links to different sections.
To create a bookmark for your web page, execute the following steps:
- 1. Place your cursor within the bookmark text and choose the Bookmark
option from the Edit menu. The Bookmark dialog window is displayed, enabling you
to create a bookmark. You can either accept the default name for the bookmark or
enter a new name.
2 Press OK to create the bookmark.
3 After you create a bookmark, you need to specify a link. Choose the Hyperlink option from the Edit menu. The Create Hyperlink dialog window is then displayed, enabling you to create a link to that bookmark on the web page.
4.Select the Open Pages tab and choose the web page from the list.
5 Choose the desired bookmark from the Bookmark combo box and press OK.
NOTE: You can create links to bookmarks on your web pages as well as pages on the World Wide Web. When you specify a link to a bookmark on the Web, use a # sign before the name of the bookmark. For example, to access the Overview bookmark for the sample web site below, you would enter:
http://www.nameofsite.com/default.htm#Overview.
Exploring the View Menu
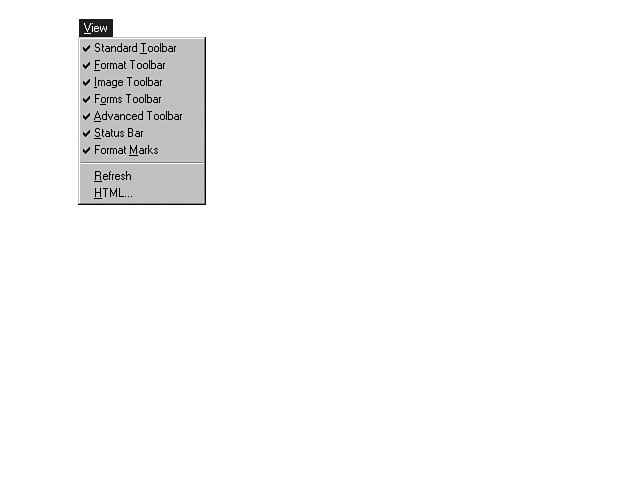
The View menu enables you to customize the layout of the available toolbars. You can choose up to seven different toolbars to display on your title bar area. Some of the available toolbars include a formatting toolbar and a toolbar to include advanced controls like ActiveX controls and Java applets. Figure 5.11 illustrates the toolbars you can use to customize your development workspace.
The View menu.
Exploring the Insert Menu
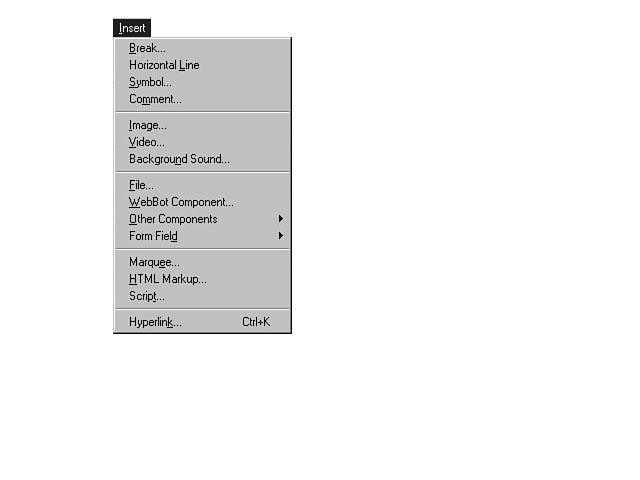
You will be using the Insert menu a lot to design your web page, because it has many useful options. Figure 5.12 shows the list of features and options that are available.
The Insert menu.
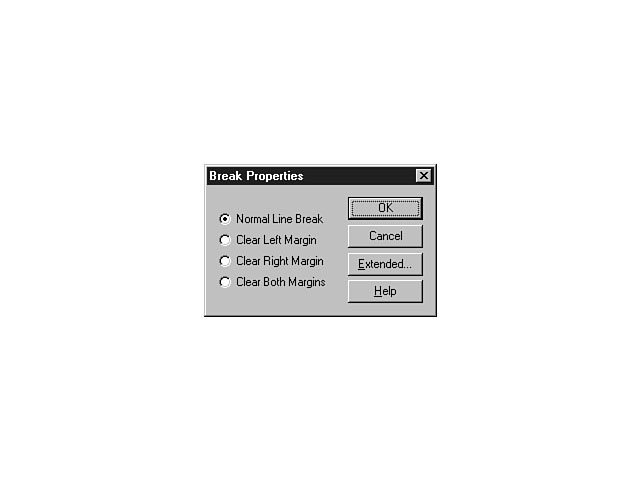
Line Break
The first menu item is the Break command. This option enables you to insert a line break for the text in your web page. Selecting this menu item displays the Break Properties dialog window. Figure 5.13 shows the settings that are available for line breaks.
Formatting line breaks.
From this window, you can format a simple line break. There also are three other options enabling you to further customize the line break. If your web page contains images, you may want to consider these other options. The Clear Left Margin breaks the line and moves the text down to the first available line where there is no left margin, or the left margin is clear. If you don't choose this option, the text could be displayed to the right of an image instead of flush against the left margin.
The other two options are similar in nature. The Clear Right Margin provides a line break at the first clear right margin. The Clear Both Margins operates on both the left and the right margins. The Clear options can be useful, especially when dealing with floating images.
NOTE: Currently, only Microsoft and Netscape support the use of clear line breaks.
Horizontal Line
The Horizontal menu item enables you to place a horizontal line on your web page. Horizontal lines are very helpful in organizing your web page contents and bringing a sense and feeling of order to the user. To insert a horizontal line, place your cursor at the designated position on your web page and select the Horizontal option from the Insert menu. This action inserts a horizontal line. You can edit the properties by double-clicking the line. You also can choose the Horizontal Line Properties option from the shortcut menu for the line. Figure 5.14 shows the properties that you can choose to design the characteristics of a horizontal line.
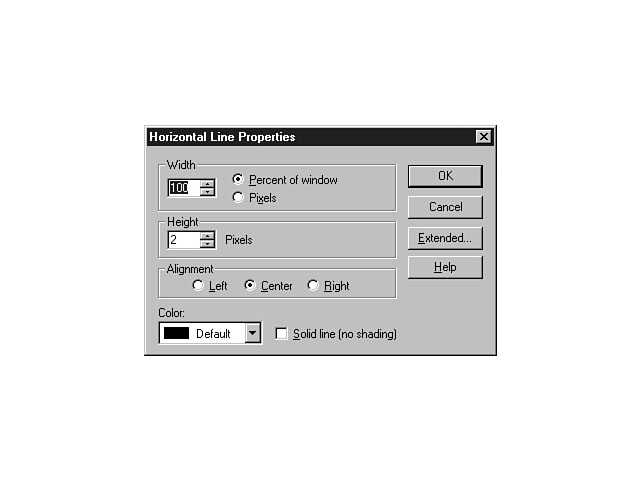
Designing a horizontal line.
From this dialog window, you can set the Width, Height, and Alignment of the line, as well as the Color. You also can designate whether or not you want the line to be shaded (the default is a shaded line). A shaded line looks very good from a design perspective because the line appears to be engraved into the page.
Symbol
You can use the Symbol menu option to use special characters to create your web page. The Symbol option inserts the special character that you select from the list and can be used for HTML tag symbols such as <>.
Comments
The Comments menu item provides a way for you to easily insert comments for your HTML code. When you choose this menu option, a dialog window is displayed, enabling you to enter your comments in a multi-line text box. The FrontPage Editor formats your comments into the web page document. Comments provide an excellent way to document and explain your code. You should definitely use this feature when developing your web pages and applications.
NOTE: The Comments menu option actually uses the Annotation WebBot to format your comments. After you enter your text and press OK, you should notice a WebBot robot when you move your cursor over the text. All comments are displayed in purple.
Images
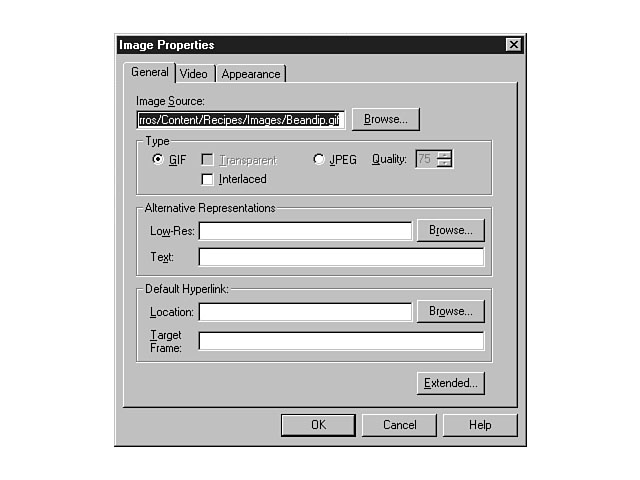
You can insert images into your web page by selecting the Image menu item from the Insert menu. You can choose to insert a local file or reference an image through a URL. To access the Image Properties dialog window, select the image and use the right mouse button to display the shortcut menu for the image. Once displayed, choose the Image Properties menu item. Figure 5.15 shows the available options related to image properties.
Setting the image properties.
This window enables you to set the attributes for the image. The first field on the window displays the source for the image file. The next section displays the file type. If the image is a .gif file, you can set the attributes of the image to be interlaced and/or transparent. An interlaced GIF is an image that is displayed in stages on your web. This property is especially useful for really large files. The user receives a gradual picture of the image and can choose to wait for the full image to display or choose another action like navigating to another place on your site. The benefit is that the user won't have to wait for the full image to be displayed to get a picture of its purpose. Transparent GIFs are displayed with a clear, or transparent, background. The background color for the image is the same as the document background, so the image looks like part of the web page.
You also can convert GIF images to the JPEG format by clicking the JPEG radio button, enabling the Quality checkbox. You can use this checkbox to define the ratio of compression to use versus quality of the image. This setting defaults to 75 on a scale of 1 to 99. A higher number creates a better quality image at the cost of a larger file. You can choose alternative representations for your images. Examples include a lower resolution image or explanatory text for those browsers that can't display graphics.
The last section of this dialog window enables you to designate a hyperlink for the image. You can use this option if the user will click on the image to navigate to another location. You can establish a URL for the hyperlink in the Location field, and can specify a target frame if the user is traveling to a web page that uses frames.
The Appearance tab enables you to set layout and design properties for the image such as Height, Width, Alignment, Border Thickness, and Horizontal and Vertical Spacing.
Image Maps
You also can create image maps within the FrontPage Editor. Image maps enable you to define areas of the image that link to other documents, objects, and web pages. These areas are called hotspots. Each hotspot represents a portion of the image and is associated with a hyperlink to a URL or a target frame. The user can click on different hotspots to navigate to the pre-defined links that you have established. You can create polygonal, circular, and rectangular hotspots using the FrontPage Editor.
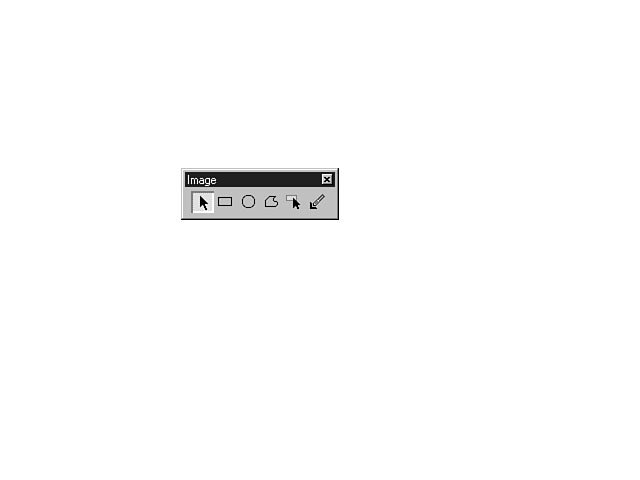
Figure 5.16 displays the Image toolbar, which you can use to create your image maps.
To create an image map, select the image and click on the type of hotspot that you want to create from the toolbar. You use the particular shape to define a specified region of the image for your hotspot. To create a rectangular hotspot, click the Rectangle object on the Image toolbar. As you move your mouse over to the image, you should notice that the mouse pointer becomes a pencil. This pencil enables you to draw your rectangular hotspot onto the image. Click and hold down the left mouse button to position the pencil where you want the first corner to be placed on the image (this corner is the anchor corner). Next, drag the rectangle to cover the portion of the image that you want defined for the hotspot and release the mouse button. This action creates the hotspot and instantly displays the Create Hyperlink dialog window. From this window, you can designate the target frame or URL hyperlink for the hotspot. You also can specify a link to a currently opened page.
Exploring the Image toolbar.
To create a circular hotspot, select the image and click on the Circle object on the Image toolbar. Position your cursor where you want the center of the circle to be placed and click and hold down the left mouse button. Next, drag the object to expand the circumference of the circle to the desired size of the hotspot. When you have designed the circle to be the correct size, release the left mouse button. This action creates the circular hotspot, and as with the rectangular hotspot, displays the Create Hyperlink dialog window, enabling you to specify the links for this hotspot.
To create a polygonal hotspot, select the image and click on the Polygon object on the Image toolbar. Position your cursor where you want the first point of the polygon to be placed and click the left mouse button. Next, drag the pencil to the next corner of the polygon and click the left mouse button again. Repeat this step until you're finished drawing the polygon. When you're finished, double-click the mouse. Again, the Create Hyperlink dialog window is displayed.
You can highlight the hotspots you have defined for an image by selecting the image and choosing the Highlight Hotspots object from the Image toolbar. This feature is very helpful when working with several hotspots for an image. When you use the Highlight Hotspots option, the image becomes clear and a colored outline is drawn around each of your hotspots. When you select a hotspot, the object looks black.
You also can use the Make Transparent object from the Image toolbar. This object enables you to make certain pixels in the image transparent. To use this tool, select the image and choose the Make Transparent object from the Image toolbar. Next, select the part of the image that you want to make transparent. As you move the mouse over to the image, you should notice that the mouse pointer changes to a pencil eraser. When you click on the desired area, the pixels become transparent.
Video
You also can insert video clips and background sound into your web pages. Choosing Video from the Insert menu displays the Video dialog window. This window enables you to enter a video clip file to use with your web page. You can either choose a local file or reference a file from the World Wide Web. The Browse push button enables you to search for the .avi file within your file directory structure.
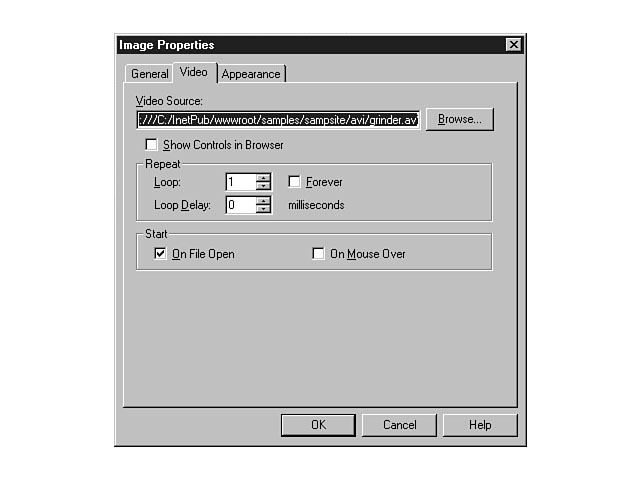
After you choose a video file and press OK, the FrontPage Editor inserts a thumbnail of the file into the web page. You can then access the Image Properties dialog by selecting the video and using the right mouse button to access the shortcut menu. Select the Image Properties menu item to set the properties and attributes for the video clip. This dialog is used for inserting both images and videos. The Video tab displays, by default, enabling you to set the attributes for the video clip. Figure 5.17 illustrates the options that you can set for video clip files.
Setting the properties for a video clip.
The first field on this window verifies the location of the source file. You can choose the Show Controls in Browser to display basic user controls for the video. These controls enable the user to play, rewind, fast forward, and stop the video. The Repeat section of the dialog window enables you to specify the number of times to replay the video. The Loop Delay defines the interval between each loop, or each time the video is replayed.
You can use the Start section to specify when the video begins to play. The options include after the file opens and when the user moves his mouse over the video within the web page. You can choose both of these options. An example of using both options would be if you wanted to play a video clip when your web page is initially opened. You may repeat the clip a couple of times and then enable the user to decide when the clip is played again. In this way the video doesn't dominate or interfere with the user experience. The Appearance tab enables you to set the layout and size attributes for the video frame.
NOTE: The FrontPage Editor doesn't inherently provide a way to insert QuickTime video clips. You can, however, manually place these files into your web pages by using HTML tags.
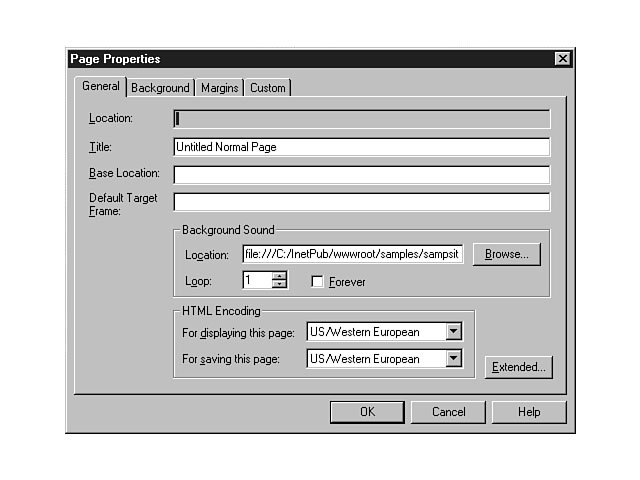
Background Sound
You can add background sound or music to your web page by selecting Background Sound from the Insert menu, which displays the Background Sound dialog window. You can insert a local file or reference a file on the Web. For local files, the Browse push button enables you to explore files from different directories to which you have access. You can then choose a file and press OK. The background sound is then placed within the context of your web page.
To view the properties for the background sound, right-click the mouse anywhere on the web page and select the Page Properties option from the shortcut menu. The Page Properties dialog window is displayed, enabling you to view and edit the attributes for the current web page. The Background Sound section is displayed in the middle of this window. The source file that you insert is displayed in the Location field of this section.
One nice feature of Background Sound is that you can specify how many times to repeat the sound or music. The Forever checkbox enables you to continuously play the file until the web page is closed. Figure 5.18 demonstrates how to set the background sound for a web page, as well as other page properties.
Setting the properties for background sound.
WebBot Components
The Include WebBot automates the inclusion of other web pages into your existing page. For example, you could create a page that has a standard header and footer section for all of your pages. The Include WebBot enables you to merge this standard page with the page you're creating. These pages must exist within the same web.
When you select the Include WebBot component from the components list and press OK, the WebBot Include Component Properties dialog window is displayed. This window enables you to enter the URL reference to include on your web page. The FrontPage Editor retrieves this page from your web and inserts the page into your existing page. You will be able to view but not edit the contents of the inserted page. To edit the inserted page, you must open the original file.
The Search WebBot enables you to include full text searching for your web site. The Search WebBot component enables you to construct a custom Search form for your pages and web site. When you choose the Search WebBot from the components list, the WebBot Search Component Properties dialog window is displayed. This window enables you to design the layout of the Search form. Figure 5.19 illustrates the options that you can choose when designing this form.
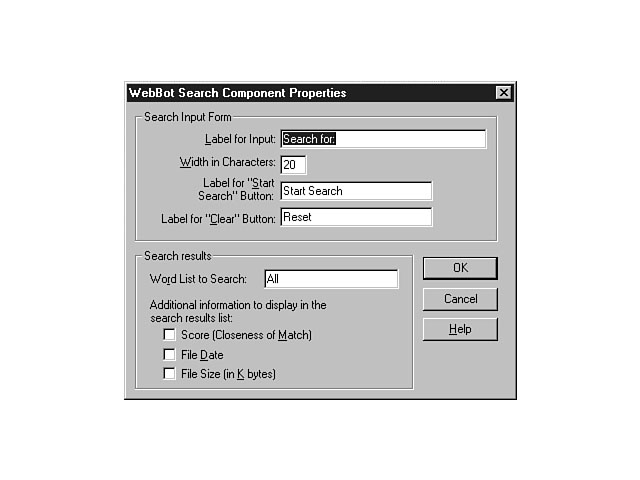
Setting the attributes for the Search form.
The top section enables you to design the layout of the form. You can specify the label text for the search input field and its character width. You also can enter the captions for the push buttons to begin the search and to clear the input field. These fields are set to Start Search and Reset by default. The bottom section of this dialog window enables you to customize the format of the search results. You can display the Score, or the closeness of the match, as well as the size and last creation/modification date for the file. The score is determined by the number of times that a search word is displayed on a page. After you select the properties and press OK, the Search form is inserted on your web page.
Remember, Visual InterDev also enables you to include full text search capability for your web site when you create a new project. The Search page that the New Project Wizard creates is more robust in that the page provides an explanation and specific instructions to the user about how to conduct the search. You will probably want to use the Visual InterDev Search.htm file when designing full text search features for your web site.
The TimeStamp WebBot enables you to indicate the last modification date and time of the web page. A timestamp can be very helpful to your users, letting them know the last time your web page information was updated. When you choose the TimeStamp WebBot from the components list, the WebBot TimeStamp Component Properties dialog window is displayed. From this window, you can choose to show either the last time the page was edited or the last time the page was automatically updated. The last time the page was edited refers to the last time you saved the file to the server. The last time the page was automatically updated consists of the previous event as well as when the page was last uploaded to the server and when the page's links were recalculated.
You can choose from many display formats to display the date and time. You can display none, one, or both of these fields. If you choose none for both the time and the date field, however, you negate the benefit and purpose of the timestamp. When you press OK, the timestamp is placed on your web page.
ActiveX Controls
The FrontPage Editor supports the use of ActiveX controls within your web page. Select the Other Components menu item to display a sub-menu list of other components. From the sub-menu, choose the ActiveX Controls item to display the ActiveX Controls Properties dialog window. Figure 5.20 displays the window for setting the attributes for your ActiveX control.
The top section of this window enables you to pick the ActiveX control and specify a name for this control. Once you have chosen the control, you can complete the other sections. The Layout section enables you to adjust properties for the control like the Alignment of the control, the Height and Width, the Horizontal and Vertical Spacing, and the thickness of the border for the control. The Alternative Representation field enables you to provide alternate HTML for those browsers that don't support ActiveX controls. You can use the Network Location field to specify a World Wide Web location for an ActiveX control and its associated data for controls that haven't been installed on the client machine.
WARNING: ActiveX controls must be installed on the client machine in order for your web pages to use them.
Choosing the ActiveX Control properties.
The Properties push button to the right of the Pick a Control combo box enables you to further establish attributes for the control. For example, the Common Dialog control has different features from the Data Command control. The Properties push button takes you to a dialog window specific to the properties of that control. Based on the ActiveX control you select, you should be able to set the proper attributes.
Java Applets
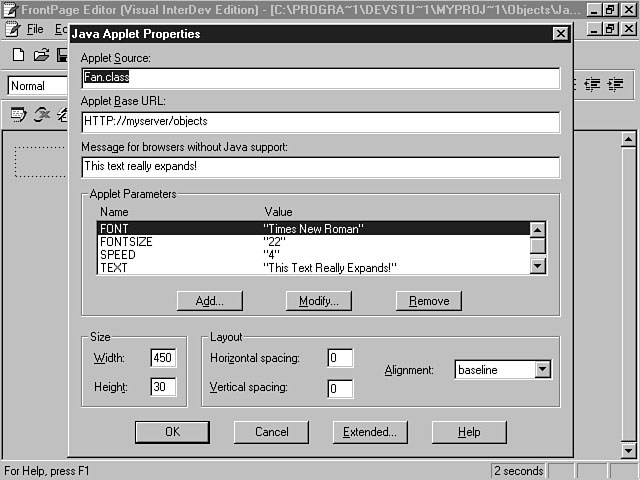
The method to insert Java applets is similar to that of ActiveX controls. To insert a Java applet, choose the Java Applet menu item from the list of other components. The Java Applet Properties dialog window is then displayed. Figure 5.21 displays the available properties for Java applets.
This dialog window is similar to the ActiveX Control Properties dialog in that you specify the size and layout settings for the applet. The top part of the window enables you to designate the name of the applet and the URL location. Also, you can establish parameter values to be used by the applet and a message for browsers that don't support Java applets. After you establish the properties for the Java applet and press OK, the FrontPage Editor places an icon on your web page to designate the position of the applet. You must use the Preview in Browser function to view the results. Figure 5.22 shows a web page that contains a Java applet using the FrontPage Editor.
Setting the Java applet properties.
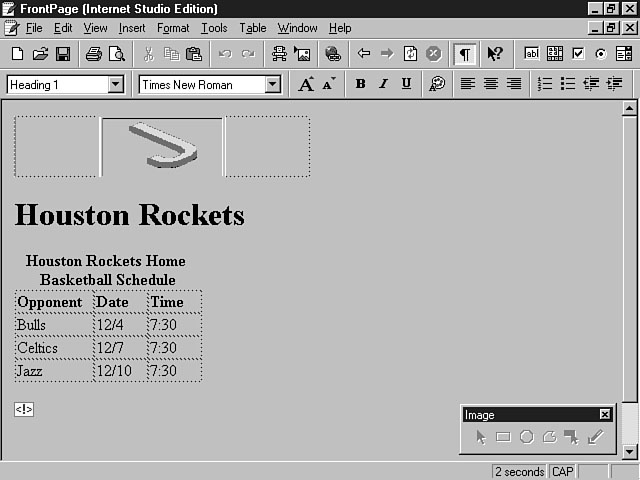
The FrontPage Editor displays an icon as a reference to the Java applet.
Plug-Ins
You can use plug-ins to support your web page. To insert a plug-in, choose the Plug-In option from the list of other components. This action displays the Plug-In Properties dialog window, enabling you to select the data file for the plug-in that you're going to use. From this dialog, you also can configure the size and layout as well as the message that will be displayed for browsers that don't support the use of plug-ins. You have the option of hiding the plug-in so that the plug-in is only displayed when it's activated. For example, you might want to show only a video player when the user chooses to view the video clip on your web page. Figure 5.23 displays the options for customizing plug-in objects.
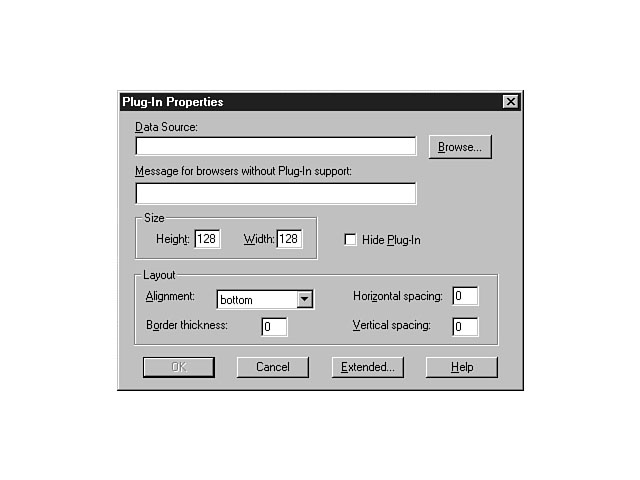
Setting the plug-in attributes.
Marquee
The Marquee option enables you to display a marquee, or scrolling text, on your web page. This feature is a Microsoft extension to the HTML 3.x standards. When you select the Marquee option from the Insert menu, the Marquee Properties dialog window is displayed. Figure 5.24 highlights the options for adding a marquee to your web page.
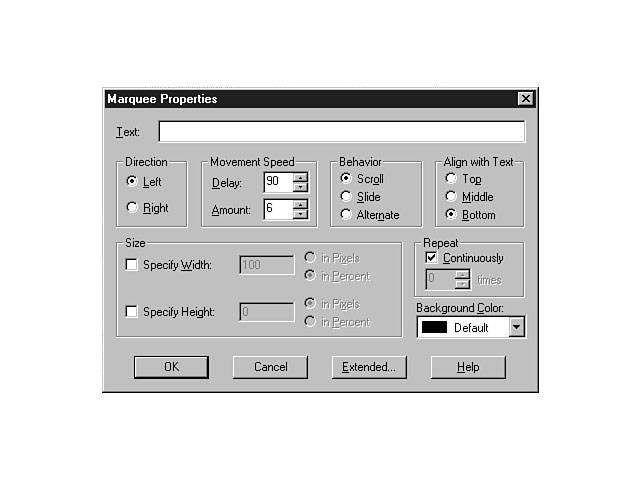
The Marquee Properties dialog window.
From this window, you can enter the marquee's contents in the Text field. Once you have specified the text that will be displayed, you can establish the marquee's behavior by configuring a variety of settings. The Direction section enables you to specify which way the text will scroll, while the Movement Speed indicates how fast the text will scroll. The Behavior section defines how the text will scroll. The Scroll option permits the characters to scroll across the page, and the Slide option causes the text to slide across the screen and stop. Finally, the Alternate option allows the text to slide back and forth across the page.
The middle section of this dialog window seen in Figure 5.24 enables you to define the size, including the height and width. Using the Repeat section, you can design the marquee to display continuously or to repeat a certain number of times. You also can set the background color of the marquee.
HTML Markup
The HTML Markup feature enables you to enter HTML tags and code that isn't directly supported by the FrontPage Editor. This code isn't validated by the FrontPage Editor and is denoted by the <?> tags. This command uses the HTML Markup WebBot to insert the non-supported HTML code.
Script
You can use the Script menu item to enter VBScript or JavaScript for your web page. When you select this option, you see the Script dialog window, from which you select the script language. The choices are VBScript, JavaScript, or Other. The VBScript option is selected by default. If you choose VBScript as the scripting language, you also can decide if you want to run the script on the server. The Script Wizard can be used for both VBScript and JavaScript. The FrontPage Editor Script Wizard is the same Script Wizard that is included with Visual InterDev.
Hyperlinks
You can use this option to create a hyperlink to another web page. The page destination could be a page within your web site or a page at another web site.
Both relative and direct links can be used between web pages. A relative link is used to access pages within your web server. With a relative link, you don't specify the full URL address, because you already know the protocol and have access to the web server's files. When you use a relative link, you're accessing the linked page in relation to the current page. There are several ways to specify a relative link. Table 5.1 illustrates different types of relative links and their meaning to the browser.
Table 5.1. Relative link options.
| Relative Link | Browser Action |
| Page.htm | Link to a file in the current directory |
| ../Page.htm | Link to a file in the parent directory |
| Within/Page.htm | Link to a file in the Within sub-directory |
| ../../Page.htm | Link to a file two directories above current directory |
A direct link indicates the full path name for the linked file. You don't have to specify the protocol for files that exist on local web servers. Table 5.2 illustrates two ways to designate a direct hyperlink.
Table 5.2. Direct link options.
| Direct Link | Browser Action |
| http://www.AC.Com/ | Link using the full URL |
| http://www.AC.Com/ | Link using full path name and filename |
| /AC.Com/outlook/o_frintro.htm | Link without the protocol |
To create a hyperlink, choose the Hyperlink menu item from the Insert menu. The Create Hyperlink dialog window is then displayed. The World Wide Web tab is the default display and enables you to specify the Hyperlink Type and URL address. You also can specify a Target Frame if you're linking to a page that uses frames.
An Overview of a Web Page Development Team
The final thoughts for the day surround an overview of a typical Web development team. The reason for discussing the topic in this lesson is to show how the FrontPage Editor and Visual InterDev work together to facilitate the development process. The following sections discuss possible development team member roles and tasks, and conclude with information about how the work can be integrated using Visual InterDev and its associated products.
Understanding the Roles of a Typical Development Team
Most Web development projects consist of the same types of team-member roles. The ratio of team member to role may not be a one-to-one correspondence. The same person might serve in multiple capacities due to the size of the project. Also, the scope of the project may determine that a role isn't needed. The following roles are typical for almost every Web-based application development effort:
- Designer
- Content Author
- Application Developer
- Graphic Artist
- Database Developer
- Architect
- Project Manager
Each of these roles is explained in detail in the following sections.
Designer
The main goal of a designer is to translate user requirements into the design of the Web application. This person is responsible for initially gathering the requirements from the users or target audience. The designer then takes these requirements and builds the design of the web site. Taking the technical competence of the users into consideration, the designer creates an effective user interface design and metaphor for the application. Finally, the designer works with all of the other roles to communicate the needs of the application's intended audience.
The designer should possess good communication and interpersonal skills because he or she has to communicate technical concepts to the users in simple terms. Similarly, this person should understand the technical implications of the design that is built and be able to communicate with the other, more technical members of the team about these issues. The designer is a key point person for ensuring the success of the application. You must begin with a good design for your web site. Permeating a bad design throughout the development process can be disastrous.
Content Author
The content author is usually a subject-matter expert about the business. This person also could be a marketing-type professional who knows how to effectively communicate the messages of the business. The person who fulfills this role will differ based on the type of Web-based application being built. In general, the content author participates in the development of the application by providing knowledge about the business or organization. This person also plays an active role in writing the content of the web pages.
Application Developer
The application developer is responsible for programming the logic of the application. This person translates the application design into technical specifications. An application developer should have a technical background and be very knowledgeable about the different technologies for developing Web-based applications. Application developers have different skill sets and backgrounds as well as levels of technical prowess. Roles for application developers can include developing the more advanced HTML code, programming the scripting and application processing logic, and developing advanced server programs like Active Server Components.
Graphic Artist
The graphic artist can make or break a web site. Your project may not have the luxury of including a professional graphic artist. This role, however, should be assigned to a person who understands basic concepts of graphics and the Web. This person should possess excellent user interface design skills. Also, this person should understand how to create and use effective images for your web site. The graphic artist also should understand the technical implications of implementing graphics on a web page. This person works with the designer, content author, application developer, and architect very closely.
Database Developer
The main role of the database developer is to translate the user and application requirements into technical requirements for the database. The ideal situation involves separating the role of database developer and database administrator. The database administrator creates the logical and physical design of the database and administers the database during the entire application development process. The true database developer focuses on programming the more extensive application code for interacting with the database. The database developer can create and test stored procedures and triggers for the database as well as dynamic SQL within the application. Some team members assume both the database developer and application developer roles if the individual is well-versed in both application- and database- programming.
Architect
The architect is responsible for ensuring the technical accuracy and quality of the architecture and infrastructure for the application and web site. This person should have deep technical knowledge and skills in the areas of networking and architecture concepts concerning the Internet and the World Wide Web. This person serves as the backbone to implementing a great application, and works closely with the database developer, application developer, and designer to understand the application goals. The architect then builds an architecture and infrastructure that can support the needs of the application.
Project Manager
I saved this role for last, and not because the project manager is not performing any work. On the contrary, this role is very critical to the success of any project. This person must work with all of the other team members to ensure that the application development project is a success. The project manager must possess good communication and interpersonal skills and be able to understand everything to some degree. The project manager must be able to communicate with all of the other team members on both a technical and functional level. This person must possess excellent decision-making and problem-solving skills and be able to resolve issues between competing application requirements and, sometimes, competing team members. Finally, the project manager must be able to properly plan the development effort and ensure that the project keeps on track.
Understanding the Role of Visual InterDev
Now that you have learned about the different roles of a development project, I want to focus specifically on how Visual InterDev can facilitate the efforts of the different team members.
As you have learned over the last few days, Visual InterDev provides several HTML editors for designing and developing the content of the web pages. The FrontPage Editor provides an excellent tool for the content author to generate the web pages for your site. Whether the content author uses the commercial version of FrontPage or the FrontPage Editor for Visual InterDev, the results can be used with your Visual InterDev project. An application developer can use Visual InterDev to integrate application logic in the form of client- and server-side scripts with these HTML web pages.
The database developer can use the Visual Data Tools to easily incorporate database interaction. The graphic artist can use the Image Composer to create professional-looking images and graphics for the web pages. Once created, these images can be included in your Visual InterDev project.
Visual InterDev is an excellent tool for both consolidating the various technologies of the Web and integrating the different roles of a development project.
Summary
Today's lesson has been packed with knowledge. You have learned about a very robust and powerful tool that can definitely enhance your productivity. The FrontPage Editor can be appreciated by both content authors and developers. Content authors can acknowledge the FrontPage Editor for its ease of use, and developers appreciate the time that the FrontPage Editor saves them in creating the routine HTML code.
This morning, the lesson introduced you to the FrontPage Editor for Visual InterDev. You learned about the benefits of the FrontPage Editor and its visual WYSIWYG environment. Next, you learned in detail about the features of the FrontPage Editor, discovering some of the more robust aspects of the editor, including character formatting, tables, forms, images, and advanced controls. Toward the middle of the day, you received a guided, in-depth tour of how to use the FrontPage Editor to construct your web pages. At the end of the day, you learned about some of the typical roles on a Web development project and how Visual InterDev and the FrontPage Editor can facilitate these roles.
So far, the topics have focused more on left-brain topics. Tomorrow, be prepared to use your creative right brain as you explore the world of images and multimedia.
Q&A
- Q Is the FrontPage Editor exactly the same as FrontPage 97?
AThe FrontPage Editor for Visual InterDev is an implementation of FrontPage 97. They aren't the same product. The FrontPage Editor and FrontPage 97 are completely compatible, however. The FrontPage Editor includes most of the functionality of FrontPage 97. You may notice some FrontPage 97 features that aren't included in the FrontPage Editor for Visual InterDev. The good thing is that you can use either product and integrate the results with Visual InterDev projects.
Q How do I view my HTML source code once I have constructed a web page using the FrontPage Editor
AYou can use either the FrontPage Editor or the Visual InterDev HTML Source Editor to view and manipulate your generated HTML code. Within the FrontPage Editor, you can choose the View menu and select the HTML menu item. The View or Edit HTML dialog window is then displayed. This window displays the generated HTML and, as the name suggests, enables you to view and edit the HTML code. You also can choose to open the HTML page from within Visual InterDev using the HTML Source Editor. Select the file and choose the Open With item from the shortcut menu.
Q Does the FrontPage Editor support the use of other image formats besides GIF and JPEG
AThe FrontPage Editor enables you to choose other image formats besides the GIF and JPEG format. These other formats include BMP, TIFF, PCX, WMF, RAS, TGA, EPS, and PCX. The FrontPage Editor converts these images, however, to the GIF or JPEG format based on the number of colors in the image. The GIF format is used for images with 256 or less colors. The FrontPage Editor converts images with more than 256 colors to the JPEG format.
Workshop
Now that you have become familiar with the FrontPage Editor, you are going to create a web page using some of the techniques and features that you have learned so far. The objective of this lesson is to help you understand and learn how to use FrontPage in your development effort. You get to choose the idea and content for the web page. You should build several web pages that use the following features:
- A bulleted list
- Tables
- ActiveX controls
- Images with hotspots
- Horizontal lines
- Special character formatting like bold and centered text
Quiz
- 1. Name two types of advanced components that you can insert into your
web page using the FrontPage Editor.
2 What are the three types of hotspots that you can create for your image maps?
3.What is the difference between an application developer and a content author?
4 What does WYSIWYG stand for?
5.What is the difference between a relative and a direct link?
Quiz Answers
- 1. Possible answers include:
- ActiveX controls
Java applets
Plug-ins
PowerPoint animation
2 Rectangular, circular, and polygonal.
3 An application developer is responsible for coding the script and programming logic and components for the application. The content author usually generates and constructs the HTML content for the web pages.
4.WYSIWYG stands for What You See Is What You Get.
5.A relative link is used to view web pages that are local to a web server. You don't have to use the full path name with a relative link. A direct link is used to specify the full path filename for a file. - ActiveX controls
![]()
![]()
![]()
![]()