
Day 18
Managing Your Web Site Files with Visual InterDev
During the last three weeks, you have absorbed a lot of information about the creation of web pages and components to include in your Web-based application. You should now possess the knowledge to be able to create a variety of essential items to build the killer app. Given this newfound ability, how in the world are you going to manage the plethora of files that you develop for your application?
This lesson answers that question by presenting the robust site management tools that are included with Visual InterDev. These tools contain some highly integrated features that can help you organize your site and create order out of chaos.
The first lesson for the day teaches you about the Link View. You will learn how to use the powerful view to get a handle on all of the files contained in your web site. Next, you will learn how to leverage your web site development to other Web-based applications and sites that you create. Visual InterDev provides some powerful features for copying portions of all of your web site to other directories or web servers. The lesson then demonstrates the proper management of the different files contained in your web site, including web pages, databases, images and multimedia, and other objects and components. The final lesson for the day teaches you how to use the features of Visual InterDev to repair broken links within your web site.
Getting a Handle with the Link View
The Link View presents a new way to look at your web. This exciting and powerful feature enables you to truly get a handle on all of the files that are contained in your Web-based application. The Link View provides a graphical tool that enables you to visually examine the files within your web site and their relationships. You have the ability to expand or contract the view to explore different aspects of your site. For example, you may want to focus solely on a certain section or group of web pages or objects. The Link View gives you the power to pick the right view for your needs. In addition to viewing the relationships, you also can use the Link View to identify the file types for each of the items in your application. This feature includes everything from HTML web pages to Java applets. In short, the Link View provides a rich, graphical tool to help you conceptualize the design of your web site.
Exploring the Link View Features
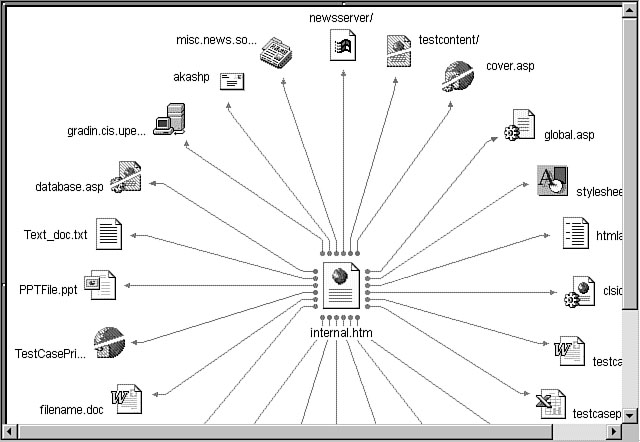
The Link View not only presents a comprehensive picture of your web site, it also enables you to interact with your web site objects from within its view. Figure 18.1 illustrates the power of the Link View as it graphically displays a sample web site.
This illustration depicts a highly robust web site that includes just about every type of file imaginable for a Web-based application. You can see that graphical icons depict the file type for each item in the view, while lines and arrows indicate the relationship between the files. The arrows and circles located at the ends of the lines serve as visual indicators that describe the nature of the relationship. A circle next to an object indicates that it is the parent, and the arrow next to an object signifies that it is the child.
From Figure 18.1, you can determine that the HTML web page named internal.htm is the parent of all of the surrounding files. You can describe the relationship another way by stating that the global.asp. file is the child of the internal.htm web page. In other words, the ASP file is a part of the web page. As with every relationship, you will have times when the communication link is broken. The Link View graphically displays these broken links in red, indicating that there is a problem. You can use the Link View to see both links to objects within your web site as well as links to external sites such as a news server or a site on the Web.
Getting a clearer picture with the Link View.
The Link View enables you to see a multitude of files, including HTML web pages, images and sound files, ActiveX controls, Java applets, and HTML layout files. You can basically examine any file that is a part of your web site using the Link View. From the Link View, you can then select and edit an object using its default editor. You also can choose to browse a web page from within this view and filter the Link View to see only the files of a certain type. This filter enables you to work with a discrete number of files contained in your web site, thereby simplifying the site management process.
The object contained in the middle of Figure 18.1 appears with a large icon, while all of the surrounding items display with smaller icons. The large icon signifies that the developer opened a Link View for this object. You will learn more about opening a Link View in the next section.
Opening a Link View
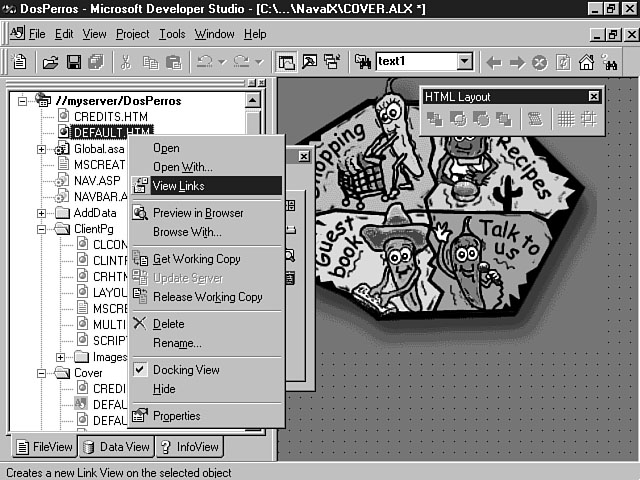
You can view a web site object using the Link View by selecting the file in the Visual InterDev project workspace and clicking the right mouse button to display the shortcut menu, as shown in Figure 18.2.
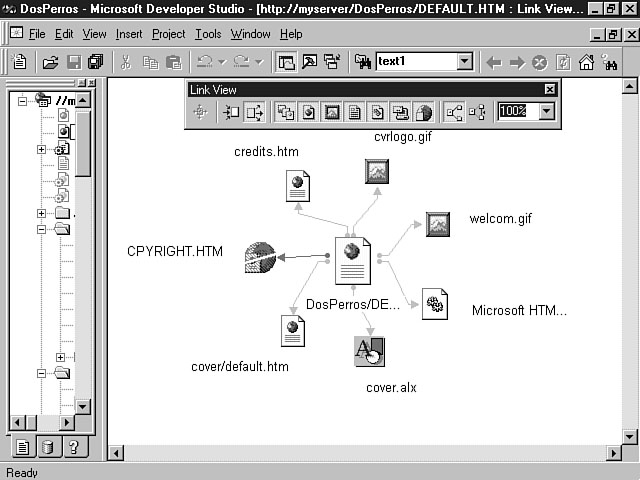
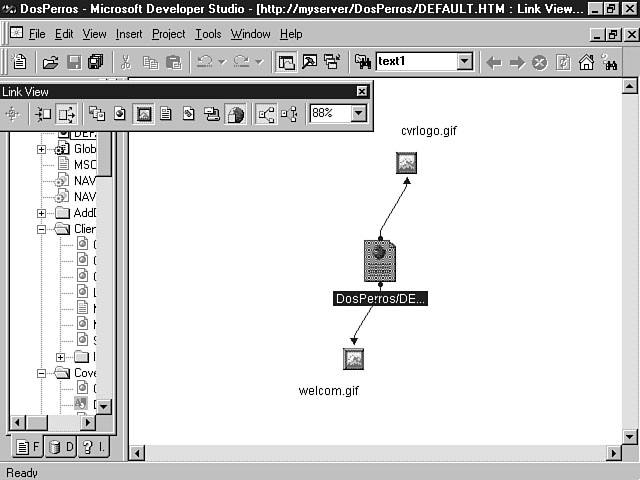
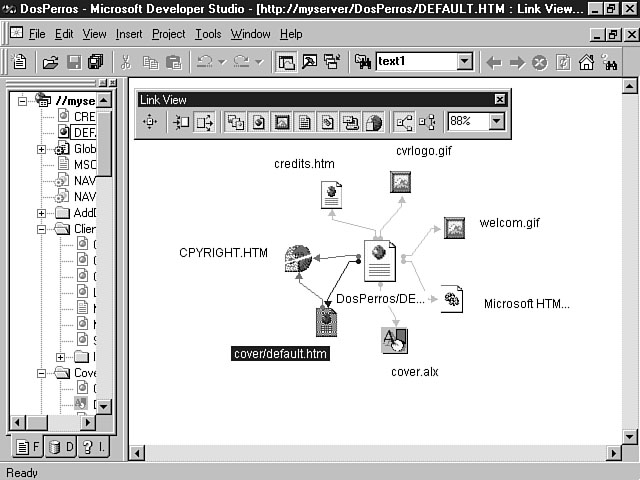
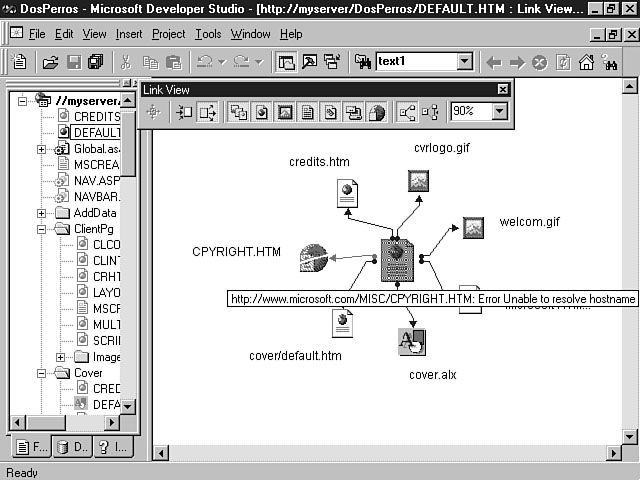
You can then select View Links from the shortcut menu to display a Link View for the file. Figure 18.3 depicts the Link View for the default web page used in the Dos Perros sample application included with Visual InterDev.
Opening a file with Link View.
Viewing the links.
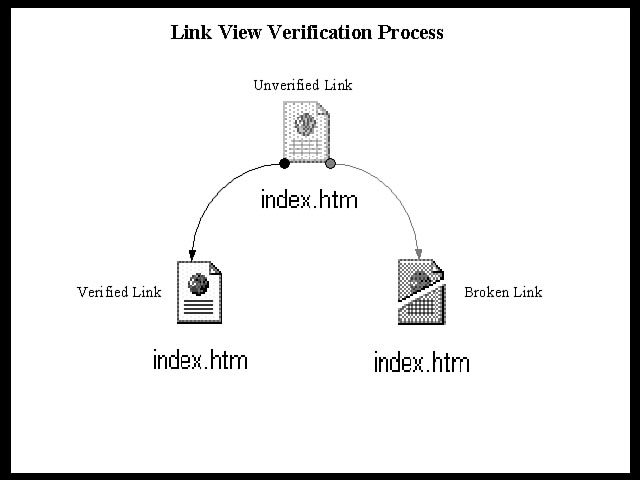
As you can see, the Default.htm consists of several GIF images, an HTML layout file (cover.alx), and several additional HTML files. The link to the CPYRIGHT.HTM file appears in red, indicating that the link to this file is broken. You should notice that the icon for this file is red and appears broken. When you open a file to view its links, the Link View initiates a verification process that gathers information on all of the object's associated files, including their file type and the nature of their relationship to the selected object. Figure 18.4 demonstrates the state and appearance of the associated files as they progress through the verification process.
The visual progression of an object.
The file located at the top of the illustration represents a file whose relationship link hasn't been determined. Notice that it looks grayed out. After the Link View verifies the relationship, the icon is either displayed in its natural color, indicating that the link has been verified and established, or the icon appears red and broken, signifying that the link relationship has been broken.
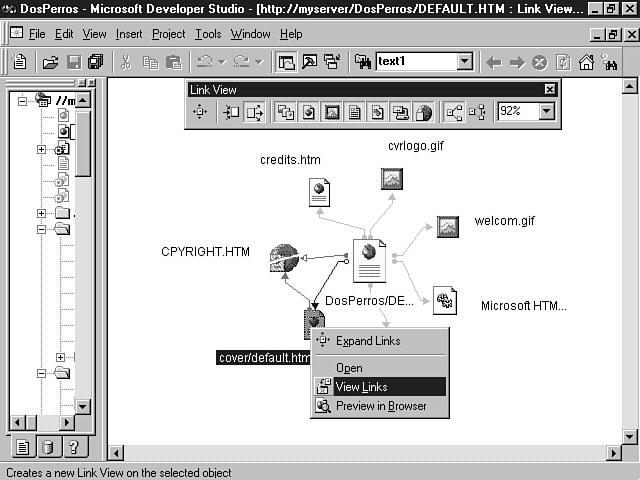
You can open a Link View on any object that appears within the Link View diagram. This feature enables you to drill down to obtain a picture of your web site's hierarchy. To accomplish this task, select the desired object within the Link View diagram and right-click the mouse button. The shortcut menu will be displayed for the object, enabling you to select View Links, as shown in Figure 18.5.
Drilling down on your web site.
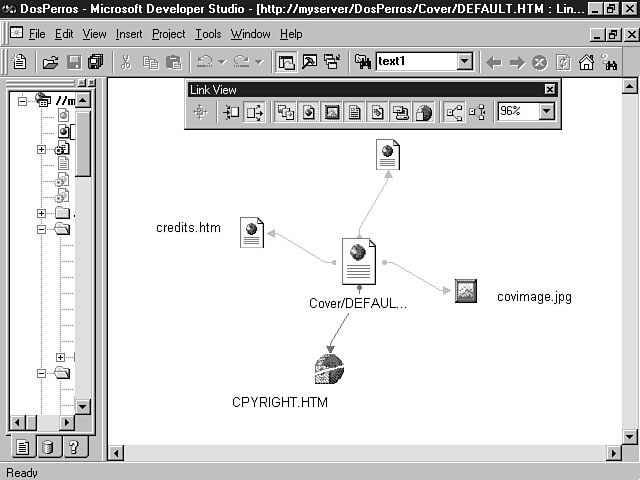
Once you select the View Links menu item, a Link View diagram is created, enabling you to view the selected object and its related files, as depicted in Figure 18.6.
Viewing another object's links.
You also can view the links for any URL address by choosing the Tools menu and
selecting View Links on WWW. You are then prompted to enter a URL address for the
web page that you want to see in the Link View. This feature is helpful when you
want to examine the structure of a web site without having to open the project within
Visual InterDev. You can use this feature for your own internal intranet addresses
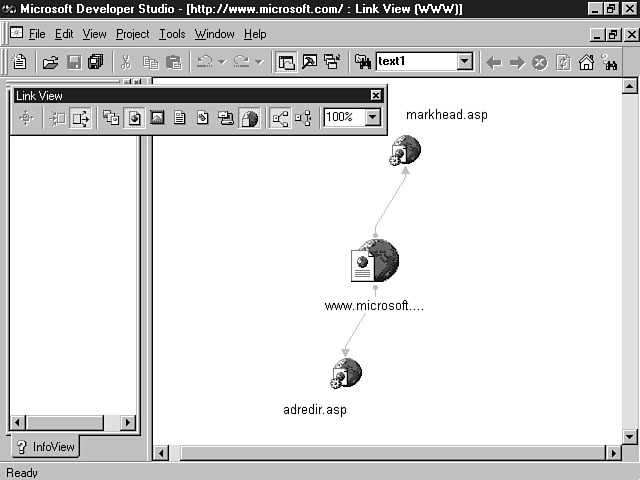
as well as for external Internet URL addresses. Figure 18.7 depicts a Link View diagram
for the Microsoft home page.
Figure 18.7.
Viewing the links for a URL on the Web.
TIP: Once a Link View diagram has been created, you can choose the appropriate display size for the diagram by using the Zoom Link View icon on the View Link toolbar. This tool enables you to choose different percentages for the diagram display, which means that you can zoom in and zoom out on the objects. You can select a default value or enter a custom value for the zoom percentage. You also can select Fit from the drop-down listbox, which fits the Link View diagram into the Link View display area.
Filtering Your Link View
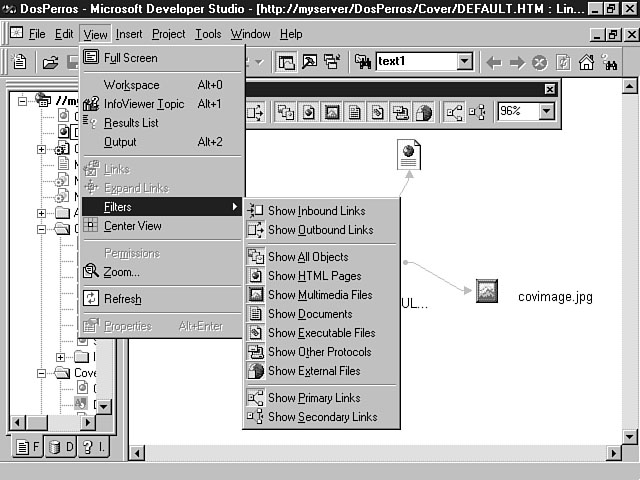
The Link View enables you to filter the amount and type of information displayed in your diagram, so you can more easily decipher and understand your web site structure. You can choose Filters from the View menu to display a menu list of available filter choices as depicted in Figure 18.8.
As you can see, Visual InterDev provides many choices to filter the objects that are displayed within your Link View diagram. Table 18.1 provides an explanation for each of the filter options that are available.
Selecting a filter for your Link View.
Table 18.1. Filter categories.
| Category | Description |
| Show Inbound Links | Displays the inbound links; in other words, the children of the parent object |
| Show Outbound Links | Displays the outbound links; in other words, the objects that the parent links into (the parent's parent) |
| Show All Objects | Displays all objects |
| Show HTML Pages | Displays HTML web pages |
| Show Multimedia Files | Displays images and multimedia files |
| Show Documents | Displays documents files (MS Word, PowerPoint, and so on) |
| Show Executable Files | Displays program files such as EXEs and DLLs |
| Show Other Protocols | Displays links to non-HTTP objects, such as news servers, Mail, and Telnet |
| Show External Files | Displays objects external to the project |
You can use any of these filters to limit the types of files that are displayed in your Link View diagram. Initially, all of the available items will be enabled. Selecting a filter option from the list toggles the choice on and off. For example, in order to show only images and multimedia files in your diagram, you would need to turn off all of the other filter choices by selecting them. Figure 18.9 depicts the decision to display only multimedia files and how that affects the view of the default page for the Dos Perros application.
TIP: Each of these menu items is displayed and can be executed from the View Link toolbar.
NOTE: The process of toggling options on and off to filter the items on your diagram is counterintuitive to the captions that are displayed for these menu items. You would think that selecting Show Multimedia Files would limit the display to only images and other multimedia items. Instead, selecting this option when it's enabled hides your multimedia files. This behavior was exhibited in the Release Candidate 2 of the product. Hopefully, the final version or the next revision will address this usability issue.
Viewing the images.
Working with Links
The default Link View diagram displays all of the primary links for the selected, or expanded, object. Primary links consist of those objects that are directly related to the expanded object. You also can choose to view the secondary links within your diagram. These links identify the relationships that exist between the objects that are displayed in the diagram. For example, several web pages may share the use of an image that is displayed on all of the pages.
For the sake of example, call the web pages Page1, Page2, and Page3 and the image Shared.gif. Page1 is the default page for the web site and contains the Shared.gif image and links to Page2 and Page3. If you opened a Link View diagram for Page1, the primary relationships for Page1 would exist with Page2, Page3, and Shared.gif. The secondary links would exist between Page2 and Shared.gif and between Page3 and Shared.gif. Figure 18.10 logically depicts these relationships.
Conceptualizing primary and secondary links.
New Term: A primary link represents a direct relationship between an expanded object and one of its associated objects.
New Term: A secondary link indicates a relationship between two or more of the associated objects for an expanded object.
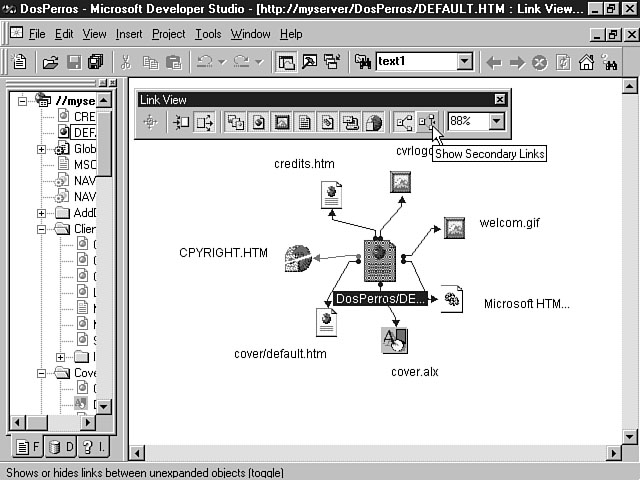
Now that you understand the concept of primary and secondary links, it's time to look at a live example in the Link View. You can display the secondary links for an expanded object by clicking the Show Secondary Links icon on the Link View toolbar, as shown in Figure 18.11.
After you have selected this option, the secondary links for the expanded object are displayed in the diagram.
TIP: The Show Secondary Links icon serves as a toggle button. To turn off the display of secondary links, click the Show Secondary Links button again.
Choosing to view the secondary links.
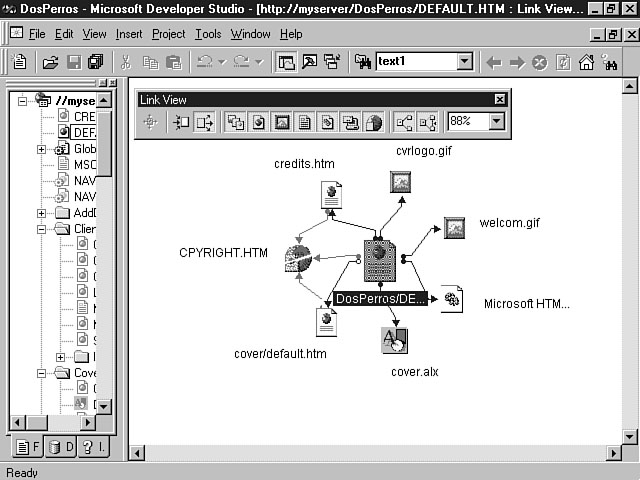
Figure 18.12 illustrates the primary and secondary links for the Dos Perros default page.
Viewing the primary and secondary links.
The common denominator in this diagram is the copyright page, which is shared among the three web pages. As you can tell, the link to this page is still broken. You learn how to repair this link during the final lesson for the day.
NOTE: You can click the Show Primary Links icon on the View Link toolbar to toggle the display of the primary links for the expanded object. Although it defeats the purpose of expanding the object in the first place, you can click this icon to hide the display of the primary links. Clicking the button again reveals the primary links for the expanded object in the diagram.
Working with Objects
The purpose of opening a Link View for your objects is to examine and understand the structure and relationships that exist within the web site. Upon further review of your site, you may want to interact with the objects contained in the diagram. The Link View enables you to directly access the object and activate the default editor for one or more objects. When you select an object in the diagram, the diagram changes to reflect the link relationships for this object, in addition to the originally expanded object, as shown in Figure 18.13.
Selecting an object.
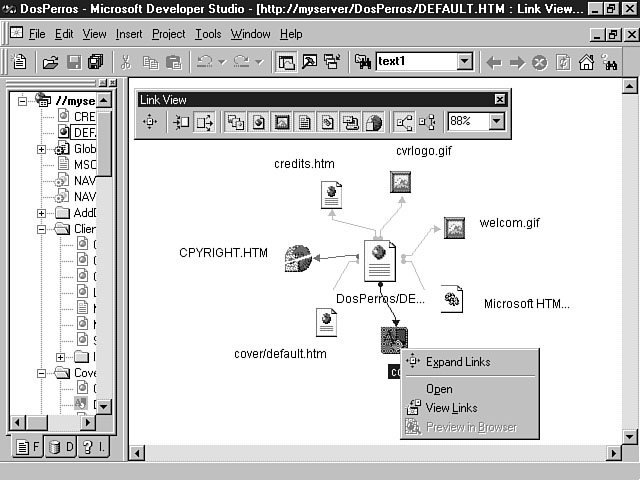
Once the object is selected, you can click the right mouse button to display the shortcut menu. For example, Figure 18.14 depicts the shortcut menu for an HTML Layout file.
Opening the object from within the Link View.
Figure 18.14 displays the menu options that are available for all Link View objects. The Preview in Browser option is disabled, because you can't view HTML Layout files in a browser. Table 18.2 lists and describes each of these options.
Table 18.2. Object shortcut menu options.
| Menu Item | Description |
| Expand Links | Expands the diagram to include the links of the selected object |
| Open | Opens the object using its default editor |
| View Links | Creates a new Link View diagram for the object |
| Preview in Browser | Enables you to preview the web page using the default browser |
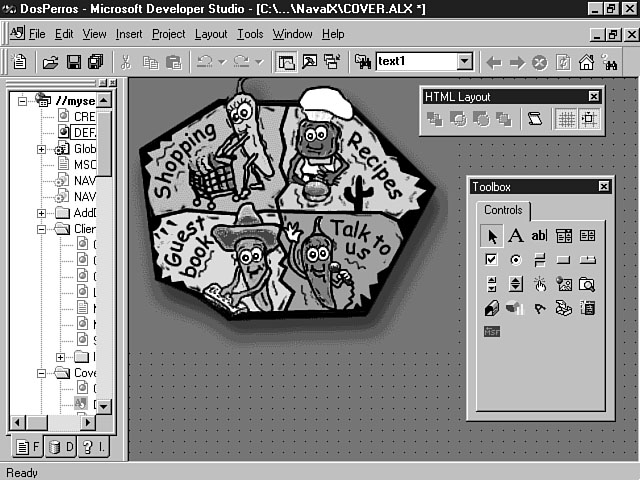
Figure 18.15 demonstrates the results of choosing to open the .alx file from the
shortcut menu in the Link View.
As you can see from the illustration, the selected .alx file is opened using the HTML Layout Editor, enabling you to make changes to the layout.
Editing the object.
You have just learned how to select and edit a single object. You can also select multiple objects in the Link View diagram by holding down the Ctrl (Control) key and clicking the left mouse button on each object that you want to select. After you have made all of your selections, you can click the right mouse button to choose an action. For example, you may want to open and work with an image and a web page at the same time. You can select both the image and the HTML web page file from within the Link View and choose Open. Both of these objects are opened with their respective default editors, enabling you to make any necessary changes.
Another example involves expanding the links for your objects. You may want to expand the links for a portion or all of your web site to gain a comprehensive look at its structure. In this case, you could individually select the objects using the previously described method, or you can choose Select All from the Edit menu to select all of the items in the diagram. Then, you can select Expand Links from the shortcut menu to display the links for all of the selected objects.
NOTE: The order in which the files are opened is determined by the order in which they are selected.
TIP: You also can select multiple files by dragging the mouse cursor over the objects that you want to select in the diagram. To accomplish this task, click the mouse in the diagram and drag it across the objects that you want to select. A rectangle will display as you drag the mouse to guide you through the selection. When the rectangle encloses all of the desired objects, release the mouse button. All of the objects contained in the rectangle will then be selected.
The ability to interact instantly with your objects from within the Link View provides a significant time-saver to your development effort. Whether you want to preview the design of a web page or directly modify an image file, Visual InterDev truly promotes the idea of an integrated development environment through the implementation of this feature.
Leveraging Your Web Site for the Future
One of the biggest challenges that businesses and IT departments face is how to leverage their current investment. Executives want to capitalize on the investments that are made in people, knowledge, or technology. A project isn't worth investing in if there's no return on the investment (ROI).
For those of you who see dollar signs as the only rate of return, let me be quick to point out that there are other investment returns that can be just as valuable as financial returns. The kind of return that I am talking about includes financial gain but also includes return on people, knowledge, and technology. You can apply this measure to any type of project. Certainly the project should translate into financial gain for the company or organization, but the people who work on the project should be better equipped at the end of the project than when they started. Also, the individuals and the company or organization should possess a richer knowledge base after completing the project. Finally, you should be able to leverage the technology for future endeavors. This technology return is what this part of the lesson focuses on.
Now, you may ask what this has to do with Visual InterDev. Well, Visual InterDev helps you leverage your technology investment in two significant ways. First, you can use the power of Visual InterDev to augment your productivity for a single Web-based application development effort. Second, you can leverage the functionality of your applications across multiple Web-based projects. Both of these methods involve the ability within Visual InterDev to copy an entire web site. The lesson describes the two methods and then demonstrates how to use this powerful feature.
Reaping the Benefits Within a Project
Visual InterDev contains a powerful feature that enables you to copy an entire web site to another location. This section describes how you can capitalize on this feature to facilitate and streamline your application development process. The lesson on Day 3, "Design and Development Considerations," explained the concepts of a development, testing, and production environment. You learned how these three environments can be used to make your project team more effective. The basic premise behind creating these environments involves the staging of your application. As you progress through your development effort, you need to provide separate environments that represent the different stages of your application. These concepts apply whether your development team consists of the well-known, three-person team of me, myself, and I, or a team of 50 people.
First, you need to create a development environment that supports the initial design and development of your Web-based application. Next, you need to create a testing area that reflects individually tested modules. This testing environment supports the integration testing of all of the components within your application.
This development stage is the final checkpoint before the application is released to the users. By having a separate testing environment, you can separate modules that are still being worked on versus those that have been adequately tested. In this way, you can ensure that individual developers don't hinder the work of their cohorts. The third stage is represented by the production environment. This environment supports the use of your web site by its constituents. This environment contains your fully tested Web-based application and separates the work of the developers from the users. Modules that are still being developed won't cause the user's version of the application to crash, because they operate in separate worlds. Figure 18.16 illustrates the concept of these three environments.
Visual InterDev supports the use of these environments by enabling you to copy your entire web site across the different environments. Given that you have established a unique directory structure for each site, you can use Visual InterDev to promote your site between each stage of development. You also could copy the web site to a different machine. In this way, you can ensure that all of the components in your web site are migrated properly without your having to identify and copy the individual files contained in your site. You will learn how to take advantage of this feature in one of the following sections, "Copying a Web Site."
Reaping the Benefits Across Multiple Projects
You also can use the copying feature across multiple projects. Invariably, you will want to use prior web sites as a starting point for future development efforts. By so doing, you don't have to reinvent the wheel every time you develop a Web-based application. You can use the Copy Web feature to copy the web site to a new location and then begin tailoring the components to meet the needs of your new application. Again, Visual InterDev enables you to leverage your prior investment in technology for the future by providing a starting point for new projects.
The three phases of development.
Copying a Web Site
Now that you understand the context of this feature, you can learn how to actually execute this feature. The Copy Web feature enables you to copy an entire web site to another server or to the same server with a new name.
NOTE: You must have administrator privileges on the destination server to execute the Copy Web command. This security restriction is a function of the server operating system, not Visual InterDev. Visual InterDev attempts to execute the command on the destination server using your user ID and password. If you have the correct administrator privileges, the web site will be copied.
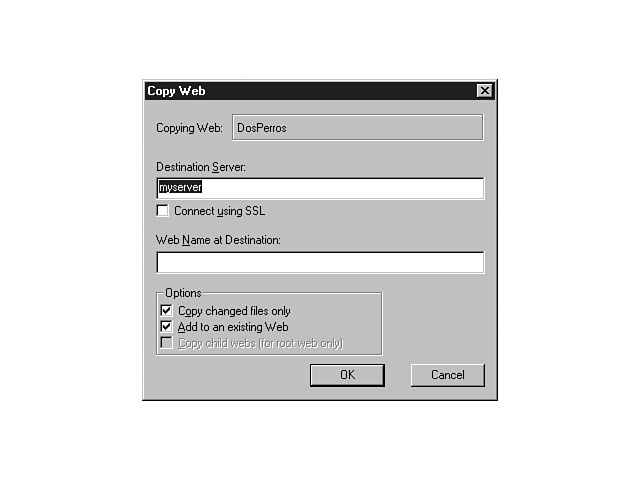
To copy a web site, select Copy Web from the Project menu to display the Copy Web dialog window. Figure 18.17 illustrates the options that are available on this window.
Copying a web site.
The name of the web site that is being copied displays in the top portion of this dialog window. From this window, you can enter the name of the destination server as well as a name for the web site that you are copying. You can enable a Secure Sockets Layer (SSL) connection by clicking the checkbox next to this option.
The options at the bottom of this window enable you to customize what is being copied. First, you can choose to copy only the changed files. This option is useful when you have initially copied a web site to the destination and you are copying an updated version to the destination. This option can be applied to the three stages of application development, when you are constantly migrating updated versions of your application from development to testing and from testing to production. You save a lot of time during the application promotion process by selecting this option, because only the files that have changed are copied to the destination location.
The Add to an existing Web option is similar to the one that you have used to create new projects. You can choose to add this web to an existing site or create a new web for this site.
NOTE: Remember from the lesson on Day 4, "Creating Your First Visual InterDev Project," if you don't select the Add to an existing Web option, the name of the project is combined with the name of the web server to form the virtual root name for the web site.
The Copy child webs option is enabled only if you are copying the root web. In this case, you can check this option to copy all of the child webs that exist within the root web.
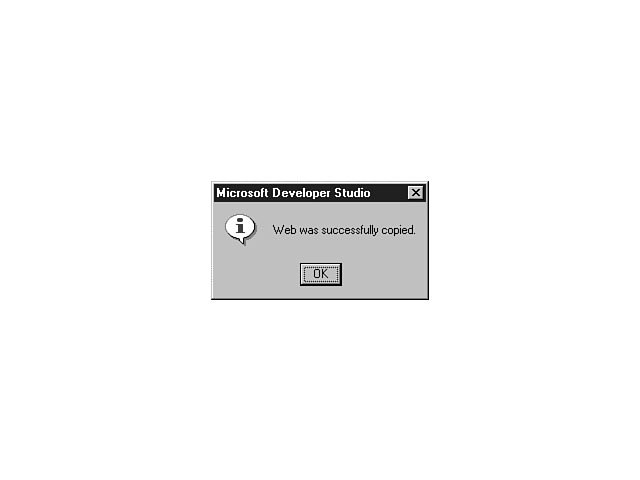
After you confirm your entries and click OK, the web is copied to the new destination, and you receive a friendly confirmation notice like the one shown in Figure 18.18.
A successful copy.
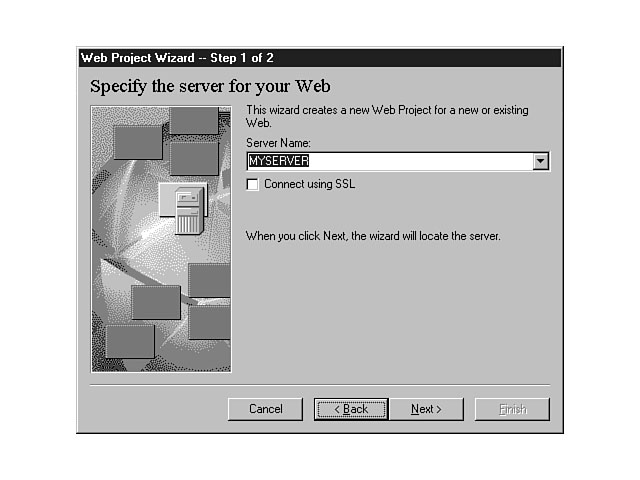
The newly copied web site assumes the security settings of the root web on the destination server machine. You must create a Visual InterDev project to access the copied web site. To do this, begin the Web Project Wizard and enter a name for your new project. After you click OK, the Web Project Wizard is initiated, enabling you to enter a server name for your web, as shown in Figure 18.19.
Specifying a server.
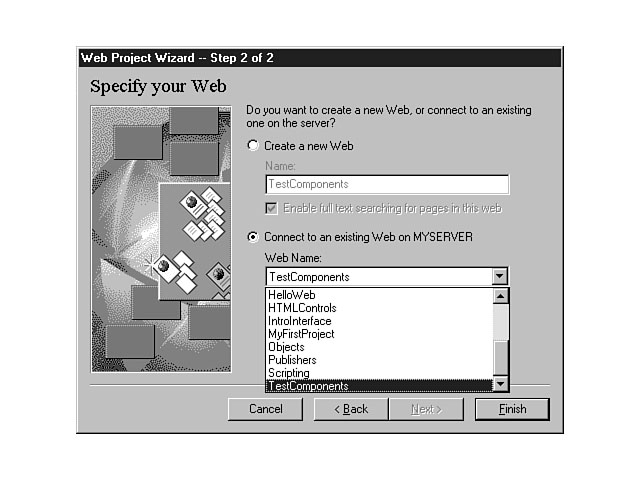
After you have chosen the server, you can click the Next button to proceed to the second step in the process. You will see the name of the project that you are creating as well as an option to connect to an existing server. Click this radio button and choose the name of the web that you entered during the Copy Web phase of this process. Figure 18.20 demonstrates this process for a web that was copied as a new web called TestComponents.
You can then click Finish to complete the process and create a new Visual InterDev project for the copied web as shown in Figure 18.21.
Connecting to a newly copied web site.
Reviewing the results: New project, old web.
This process is very intuitive and straightforward. In a nutshell, it involves two major steps--copying the web site, and creating a new project for the newly copied web site. This feature definitely removes the headache of migrating your Web-based applications as well as helps to increase your ROI.
Managing the Files in Your Web Site
Visual InterDev supports many of the same Windows Explorer functions manipulating files and folders within your project. The File View resembles the Explorer and enables you to interact with all of the folders and files in your project. Using the File View, you can add, edit, copy, delete, or rename any file or folder that is displayed in the project workspace.
In the previous section, you learned how to copy an entire web site. Eventually you will have to add files from an existing project to a new project that you are working on. The File View makes this process easy by enabling you to copy these files into the new Visual InterDev project. To add files to the root directory of the project, select the root directory and click the right mouse button to display the shortcut menu, as demonstrated in Figure 18.22.
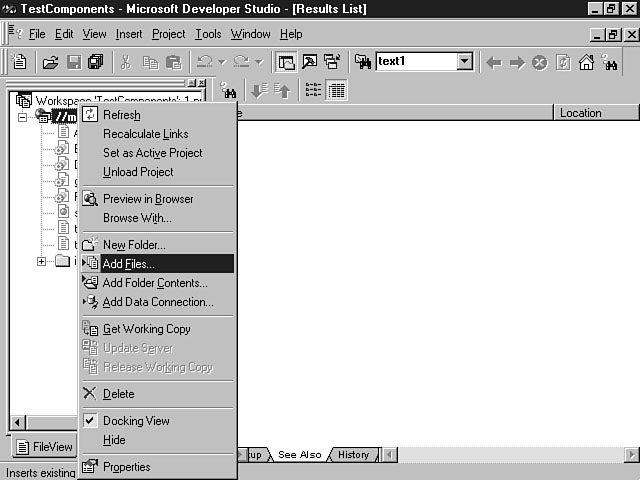
Adding a file to your project.
Next, choose Add Files from the list of menu options. The Insert Files into Project dialog window displays, enabling you to search for and select the file that you want to add to the project, as illustrated in Figure 18.23.
Once you select the file to add and click OK, it becomes a part of the project.
Any changes that you make to the file occur within the context of the project. The
changes don't affect the existing project, because you have made a copy of this file
and saved it in a different project. You also can import a folder's contents into
a project, which is helpful for copying multiple files into the project at the same
time.
Figure 18.23.
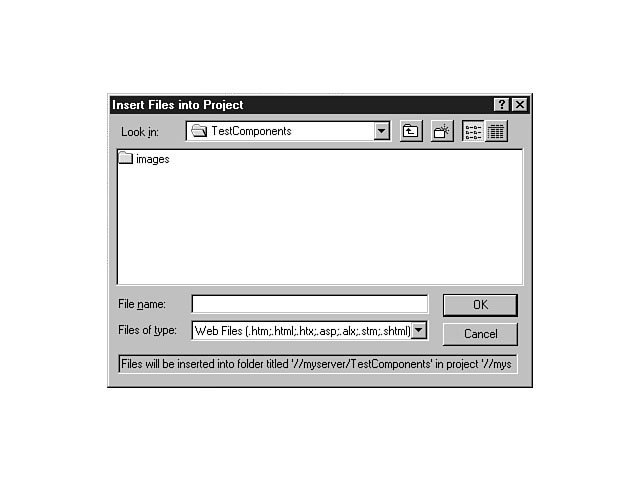
Choosing the new addition.
TIP: You can drag and drop files and folders from the Windows Explorer into the File View.
Another file- and folder-management function is adding a new folder to your project to properly organize your files. For example, you may want to create folders to organize items such as images, Java applets, sound files, and ASP files. You can right-click the root directory in the project workspace and choose Add New Folder from the shortcut menu. You will then be able to enter the name for your new folder.
To rename a file or folder, select the item in the File View and right-click the mouse to display the shortcut menu for the item. Choose Rename from the list of menu items and enter the new name for the file or folder.
To delete an item, right-click the mouse on the file or folder and choose Delete from the list of menu items. A message will display, confirming that you want to delete the file or folder. For folders that consist of multiple items, a confirmation is displayed, enabling you to either delete all of the files at one time, or confirm the deletion of each file contained in the folder.
The right mouse button functionality and features included with Visual InterDev tremendously simplify the process of managing and manipulating the files contained in your project. This functionality is accomplished through the File View, which borrows a page from the Windows Explorer and provides a highly intuitive approach to working with your files.
Repairing the Links
The final lesson for the day teaches you how to resolve broken relationships within your diagram. Visual InterDev consists of an automatic tracking system that monitors the links between the objects and files in your project. For example, when you rename a file in your project, you receive a warning message similar to the one displayed in Figure 18.24.
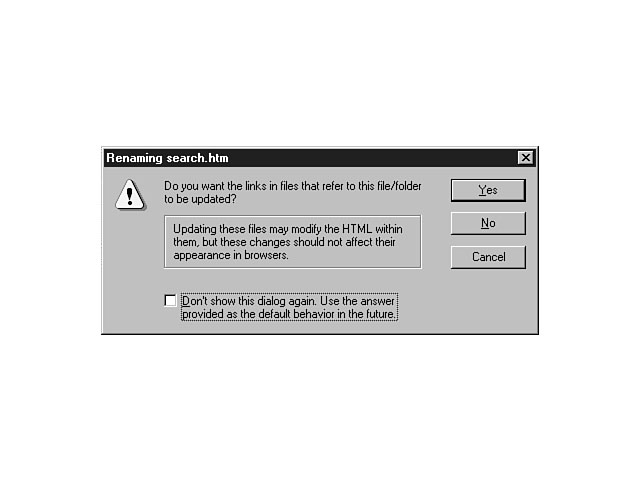
Resolving a conflict: the proactive approach.
This dialog window enables you to update the links in files that refer to this object so that a conflict won't arise when you try to run your application. This proactive approach to conflict resolution ensures a happy home for your project. There will be occasions when conflicts do arise, however, as with the copyright notice in the Dos Perros application. The next section takes a closer look at the broken link and searches for a resolution.
You can use the tooltips help for an object that contains a broken link to identify the conflict. For example, placing the mouse cursor over the CPYRIGHT.HTM file displays a tooltips message that is crying out for help, as shown in Figure 18.25.
Identifying the problem.
The file location information is displayed along with an error message for this object, which describes the conflict in the link relationship. The copyright notice file is located at an Internet URL address, and the user isn't logged on to the Internet to access this site. Based on this information, you can either copy the file to include it in your intranet application, or you can enable the link to be resolved at runtime when the user will be logged on to the Internet.
This example demonstrates the process to follow on those rare occasions when you have a conflict in your application. Because Visual InterDev takes a proactive approach to managing these conflicts, you can feel confident that your objects will remain in constant communication about their whereabouts, so that conflicts will be minimal.
Summary
Today's lesson demonstrated how you can take control of your projects and manage them effectively. Web-based application development can quickly get out of hand if you don't have the proper tools and methods in place to manage your projects. You have now discovered the tools that Visual InterDev includes to address the issue of site management. You also have learned about some effective methods surrounding the use of these tools. It is up to you to use them for efficient and effective management of your web sites.
The first part of today's lesson demonstrated how to get a handle on your projects by using the Link View. This powerful feature offers robust functionality for viewing and interacting with your application objects. This part of the lesson took you on a guided tour of the features of the Link View and showed you how to properly use these features to your advantage. You learned how to view the links between your objects and how to filter the information that appears in the diagram.
The lesson next explained how to leverage your current development investments for future applications. You learned how to copy your web sites and how to use this feature within the context of a single development project and across multiple projects. The Copy Web feature provides excellent support through the three key stages of your project--development, testing, and production. The lesson then shifted gears and outlined the inherent file management features of Visual InterDev.
The final lesson explained how Visual InterDev proactively manages and resolves conflicts within your application. You also learned how to use the Link View to debug conflicts that arise between objects in your application.
Q&A
- Chapter Q - Does the Copy Web feature provide source code control for my application?
Chapter A - The Copy Web feature enables you to copy entire web sites to different locations on the same server as well as to directories on different servers. This feature really has nothing to do with source code control. Visual InterDev does support tight integration with Visual SourceSafe to provide robust source code control features for your application projects. You learn about this integration during tomorrow's lesson.
Chapter Q - What is the main purpose of the Link View?
Chapter A - The Link View provides a robust site visualization tool that enables you to oversee and manage the structure of your web site. One of the main strengths of this tool is that you can view as well as interact with your application objects, all within the confines of one integrated development environment.
Workshop
Today's workshop involves a research project. I want you to research web site management and site visualization tools on the Internet. This field is expanding at a rapid pace as the issues surrounding the proper management of a web site continue to heighten in importance. You should make a list of these tools and search for their purpose, features, strengths, and weaknesses. Then compare the purpose and qualities of these tools with the site visualization and management tools contained in Visual InterDev. In what ways are the other products weaker? In what ways are they stronger? Document answers to these questions and others that you have regarding this topic so that you can refer to them in the future.
Quiz
- Chapter 1. - What is the difference between a primary and secondary link?
- Chapter 2. - What is the name of the feature that enables you to view your web site?
- Chapter 3. - Name the feature that enables you to copy an entire web site to another location.
- Chapter 2. - What is the name of the feature that enables you to view your web site?
Quiz Answers
- Chapter 1. - A primary link defines a direct relationship between an object that
has been expanded and one of its associated objects. A secondary link differs in
that it represents a relationship between two or more of the associated objects.
- Chapter 2. - Link View.
- Chapter 3. - Copy Web.
- Chapter 2. - Link View.
![]()
![]()
![]()
![]()