
Day 8
Communicating with a Database
The second week begins with a very exciting topic--database integration. Communicating with a database is an integral part of any application. For a Web-based application, it's essential to provide the users with a way to interact with data and information. This lesson begins a series of lessons on how to use the features of Visual InterDev to facilitate communication between the users and their data. Today's lesson provides an introduction to help you build database communication into your application. Day 9, "Using the Visual Data Tools for Maximum Productivity," extends the scope of today's lesson to show you how to use the Visual Data Tools to enhance your productivity. To round out the discussion of database integration, you will learn how to administer your database components on Day 10, "Managing Your Database Components."
Today you will receive an overview of how to leverage Visual InterDev to access your database information. In this overview, you are introduced to the benefits of database integration and how Visual InterDev seamlessly provides this essential component. The next part of the lesson explains the Active Data Object model. Visual InterDev uses this model to provide controls for communicating with the database. The lesson also explains the different types of datasources that you can establish based on the Open Database Connectivity (ODBC) standard.
The final sections introduce you to several database features of Visual InterDev. You will learn how to use the Data View to examine and interact with your database objects. The lesson also outlines the features of the Query Designer and how this tool can make your life easier. Lastly, you will see an introduction to special design-time ActiveX controls that are geared specifically at database integration.
Leveraging Visual InterDev to Access Your Data
Companies and organizations are jumping on board the Internet and intranet cruise liner at a rapid pace. Specifically, businesses are providing a way for people to take action. Electronic commerce is expanding at a rapid pace. You can visit your favorite retailer on the Internet and buy the gift that your family forgot to give you for your birthday. These retailers include new businesses where their only place of business is the online marketplace. Amazon.com Books is a good example of this kind of virtual business.
Corporations are discovering the power of the intranet to provide applications for their employees, and are using the power of private intranets to share applications and information with partnering companies. The thin-client model of a Web-based application provides a compelling reason to build new applications using this model as well as to convert existing systems to the Web.
All of the aforementioned developments require one central component to make them useful--data. Whether you're building an electronic commerce application for the Internet or constructing an intranet to provide applications for your employees, you must enable the users to interact with the information. The application must support creating, storing, modifying, and, if necessary, deleting information to be considered valuable.
A database provides the vehicle for storing the information for future use. But how do you develop applications that can access the database? Visual InterDev provides some very robust features for accessing the database from your application. You will be learning about a few of these features in today's lesson.
You can use Visual InterDev to rapidly build your application to include database connectivity. These features are intuitive, powerful, and easy to use. The word "leveraging" is used in the title for this section. The word leverage refers to the use of a lever to provide an advantage in the accomplishment of a task. For example, you might use a physical lever to help you move some heavy object. You might capitalize on a friendship to get you into the door at some organization or business. Similarly, Visual InterDev provides the lever to accelerate your development of an interactive, database application. You should realize the power of the database features over the next few days.
The Benefits of Database Integration
When I speak of database integration, I'm not only talking about being able to access a database from your Web page, but also using this connection to integrate the results to create a holistic application for the user. I also am referring to using a comprehensive development tool to produce these results.
Integrating the Data
A holistic application refers to an application that provides a complete experience for the user. If a user places an order for some items, the application should provide a way for that person to check the status of their order. Also, your application should integrate the use of the data to provide additional value to the different types of users.
The customer supplies some customer information along with the order. This data is stored in different tables within your database. You should be able to provide a way for the business user in the sales department to locate information about the customer and their order information. The sales manager may want to explore the past buying habits of this person and determine if he or she is a repeat customer. In other words, you should use the data and integrate this information throughout your application to satisfy the request of both external and internal users.
Your requirements will vary, however, depending on what type of application you're building. A public Internet site that provides electronic commerce will be dramatically different from a private intranet application. Integration of the data is still the key for both types of applications.
An example of an intranet application might be an oil and gas trading system that facilitates the exchange of oil and gas between energy companies. An energy company would consist of several departments that work together to complete a trade. First, an energy trader of company A makes a deal with company B to sell some oil or gas. Basic data about the deal is recorded, including the product, the price, and other company B information. Then, company A's contract administration workgroup uses the deal information to develop a formal contract.
The deal information is used as the core of the contract as well as for additional information concerning the terms and schedule of the contract. Next, the credit department uses the information to verify the credit history of company B. After the deal is consummated, company A's scheduling department schedules the transfer of the product along some medium such as a pipeline or barge. This information is linked to the transaction so that the accounting department can account for the movement of the product and send an invoice to company B. The accounting department would use all of the information that has been captured along the way to create the invoice as well as to maintain its books. Integration of data is essential to the completion of this cycle.
Comparing the Options
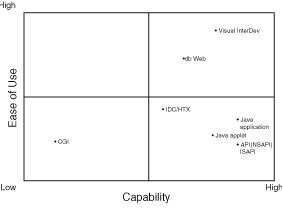
There are many options for providing database connectivity to your Web page. These options range from simple solutions that don't contain much robustness to the very powerful tools that are difficult to use. The matrix in Figure 8.1 compares some of the many options that are available for connecting a Web page to a database.
Web-to-database connectivity com-parison matrix.
The matrix in Figure 8.1 consists of two axes. The horizontal axis measures the capability of the features of the tool and ranges on a scale from Low to High. The vertical axis describes the ease of use and again ranges from Low to High. I have rated each tool in the comparison on both of these scales to determine its position in the matrix. As you can see from the comparison, Visual InterDev is very robust and easy to use. Java applications and applets rate slightly higher than Visual InterDev on the capability scale due to their portability across platforms. These same tools rate lower on their ease of use due to the nature of the Java programming language.
Java is very similar to C++ and is, therefore, a more complex language when compared to a tool like Visual InterDev. The database tools in Visual InterDev are very intuitive and easy to use because you can visually build your SQL.
Visual InterDev also receives high marks for its ability to provide a single environment for constructing both the Web page and the database calls for your application. With earlier database solutions like Internet Database Connector (IDC), you had to create one file to handle your SQL information and calls and another file to process the formatted HTML page.
API programming receives a high rating on the capability scale but is more difficult to use than the other solutions. For those CGI pioneers, you're probably unhappy about the low rating of CGI in the comparison matrix. CGI will still be used as a solution for connecting to a database. With the advent of APIs that improve the performance of server connections as well as visual tools that significantly augment the time it takes to build your database application, CGI is now considered more of a legacy.
Visual InterDev Benefits
Now that I have illustrated where Visual InterDev compares with other database connectivity tools, I will outline some specific benefits of the database features included with Visual InterDev. The benefits of having an integrated development environment to create your application can't be understated. You may be familiar with some of the tools that were listed in the Web-to-database connectivity comparison matrix. With many of these solutions, you have to use separate development environments and tools to accomplish database connectivity. Visual InterDev provides a comprehensive and integrated development environment that offers the following features and benefits:
- Ease of use
- Visual environment
- Rapid application development
- Robustness
Ease of Use
Visual InterDev offers a seamless environment that includes several database tools under one integrated roof. For this reason, Visual InterDev is very easy to use. You don't have to migrate between separate tools and environments to build your database connection and SQL calls as well as your formatted HTML web pages. Also, the Visual InterDev development environment provides toolbar and menu options to guide you through the process of adding database functionality into your web page.
Visual Environment
Visual InterDev, as the name indicates, provides a visual environment with which to build your applications. This intuitive environment includes the Visual Data Tools, which you will learn more about tomorrow. These tools enable you to visually construct your SQL statements and immediately test the results. MS Access users love the interface of the tools because of the similarities between the two environments. You discovered the benefits of a visual tool to build your HTML web pages during the lesson on the FrontPage Editor for Visual InterDev in Week 1. The Visual Data Tools provide the same type of benefits to your database calls. You don't have to know the details of SQL to construct your queries. For power SQL programmers, the visual nature of the tools will save you time from programming the mundane and routine queries and enable you to spend time on the more complex SQL calls.
NOTE: Some people think of the term query to denote the execution of an inquiry, or a SELECT statement against a database. In this book, I use the term query to refer generically to any SQL statement that you can execute against a database. I will specifically use the word select or the keyword SELECT when I am describing an inquiry against a database.
Rapid Application Development
Visual InterDev provides an environment that enables you to rapidly build database connectivity and integration into your application. Our modern age requests, and sometimes demands, instantaneous information all the time. With Visual InterDev, you can use the database tools to help meet the desire of your users. Visual InterDev promotes the theory behind rapid application development by supporting both PC desktop and server databases.
You learned on Day 3, "Design and Development Considerations," how to use databases like MS Access and MS SQL Server at different stages of the development cycle to rapidly build your application. The method involves conducting joint application design (JAD) sessions with your users, using Visual InterDev and MS Access to build a working prototype of the application. The database tools enable you to construct actual ODBC-compliant SQL calls that can eventually be used when you migrate the application to a more robust production database like MS SQL Server. This method can facilitate a very iterative and rapid cycle for your development process.
Robustness
So far, I have talked a lot about the ease of use of the Visual InterDev database features. Some people seem to think that a product has to be difficult to offer powerful features, and that a product that is easy to use can't possibly be very robust. Visual InterDev provides the best of both worlds--robustness and ease of use. You can program complex SQL directly from within the Visual InterDev environment. For some databases, you also can edit and manage your database components. Visual InterDev supports all of the major ODBC-compliant databases including MS SQL Server, Oracle, Sybase, Informix, IBM DB2/2, MS Access, Microsoft FoxPro, and Borland Paradox.
The ActiveX Data Object
The ActiveX Data Object (ADO) provides database access for all of the Visual InterDev database tools. ADO serves as the central model for you to build database interaction within your web pages. ActiveX Data Objects can supply connections for your web pages to any ODBC-compliant database. Microsoft implemented ADO specifically to provide data access across the Web. The main benefits of the ADO model include low memory overhead and high speed, which are ideal for Web-based applications.
ADO enables you to use ActiveX scripting to establish a connection to your datasource. You also can use ActiveX scripting to customize the properties and methods of an ActiveX Data Object. ADO supports a variety of data types, including images and binary large objects (BLOBs). ADO supports transactions, cursors, error handling, and the use of stored procedures.
Exploring ADO
The following section provides a brief explanation of ADO. This overview provides a basic context for you to understand how Visual InterDev provides data access for your application through the use of ADO. This discussion isn't meant to be an exhaustive review of ADO and similar data access methods. For an in-depth discussion of these topics, I would suggest that you visit the Microsoft ADO Web site at
www.microsoft.com/ado
and the Microsoft OLE DB Web site at
www.microsoft.com/oledb
What Is ADO?
Microsoft designed ActiveX Data Objects, or ADO, to be language-independent objects for you to access a database from your Web pages. ADO is built on top of the OLE DB model from Microsoft. For Visual Basic programmers who are familiar with Data Access Objects (DAO) and Remote Data Objects (RDO), you may think that Microsoft is playing alphabet soup with so many standards and acronyms. ADO is the successor to both RDO and DAO. ADO combines the best of previous data access methods with an object-based standard, and includes the capability of RDO and DAO and extends their reach to provide data access for the Internet using the OLE model.
NOTE: Data Access Objects (DAO) were first introduced with previous versions of Microsoft Visual Basic and Microsoft Access. DAO was developed to encapsulate database functions and operations within the context of an object. DAO provides access to ODBC-compliant databases.
Remote Data Objects (RDO) were the successor to DAO and were included in Visual Basic 4.0. RDO provided a better solution for ODBC database access and extended the reach of these objects to the server.
The benefit of using ADO over these two methods is that you can independently create objects. With RDO and DAO, you had to create a hierarchy for your objects. Also, ADO is faster and more efficient.
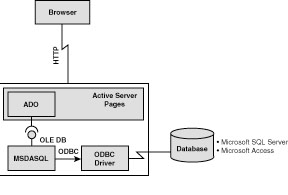
The idea behind OLE DB is to provide an object-based interface that makes remote objects appear as if they were local. You can see how this model would help you in your development. The goal is to enable you to access your database through helpful objects that provide seamless access to your database, which could reside on a remote server or locally on your machine. Figure 8.2 illustrates how ADO and OLE DB work together to provide database access for a MS SQL Server database.
Figure 8.2 presents a configuration for a typical Web-based application built using Visual InterDev. You can see that the ActiveX Data Object resides within an Active Server Page on the web server. When the browser sends a request for database information, the Active Server Page is called, and ADO submits the request via OLE DB to the database server.
MSDA SQL is used to format the ODBC request for the database server. MSDA is an ODBC-specific SQL language, and both MS Access and MS SQL Server support the use of it to communicate with their respective datasources. The ODBC driver translates the MSDA SQL into a specific language for a particular database. The information is then passed back through this pipeline. The Active Server Page and ADO work together to format and send the results back to the browser.
ADO and OLE DB.
NOTE: The previous illustration contained some components that are specific to MS SQL Server and MS Access. ADO works with any ODBC-compliant database. This illustration is provided as an example to understand the communication links and path from the browser to the database and back. Other databases implementations of ADO may contain slightly different components, but the communication concepts will be the same.
Understanding ADO Objects
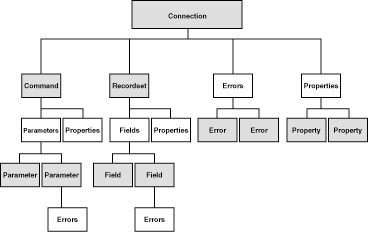
I have mentioned that ADO is an object-based solution. The ADO model includes seven major objects:
- Connection object
Comma object
Records object
Fie object
Paramet object
Proper object
Err object
Figure 8.3 illustrates how each of these objects relate to each other.
ADO model.
In this model, you see that the Connection object is the central object in the model. Every other object in the model is related to the Connection object. This hierarchy makes sense, because the other objects can't exist without a connection to the database. The ADO model isn't an autocratic hierarchy. In other words, you don't have to create the second tier of objects under a single Connection object. For example, you could create a Recordset object that is separate from a previously defined Connection object. The Recordset object that you define will exist under a newly created Connection object. Although you aren't confined to a strict hierarchy, you will typically use the structured nature of the ADO model to provide organization for your objects and code.
Before I explain each of these objects, I need to explain the concept of how objects, properties, and methods work together. Objects contain certain characteristics, or attributes. These attributes help to define their behavior and composition. Methods define certain commands that can be carried using these objects to accomplish some task. These terms are explained in detail on Day 13, "Interacting with Objects and ActiveX Controls."
The Connection Object
The Connection object controls your connection to the database. All of the information about your connection is established with this object. You can customize the behavior of the Connection object. For example, you can set the timeout properties and default database for the connection, and you also can specify to open and close the connection to the database and manage its transaction properties.
The Command Object
The Command object enables you to specify a specific command that you are going to execute on a database. For example, you could use the Command object to call a stored procedure. You can create a Command without associating the object with a previously defined Connection object. This feature is an example of where ADO differs from previous database access methods. You don't have to use a hierarchy of objects to carry out your commands. You will want to organize your objects into a hierarchy, however, when you execute multiple commands against the same database connection.
The Recordset Object
You can use the Recordset object to manipulate the records, or rows within your database tables. A recordset can contain all of the rows within a base table. A recordset also may consist of the result set from a specific query. The Recordset object supports both immediate and batch updates. Immediate updates are executed against the database instantaneously. With batch updates, the changes are saved and then sent as a batch to the database. Most of the time, you will probably be using immediate updates.
The Recordset object supports the use of four different types of cursors. These cursors indicate how the user will interact with the information in your database. The type of cursor that you can use depends on what cursors your database supports.
New Term: A cursor establishes the navigation behavior for the data that is contained in a database. A cursor's relationship with a database is analogous to the mouse cursor's relationship with a document. The mouse cursor indicates where you are in a document and where you can go. Similarly, a cursor defines where you are in the database and where you can go.
Table 8.1 represents the four types of cursors that you can use with the Recordset object, along with a description of each.
Table 8.1. Recordset cursors.
| Cursor Type | Description |
| Dynamic | View additions, changes, and deletions by other users |
| Keyset | View changes, but not additions and deletions |
| Static | View only a copy of the data; cannot view additions, changes, or deletions |
| Forward-only | Same as Static cursor but can only scroll forward through a table |
The Field Object
The Field object pertains to a particular column within a recordset. You can use this object to retrieve specific information about the field as well as change the contents of a particular field.
The Parameter Object
You can use the Parameter object to specify parameters for executing a command against the database. For example, you could use this object to designate the values for the parameters that are passed to a stored procedure on the database. This object is typically used with the Command object.
The Property Object
The Property object captures specific properties that are defined by the service provider. The service provider performs the specific services that enable you to access and query your data. OLE DB service providers can choose to present additional characteristics, or properties, to the ActiveX Data Object. You can then use these properties to implement further capability within your application. For example, you could use the Property object to determine whether a service provider supported transactions.
The Error Object
The Error object collects error information that is generated from the database. Any errors that are encountered when attempting to perform a database function are captured within this object.
Understanding ADO Collections and Properties
ADO provides collections and properties for the objects within the ADO model. Collections consist of a group of properties for an object. You use properties to customize the behavior of your objects. Table 8.2 lists the types of collections that exist for ADO objects.
Table 8.2. ADO collections.
| Collection | Description |
| Fields | Collection of Field objects for a Recordset object |
| Parameters | Collection of Parameter objects for a Command object |
| Properties | Collection of Property objects for an instance of an object |
| Errors | Collection of Error objects for an ADO operation |
Each ADO consists of a distinct set of properties. Refer to the ADO help documentation within Visual InterDev for an alphabetical listing of all of the ADO properties.
Seeing Clearly with the Data View
Now that you have learned about the underlying data model used by Visual InterDev, you will get a chance to experience some of the Visual InterDev features that are supported by the model. The first feature that you will learn how to use is the Data View. You received an introduction to this feature during the first week. The Data View enables you to view all of the database objects within a database. These objects include tables, fields, views, stored procedures, and triggers. You can use the Data View to access all of these objects from your client machine. You also can use the Data View to examine detailed information about the database objects including field types, key structures, and table definitions.
Exploring the Data View
The Data View tab is displayed next to the File tab in the Visual InterDev project workspace when you connect your project to a datasource. You will learn how to use a wizard to walk you through this process in the next section entitled "Building a Connection with a Database Wizard." Visual InterDev uses a live connection to the database to present the Data View. This connection enables you to interact directly with the database objects. Figure 8.4 demonstrates the power of the Data View.
Using the Data View to see your database.
The best part about the Data View is that it provides a graphical tool for this interaction that is very intuitive. The Data View works in conjunction with the Query Designer and the Database Designer (which you learn more about tomorrow) to provide a robust set of database tools for a developer. The Data View enables you to connect to any ODBC-compliant database. You can establish multiple connections to different databases.
Table 8.3 examines the icons that are displayed within the Data View, as well as their meanings
Table 8.3. Data View icons.
| Icon | Folder Name | Description |
| Database Project | Project that contains database connection | |
| Data Source | Identifies a datasource connection | |
| Database Diagram | Indicates a database diagram | |
| Table | Represents a database table | |
| View | Represents a database view | |
| Stored Procedure | Indicates a stored procedure | |
| Parameter | Signifies a stored procedure parameter |
The Data View provides a very intuitive method for examining your database and its contents. Moreover, you don't have to use a separate database administrator tool to view these objects. You can develop your application and manipulate your database objects all within the comforts of your own Visual InterDev home.
Building a Connection with a Database Wizard
You can connect to a database in several ways. The easiest method is to use the Database Connection Wizard to add a database connection to your project, and this section walks you through that very procedure.
Selecting the Datasource
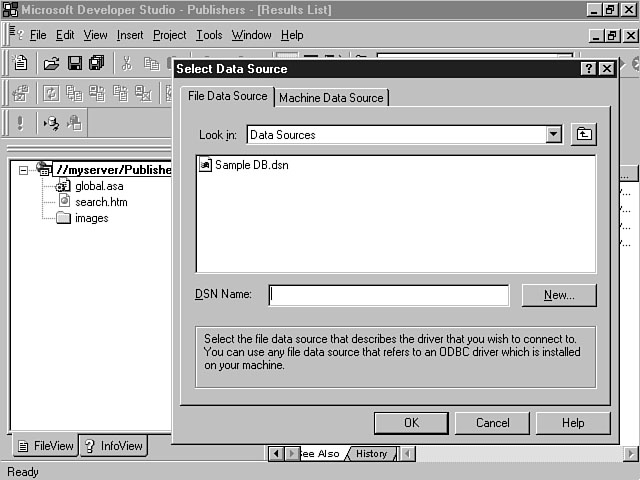
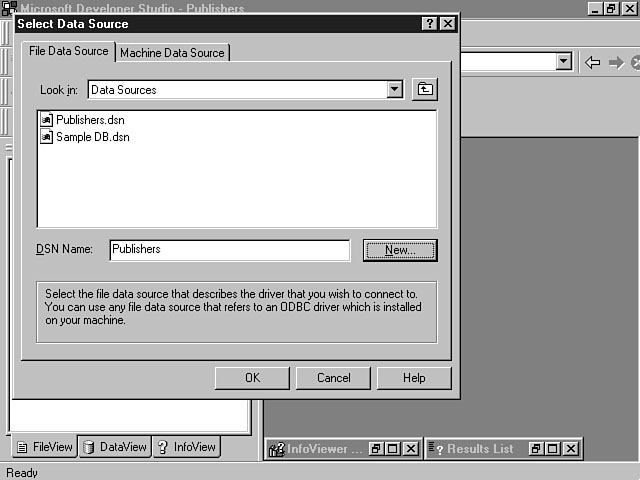
To insert a database connection into your project, select the Project menu and choose the Add to Project menu item. The Add to Project submenu displays a list of choices for you to choose from. Select Data Connection from the list. This action displays the Select Data Source dialog window. Figure 8.5 illustrates the available options on the Select Data Source dialog window.
Selecting a data- source.
File Data Source
The File Data Source tab display is shown in Figure 8.5. This display enables you to configure a File datasource name (DSN) for your project. A File DSN enables you to set up a file-based connection that is local to a specific computer. This connection can be shared by multiple users.
A file-based connection means that the information to connect to the database is stored in a .dsn file. You must install an ODBC driver on this computer to communicate with the database. When the database connection is created for your project, the information in the .dsn file is inserted into the connect string within your global.asa file.
A File DSN is sometimes referred to a "DSN-less" connection, because connection information is stored within your project--not a separate file. A File DSN is recommended due to its portability. You don't have to copy or create a DSN file on the computer when you move the application.
The Look In combo box enables you to browse the file system for a datasource. This combo box defaults to the ODBC\Data Sources\ directory on the computer. The File DSN listbox displays all of the available datasources within the specified directory. You can either double-click a datasource within the listbox or select the item and click OK to connect to the data- source. The New button enables you to create a new datasource.
Machine Data Source
The Machine Data Source tab display enables you to establish a machine datasource for your project. You can create two types of Machine datasources. The first type is called a User DSN. This type of DSN can only be used by the designated user and is specific to a machine. A System DSN is the other type of Machine datasource. A System DSN is specific to a machine but can be shared by multiple users. This information is stored in the Windows Registry and must migrate with the application if it's moved to another machine. Figure 8.6 depicts the Machine Data Source tab display.
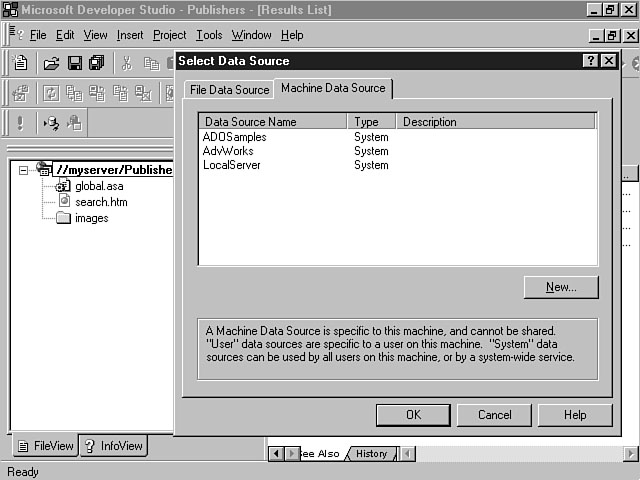
Specifying a Machine Data Source.
This window contains a list of machine datasources that are available. You can select an item from the list and click OK to create a connection to an existing Machine datasource. You also can create a new Machine datasource by pressing the New button. You will be prompted to indicate whether you're creating a User DSN or a System DSN.
Creating a New Datasource
I stated earlier that for both the File and Machine datasource you could choose an existing datasource to insert into your project. The datasource will create a connection, enabling you to interact with the database. This process is straightforward if you have already established the datasource. This section focuses on showing you how to create a new datasource. I will continue to walk you through the Database Connection Wizard windows to create a new File DSN. The process to set up a Machine datasource is very similar.
Selecting the Type of Datasource
When you click the New button from the Select Data Source window, the Create New Data Source dialog window is displayed. This window enables you to specify the database driver that will be used to create the new datasource. Figure 8.7 demonstrates an example of how to specify the datasource type.
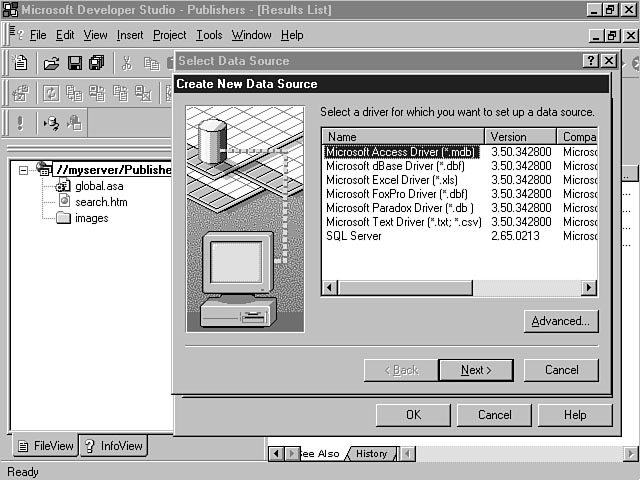
Selecting a new data- source type.
In Figure 8.7, a listbox displays the available drivers for the data type. These items vary depending on what database drivers you have installed on the machine. The Advanced button enables you to view the driver information that will be created for the datasource based on your selection. You can customize this information if you want to be very specific about the parameters that should be created for the datasource. You can use the Create New Data Source window to enter this information directly into the listbox. In this example, I'm going to select the SQL Server driver to create a new datasource connection to MS SQL Server. After you have made your selection, click the Next button to display the next dialog window.
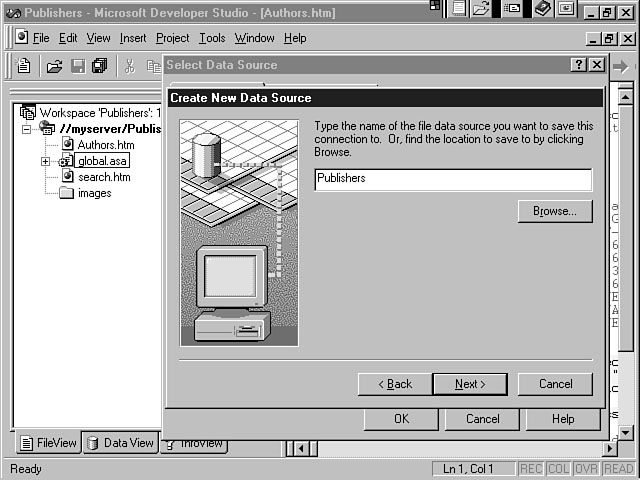
The next step involves entering a name for your datasource. Figure 8.8 shows the window for entering this information.
Naming the data- source.
The name that you enter is used to represent the underlying datasource and database objects. You should choose a meaningful name that accurately indicates to the user what kind of information the datasource contains. For example, "Orders" is a more meaningful name than "MyData."
The Final Steps
Once you have entered the name for the datasource, a listbox is displayed, indicating the choices that you have made. This window specifies the datasource type, name, and driver. You can click the Back button to go back and change one of the parameters. Pressing Finish confirms the choices that you have made and creates the new datasource. You also can click the Cancel button to cancel this process. Figure 8.9 displays an example of a new File data- source named Publishers that will be created for a MS SQL Server database.
A new File datasource.
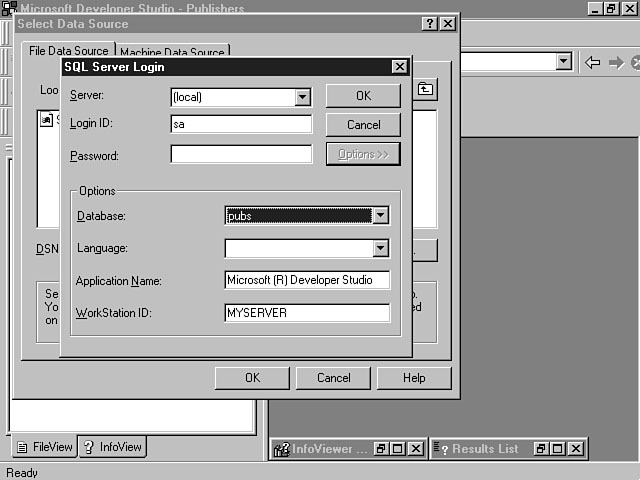
After you click Finish, a dialog window display prompts you to log in, if necessary, to the database that you have chosen. Figure 8.10 confirms your new datasource.
Confirming your new datasource.
From this window, you enter the server, user ID, and password. The Options button enables you to enter specific datasource information like the name of the database and the application type. When you click OK, Visual InterDev logs in to the database and establishes the database connection. Figure 8.11 displays the additional options that are available from the SQL Server Login window.
Logging in to the database.
After you confirm the login parameters by pressing OK, the Database Connection Wizard creates the .dsn file. Figure 8.12 shows the resulting Publishers.dsn file that was created based on this example.
You can select the DSN file from the list and click OK to insert this datasource connection into your project. You will be prompted to log in, if necessary, to the server again. After you log in to the server, Visual InterDev creates the connection and the results are placed into your project.
Analyzing the Results
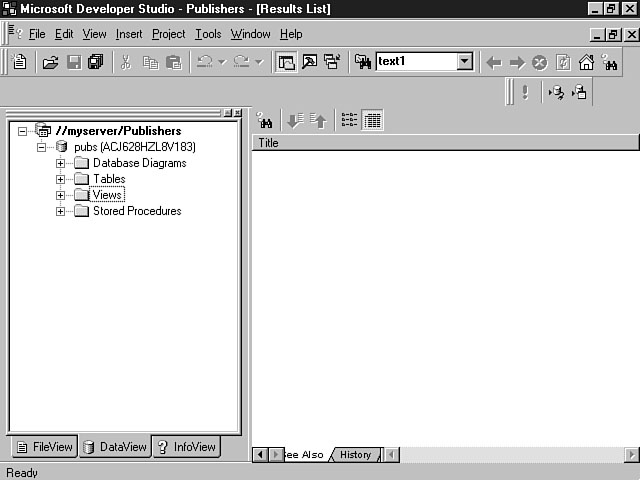
Figure 8.13 displays the datasource that was created from the preceding example.
Selecting the newly created datasource.
Examining the results with the Data View.
The datasource information is captured in the global.asa file. Listing 8.1 shows what happens to the global.asa file when a Microsoft SQL Server connection is inserted into a project.
Listing 8.1. Using the global.asa file to connect to a datasource.
<SCRIPT LANGUAGE="VBScript" RUNAT="Server">

Sub Session_OnStart
`==Visual InterDev Generated - DataConnection startspan==
`--Project Data Connection
Session("pubs_ConnectionString") = "DRIVER={SQL Server};
SERVER=MyServer;UID=sa;PWD=;APP=Microsoft (R) Developer ÂStudio;WSID=MYSERVER;DATABASE=pubs"
Session("pubs_ConnectionTimeout") = 15
Session("pubs_CommandTimeout") = 30
Session("pubs_RuntimeUserName") = ""
Session("pubs_RuntimePassword") = ""
`==Visual InterDev Generated - DataConnection endspan==

End Sub

Sub Session_OnEnd
`Insert script to be executed when a session ends
End Sub

Sub Application_OnStart
`Insert script to be executed when the application starts
End Sub

Sub Application_OnEnd
`Insert script to be executed when the application ends
End Sub
</SCRIPT> From Listing 8.1, you should be able to see that the Database Connection Wizard enables you to create a datasource in a few simple steps. The datasource is placed in the Visual InterDev project workspace, providing a live connection to your database objects. You can then use the Data View to access the objects.
The Query Designer Makes Life Easier
The Query Designer is part of the Visual Data Tools included with Visual InterDev. These tools definitely make the life of a database programmer easier, providing graphical tools to access the database objects. You will learn how to use the Visual Data Tools tomorrow, but the following section introduces you to some of the Query Designer's features.
Understanding the Query Designer
Once you have created your datasource, you're ready to access the data. The Query Designer helps you accomplish this task by enabling you to visually specify your SQL statements. You build your statements by selecting the tables that you want to use as well as the fields within those tables. As you make your choices, the SQL statement is constructed. You can view the statement as it is built and make any changes to the native SQL. You also can test and view the results of your query within another pane in the Visual InterDev development environment. The Query Designer can significantly enhance your database development effort. You can use the Query Designer to drastically reduce your database programming and testing cycle.
Query Designer Features
To use the Query Designer, click the DataView tab within the Visual InterDev project workspace. The Data View display tab enables you to see and access all of the objects for the datasource. You can use the Query Designer to execute queries against the database, and to specify the tables, columns, and order of the query results. You can very easily create joins between multiple tables. In addition to queries, you also can insert, update, and delete data that is contained within the database. You also can use the Query Designer to execute stored procedures if you're using MS SQL Server as your database. The following section examines the features of the Query Designer in a little more detail.
Query Designer Workspace
The Query Designer contains four panes that you can use to interact with your data. The following list indicates the Query Designer panes:
- Diagram pane
- Grid pane
- SQL pane
- Results pane
Diagram Pane
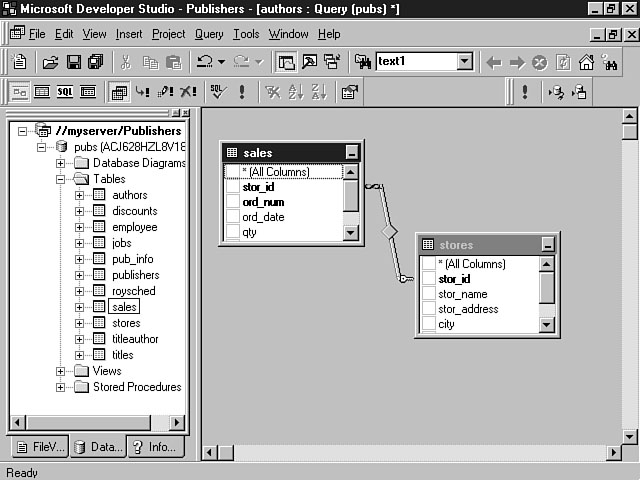
The Diagram pane enables you to work with the database objects to construct a SQL statement. Using this pane, you can drag and drop tables and views into the workspace. Figure 8.14 depicts the layout of the Diagram pane.
The Diagram pane.
As you choose the tables, the Query Designer associates related tables and indicates table joins through the use of lines between the tables. You can select individual columns to be included in the SQL statement or select All Columns. For those SQL programmers, selecting the All Columns option performs a SELECT * to retrieve all of the columns within the table.
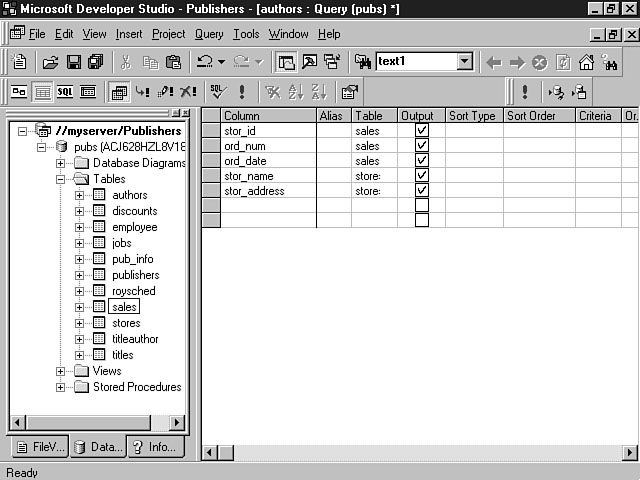
Grid Pane
The Grid pane provides a spreadsheet interface to customize the results of the query. You can designate which columns to show in the result set as well as how to order and group the results. Figure 8.15 shows the Grid pane for two sample tables.
SQL Pane
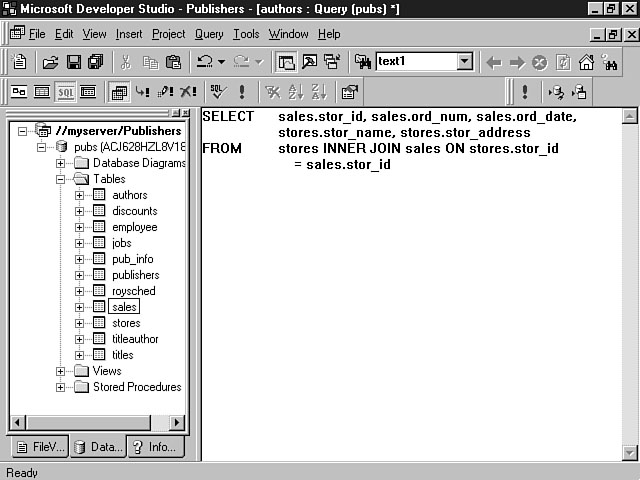
The SQL pane enables you to view the SQL statement for the tables and options that you have selected. You can use the SQL Pane to view a SQL statement as well as to modify the statement. You also can use this pane to create your own SQL statements. Figure 8.16 displays a SQL statement within the SQL pane.
Customizing the results.
The SQL pane.
Results Pane
You can use the Results pane to view the data that is returned from the SQL statement. Based on the query that you construct, this pane displays the results set of the current query. You can use the Results pane to add, modify, and delete data in the database. The effects are immediate, because you're using a live connection to access the database.
NOTE: The actions that you can perform are limited to your access permissions on the database. Visual InterDev uses the access rights for your user ID and password to determine which commands you can execute.
Figure 8.17 shows the Results pane as well as the other three Query Designer panes.
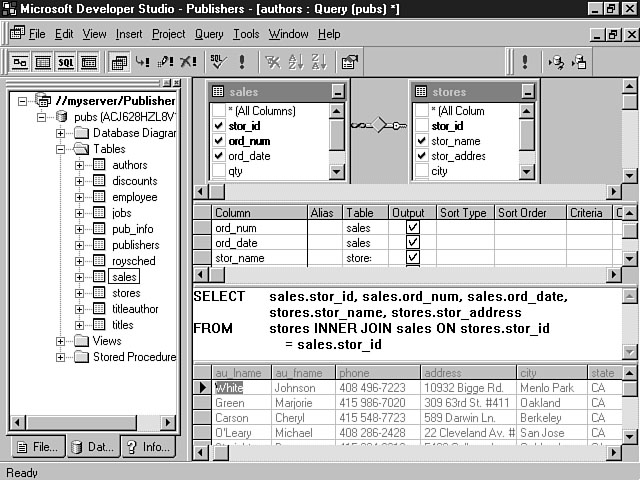
Displaying the Results pane.
Database Design-Time ActiveX Controls
Visual InterDev includes several design-time controls for communicating with a database. You will see an in-depth lesson on these controls on Day 14, "Extending Web Pages Through Design-Time Controls." You received an introduction to design-time ActiveX controls during the first week. Design-time controls enable you to set properties and attributes at the time of design. At runtime, the properties that you set will perform robust functionality without the overhead of an ActiveX control.
The Database design-time controls that are included with Visual InterDev are built on top of the ADO model. These controls generate much of the script that is necessary for connecting and executing commands against a database. A good example of a database design-time control is the Data Command Control. You can insert this control into your application and then use the Query Designer to build your SQL statements. The Data Command Control will capture all of the scripting that is necessary to execute your SQL statements and insert this logic into an Active Server Page.
Database design-time controls can provide a lot of power to your application. You can use these controls to significantly reduce the time that it takes to build database integration into your application.
Summary
This lesson has provided you with an overview of how to communicate with a database from your Visual InterDev application, setting the stage for tomorrow when you discover how to use the Visual Data Tools.
First, the lesson centered on the benefits of database integration, explaining integration from a user's--as well as a developer's--point of view. Visual InterDev can serve as a powerful lever for building database integration into your application. Next, the lesson uncovered the mystery of the ActiveX Data Object (ADO) model. The ADO model was explained so that you could understand what Visual InterDev uses behind the scenes to connect and access the database. You then received an in-depth look at how to use the Data View to access your database objects. The Data View works in conjunction with the Visual Data Tools to provide some very robust features for interacting with the database.
Toward the end of today's lesson you learned how to build a database connection for your project using the Database Connection Wizard. The lesson provided a step-by-step tour of how to establish this connection. You also learned how to access your data using the Query Designer once the connection has been built. The lesson explained the basic Query Designer features and workspace. The final section of the day focused on Database design-time controls. The lesson presented an introduction to how these ActiveX controls can be used at design-time to provide robust functionality when your application is executed.
Q&A
- Q Are ActiveX Data Objects (ADO) just a renamed version of Remote Data Objects
(RDO)?
AADO is the successor to RDO, but their models aren't identical. ADO extends the functionality of RDO to the Internet. ADO differs from RDO in that you don't have to create a hierarchy of objects to execute certain commands. All of the objects within the ADO model can be instantiated as individual objects.
Q How does the Data View differ from the File View
AThe Data View enables you to see the directory structure of your files within your Visual InterDev project. These files include everything from HTML web pages to images. The Data View is a special view that is inserted into the project workspace after a database connection has been made for the project. You use the Data View to specifically access and modify the objects within your database, including tables, fields, views, and stored procedures.
Q When I use the Data View, do my changes affect the database or am I using a copy of the database
AWhen you insert a database connection into your project, Visual InterDev creates a live connection to the database. Therefore, when you use the Data View to view and modify the objects and data, you're interacting with the actual database. Your changes have an immediate effect on the database.
Workshop
For today's workshop, I want you to create the datasource that was presented in the lesson. If you're using a database other than MS SQL Server, create a datasource connection to your particular database. After you have established the connection, practice using the Data View and the Query Designer so that you will be familiar with these tools when you put them to the test during tomorrow's lesson. Try using all four of the Query Designer panes to produce the desired results from your SQL statements.
Quiz
- 1. What are the four panes of the Query Designer?
2 What is the difference between a File datasource and a Machine datasource?
3 Name the two types of Machine datasources.
4.In the ADO model, what is the Recordset object?
Quiz Answers
- 1. The four panes of the Query Designer include
- Diagram pane
Grid pane
SQL pane
Results pane
2.A File datasource enables you to capture database connection information within a DSN file. Visual InterDev inserts the information contained in this file into an Active Server Page, thereby, creating a "DSN-less" connection. A File DSN is preferred, because you don't have to establish the datasource name on every user's machine.
A Machine datasource creates a datasource connection that's specific to a machine. If you move the application to another machine, you also have to re-create the DSN for the new machine.
3.The two types of Machine datasources include a User DSN and a System DSN. The User DSN is tied to a specific user, while a System DSN can be shared among all users.
4 The Recordset object enables you to access the properties and values of a result set that is returned from your database. An example would be accessing the properties of a table and modifying the contents of the table or rows that are returned from a specific SQL call. - Diagram pane
![]()
![]()
![]()
![]()