


In this lesson, you’ll gain an understanding of what a database is and how to use the database view, and you’ll learn to open and close a database.
In addition to using Notes for mailing messages to your co-workers, you can use Notes to share and access documents of various types. You might want to access your company’s handbook, a colleague’s sales reports, info rmation on a new client or service, advertising letters, or any other important data you may need in order to complete your work.
A Notes database is not the same as what you would typically consider a database. You’re probably used to the type of database you create with Access, Approach, or Q&A, in which you use fields to define such information as names, addresses, pr oducts, numbers, and prices. In Notes, however, related documents are stored in databases. The documents in a database can contain text, graphics, pictures, and other types of data. One Notes database you’re already familiar with is you r mailbox—a collection of documents you’ve received and sent.
Think of a database as a file folder; related documents are stored within the file folder. The creator of the database designates the types and designs of documents that are stored in the database. For example, advertising letters may be stored in one database, and quarterly sales figures may be stored in another.
Think of a workspace page as a file cabinet drawer containing several related databases or file folders. Use your six workspace pages to organize and manage different types of databases. You might use one page, for instance, for customer records and an other page for product information.
You can access databases from your local drive and store them in your workspace pages. Two Notes databases already on your drive are the Help Lite files and your personal address book. You also can create and store your own databases on your local driv e. You’ll learn how to create your own databases and documents in Lesson 16.
Another feature allows you to access databases from any server available to you on your network. Your Notes server contains many default databases, including Help files and your company’s address book. In addition, your supervisor, your Notes admi nistrator, and perhaps some of your colleagues can add databases that you can access. If you’re attached to other domains or Notes servers, you also may be able to access databases stored on those networks.
These are a few of the types of databases you may encounter:
If you’re used to working in a word processing or spreadsheet program, you’re used to saving one document as a file. In Notes, however, the entire database—including all of its documents—is saved as a file. A database full of docume nts is like a word processing file full of paragraphs. So when you want to copy or delete a document from a database, for example, you have to copy or delete all documents in the database because they are all part of the saved file.
All databases display similar elements and views. Depending on the type of database you open, you’ll see general views (such as All Documents, Folders and Views, and so on) and specific views that apply only to the database. For example, a document library database may contain such views as My Favorite Documents, Archive Logs, and Review Stats.
To open a database already on your workspace page, double-click the database’s icon. Alternatively, you can right-click the database icon and choose Open.
 New Database
For information about adding a new database to your workspace, see Lesson 10.
Viewing the About Document
The first time you open many databases, an About document appears. The About document displays information about the database you’re about to view, and it appears only the first time you access a database. The About document is created by the person who created the database. For example, suppose your department head creates a database full of departmental forms such as expense reports, referral forms, and timesheets. She mi ght then create an About document that describes each form and explains when you can use it.
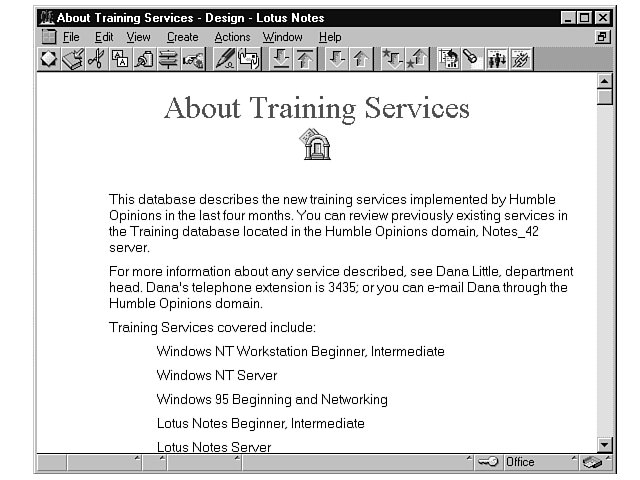
When you create your own database in Lesson 16, you’ll also create an About document. Figure 11.1 shows the About document for a database about new training services that was created for the Humble Opinions company.
When you’ve finished viewing the About document, choose File, Close to close it and open the database.
OopsYou can access the About document again at any time. Simply open the database and choose Help, About This Database. The About document appears. Choose File, Close to close the document again when you’re done.
Viewing the Database
When you close the About document, the database appears (see Figure 11.2). You’ll recognize many elements of the database window because it is similar to your mailbox window. All databases contain similar elements.

When working in a database, just as in your mailbox database, you select a view in the navigation pane by clicking once on that view. A right arrow beside a view means you can display more related topics by clicking that arrow. When all views are displ ayed, the arrow changes to a down arrow, which you can click to hide the related views. Click once on any view to select it. A rectangular outline appears around a selected view, and the items in the view pane change.
In the view pane, a right arrow beside a category represents hidden document titles. You must click the arrow beside the category to display the document titles. Click the arrow a second time to hide the related topics. For more information abou t viewing a database, see Lesson 12.
CategoryIn a database, a category describes the documents filed within that particular database. You cannot open the category like a document, but you can expand or collapse i t by clicking the arrow beside it. When it is expanded, the titles of the documents within the category appear.
When you’re finished with a database, close it by choosing File, Close or by pressing Ctrl+W. If you’ve added documents or made any changes to the existing database, Notes will prompt you to save. Click Yes to save your changes; click No to abandon the changes; click Cancel to return to the database.
Don’t CloseIf you don’t want to close the database but you need to do something else in Notes, such as work in your mailbox or view your workspace, you can leave the database open. To switch to the workspace, choose Window, Workspace at Office. To switch to another open database, choose Wi ndow and the name of that database.
In this lesson, you learned to open and close a database and to work in the database window. In the next lesson, you’ll learn about database templates, and you’ll learn how to view and manipulate documents in the document window.