


In this lesson, you learn to label page tabs, arrange workspace pages, locate database files, and add a database to a page.
Notes provides six workspace pages you can use to store and organize your work in Notes, plus one page titled Replicator. You can label, or name, the workspace pages to suit you and your way of w orking.
 Replicator
The Replicator page contains tools you use to work remotely with Notes (when you’re u sing a modem to attach to the network, for example). For more information on remote access to Notes, see Lesson 25.
The following steps walk you through labeling page tabs.
What’s in a Name?A workspace page name can contain as many as 32 characters, including letters, numbers, spaces, and other keyboard characters.
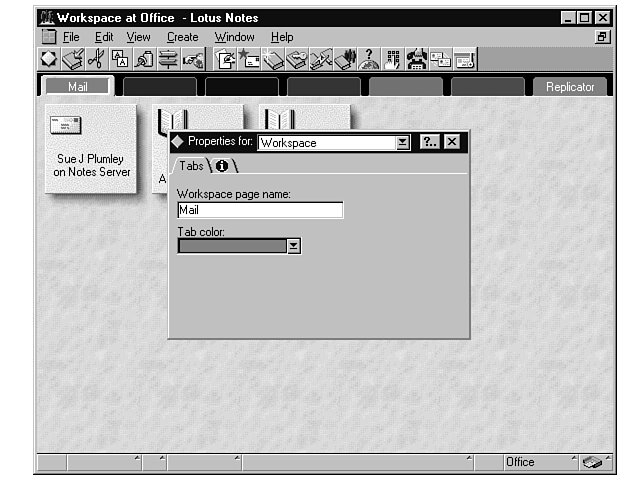 Color
ColorYou can click the Tab color drop-down arrow in the Properties for Workspace InfoBox and select a different color for the page tab, if you want.
Thus far in working with Notes, you’ve used your mailbox, your company’s address book, and perhaps your personal address book to create an d send mail throughout your network. On the work-space page, icons represent each of these items. You can move the icons around on your workspace pages to better organize your workspace, and you can move icons from page to page. In addition, you can use t he same methods to move other databases you access, copy, and create on your workspace.
DatabasesDatabases contain documents; your address book is a database, for example. For more information about databases, see Lesson 11.
To move an icon on the same page, click and drag the icon to a new location. The mouse cursor changes to a hand while the mouse button is pressed in, and it changes back to a pointer when you release the button.
Overlap IconsIf you drag one icon over the top of another, the two icons switch places.
To move an icon to another workspace page, click and drag the icon until the mouse pointer (a hand) is over the top of the page tab to which you want to move the icon. When you release the mouse but ton, the icon appears in the selected workspace page.
You can add a database to any of your workspace pages from either the server or your local drive. When you add a database, you’re simply adding reference documents yo u can use in Notes. One database you might add, for example, may contain Help files. Another database might contain company files you need for a specific job.
To add a database to a page, follow these steps:
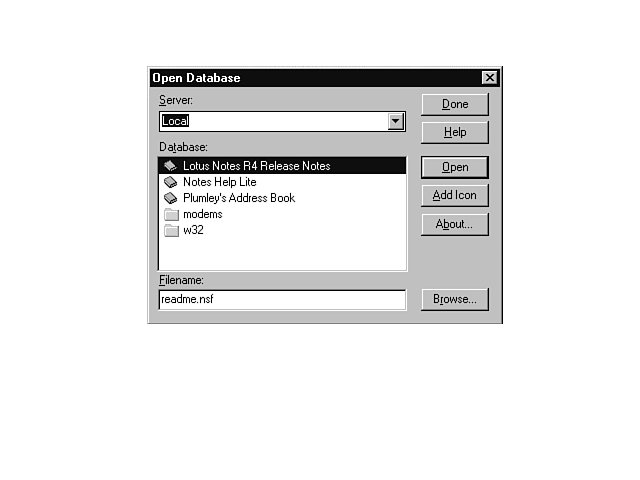
Local Select this option to add a database from your own local drive.
Other Select this option to view a list of available servers or computers from which you can choose. The Choose Other Server dialog box appears with a list of servers. Select one and click O K.
Done Closes the Open Database dialog box without adding a database to your workspace.
Help Displays Help information on adding a database to your workspace.
Open Adds the database to your workspace and opens the database for you.
Add Icon Adds the database icon to your workspace and returns to the Open Database dialog box so you can select another database.
About Displays a preview window with the database showing so you can see if it’s what you want. Click Close when you finish viewing the database to return to the Open Database dialog box.
Can’t Find a Database?Select one of the command buttons described in step 6 to complete the process.
You can remove any database icon from the page. Removing the icon does not delete the database, so you can add the de leted database to your workspace page again at any time.
To delete a database icon from a page, right-click the icon to display the shortcut menu. Choose Remove from workspace, and the Lotus Notes confirmation dialog box appears. Click Yes to remove the icon, or click No to cancel the command.
In this lesson, you learned how to name workspace page tabs, arrange icons, add a database icon, and remove a database icon. In the next lesson, you’ll learn to open and close a database as well as to understand a database.