


Lesson 9
Using Advanced Mail Features
In this lesson, you learn to organize your mail, attach a file to a mail message, and import and export files using mail.
Organizing Mail
When working with Notes, you might be inclined to accumulate messages that you want to keep as reminders. However, accumulated messages take up valuable
disk space and make it hard for you to find important items in your mailbox. To help you keep your mailbox cleaned up and to optimize your hard disk space, Notes offers these areas, or views, in which you can organize and store your messages.
- Inbox, Drafts, Sent, and All Documents Use these views to store both incoming and outgoing mail. For more information, see Lesson 5.
- Trash Place mail messages you no longer want to keep in the Trash view and then delete them from your hard disk by emptying the trash (see Lesson 6).
- Folders Create your own folders in which to store messages you need to keep. For example, you might create a general Sales folder, and create a folder within it for each product or service you sell. Then you can plac
e mail messages about each product or service in their own folders so you can quickly and easily find them. (See Lesson 6 for details.)
Figure 9.1 shows the open mailbox, with the previously described views listed in the navigation pane.
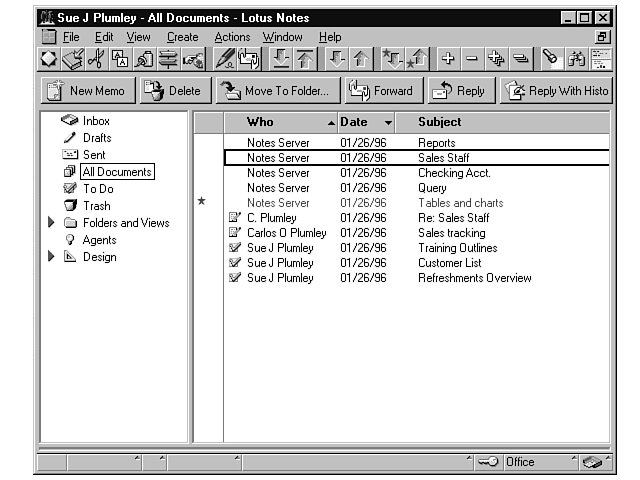
Figure 9.1 Use the views in the Notes mailbox to organize your mail.
Storing mail messages in certain places makes it easier for you to locate them. In addition to doing that, follow these guidelines to prevent excess files from accumulating on your hard disk. Overall, these practices conserve disk space and make managi
ng and organizing those files you keep easier and more efficient.
- When you receive a message, deal with it immediately. You might want to delete the message after you read it, reply to the message and then delete it, or store the message in a permanent place.
- Don’t save copies of the messages you send unless you really need the information in the message. Saved out-going messages take up disk space, too.
- If you must save outgoing messages, you might consider saving a printed copy instead of the copy on disk.
- Every month or so, review the messages in the Inbox, Sent, Drafts, and other views of the mailbox, and delete any messages you no longer need.
Attaching Files
You can send, or attach, files—word processing documents, spreadsheets, programs, data files, and so on—with a mail message to anyone
on the Notes network. To attach a file to a message, follow these steps:
- In your mailbox, create a new memo as described in Lesson 7. Enter the addressing information and any message you want to send.
- With your insertion point within the body text brackets, choose File, Attach. The Create Attachment(s) dialog box ap
pears (see Figure 9.2).
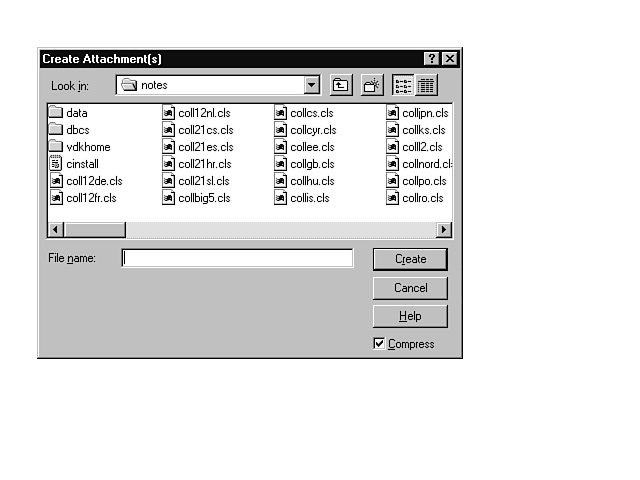
Figure 9.2 Choose the file you want to attach to a mail message.
- In the Look in drop-down list, select the drive and directory containing the file you want to attach. (You can attach any file from your local drive, from a floppy drive, or from the network drive.)
- Select the file from the list, or type the file name in the File name text box.
- (Optional) Choose the Compress check box if you want Notes to compress the file.
 Compress the File?
 If you choose to compress the attached file, the file is packed, or reduced in size, to speed up the transfer over the netw
ork. The recipient of the compressed file won’t know the difference; Notes decompresses the file automatically when the recipient opens it.
- Choose Create. An icon representing the file and the file’s name appear in your memo (see Figure 9.3).
-
When you’re finished with the message, send it as you normally would.
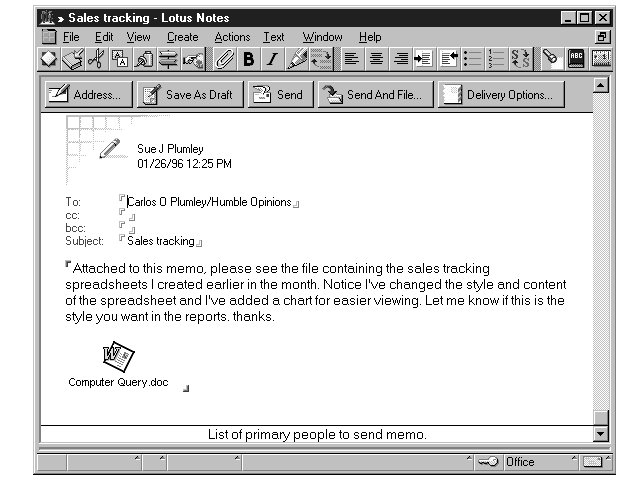
Figure 9.3 Attach one or multiple files to a memo, invitation, or other mail message.
In the mailbox, mail messages that contain attached files have a paper clip beside their subjects. Open such a message as you would any other, and you see that it contains an icon for the attached file. To read an attached file, double-click the file&#
146;s icon. The Properties for Attachment InfoBox appears (see Figure 9.4). Click on the Information tab—the tab with the lowercase i on it—and click one of the buttons described in the follo
wing list.
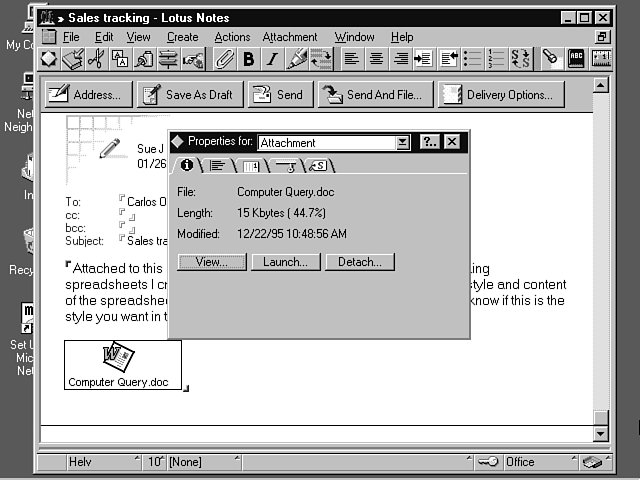
Figure 9.4 Use the InfoBox to control the attached file’s properties.
- View Select this button to display the file in the File Viewer. The File Viewer does not enable you to edit the document in any way, and you can’t view all file types. View may try to launch the program associat
ed with the file type, or it may display an error. Choose File, Close to exit the File Viewer and return to the memo in Notes.
- Launch Choose this button to launch, or start, the program with which the file was created. You can edit, format, or otherwise manipulate the file using this option. Click the application’s Close button to return to Notes.
- Detach Choose Detach to display the Save Attachment dialog box, where you choose a folder in which to store the file. You can save the file on your local drive or on the network drive, and
you can save the file with the same name or a new name. Click the Detach button in the Save Attachment dialog box to complete the process.
 Launch
 To start, or execute, a program. When you open Notes, for example, you’re launching the program.
To close the InfoBox, click the Close (X) button; to open an InfoBox, right-click the attached file’s icon and select Attachment Properties. To learn more about InfoBoxes, see Lesson 3. To lear
n more about the other tabs in the InfoBox, see Lesson 18.
 Don’t Worry
 If you want to get rid of an attached file, click on its icon and then press the Delete key.
Importing Files
You import a file by opening another application’s file in Notes. When you do, the imported file becomes a part of Notes, taking on
all characteristics and formatting of the Notes document. You might import a file if your reader doesn’t have the necessary software to launch an attached file, or if the reader only needs the text or data and doesn’t need to format or alter the
data in its original program.
 Import vs. Attach
 When you attach a file, that file remains in its original format (say, WordPad, 1-2-3, or Word for Windows, for example) and the file moves with the mail mess
age to which you attach it. When you import a file (from WordPad or 1-2-3, for example), you convert the text so it works in Notes. The text becomes part of your mail message.
Table 9.1 lists the most common types of files you can import to Lotus Notes. For a more complete list, look in the Files of Type drop-down list in the Import dialog box.
Table 9.1 File Types Notes Can Import
| File type | Desription |
| Lotus 1-2-3, Symphony | Spreadsheet files |
| Ami Pro Document | Word processing files |
| ASCII Text | Text files |
| BMP, GIF, JPEG, PCX, and TIFF Images | Picture files
|
| Excel 4, 5 | Spreadsheet files |
| Word for Windows 6, 7 | Word processing files |
Follow these steps to import a file into your mail message:
- In your mailbox, start or open the memo into which you want to import the text.
- Position the insertion point within the brackets in the location where you want to insert the imported text.
- Choose File, Import. The Import dialog box appears (see Figure 9.5).
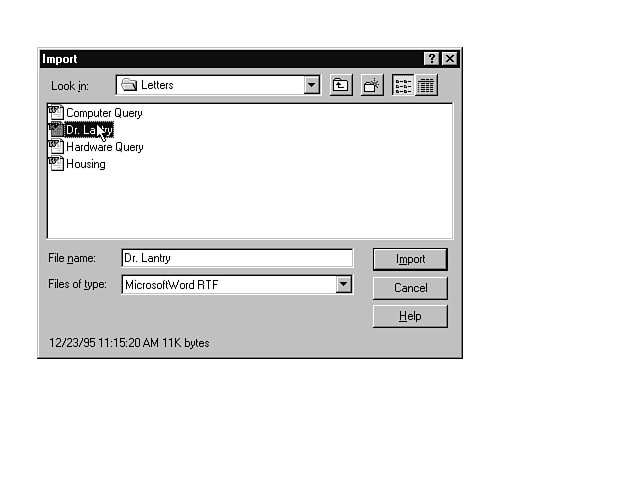
Figure 9.5 Select the file you want to import to the mail message.
- In the Look in drop-down list, choose the folder in which the file resides.
- In the list of files, select the file you want to import.
- In the Files of type drop-down list, select the type of file you’re importing.
-
Click the Import button, and Notes imports the file to the message.
 Won’t Accept File Type?
 If Notes displays a message saying the file type is not supported, you may need to go back into the original application and save the file in a different format, such as ASCII text. See the application’s documentation for more information.
Notes imports the text into the message. You can now select the text, edit the text, or otherwise manipulate the text before you send the memo.
Exporting Files
You can export any of your mail message files for use in another application. If you open the message before you export it, Notes offers
more export options, such as WordPerfect and Ami Pro.
 Export
 To convert a file to another file format, such as a format you can use in a word processing or spreadsheet application.
Table 9.2 lists the file types to which you can convert a Notes file for use in another application.
Table 9.2 File Types to Which Notes Can Convert
| File Type | Description |
| ASCII Text | Straight text |
| Ami Pro | Word processing file |
| CGM and TIFF | Picture files |
| Word for Windows 6, 7 | Word processing files |
| WordPerfect 6.0, 6.1 | Word processing files |
 It Doesn’t Work
 You can use these file types only when reading or editing a memo.
To export a file from Notes, follow these steps:
- In your mailbox, select the file you want to export and choose File, Export. The Export dialog box appears (see Figu
re 9.6).
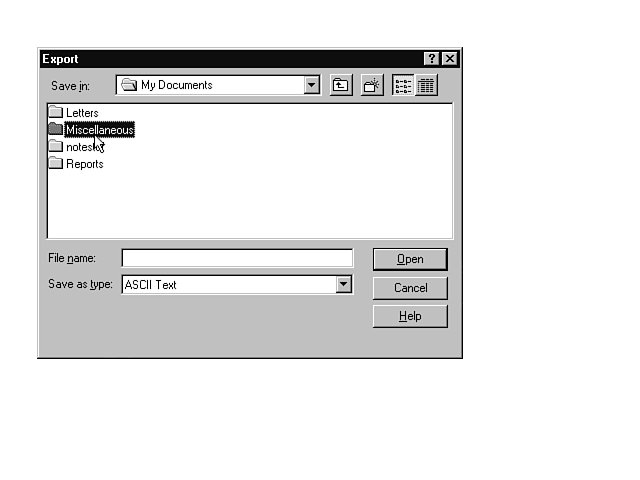
Figure 9.6 Choose a location and file name for the exported text file.
- In the Save in drop-down list, choose a folder in which to save the exported file.
- In the File name text box, enter a name for the exported file.
- In the Save as type drop-down list, choose a file type to save the exported file as.
- Choose Export. The file type Export dialog box appears.
- When prompted, enter options depending on the selected file type.
-
When you finish setting the options, click OK in the Export dialog box. Notes exports a copy of the file to the location you selected. You can open the exported file(s) in an application that uses the designated file types.
In this lesson, you learned to organize your mail, attach files to mail messages, and import and export files to Notes. In the next lesson, you’ll learn to manage workspace pages.


 Compress the File?

 Launch
 Don’t Worry
 Import vs. Attach
 Won’t Accept File Type?
 Export
 It Doesn’t Work


