


In this lesson, you learn how to set up a modem, how to connect to and disconnect from a network, and how to replicate mail and databases.
Notes includes many features that help you connect remotely to your network by way of a modem instead of a direct cable. You use remote connections with Notes when you’re working away from the office, at home, or on the road with a notebook computer. You can complete your work—mail, document creation, task lists, and so on—on your computer without being attached to the network. Then when you’re ready, you call up the server and transfer the data from your Notes program to the network.
Before you plan to connect to the server remotely, check with your Notes administrator to make sure you have a certified Notes User ID and appropriate access to the Notes server. You also need to make sure that the server is set up to receive incoming calls through a modem. Finally, you should know the exact name of your server.
 Remote Connection
A network connection that uses a modem and phone lines instead of a direct cable. For a remote connection to work, both the server and the remote computer must have Notes installed. In addition, each one must have a modem and must be attached to a phone line.
When you work on a computer that’s attached to the network with cables, the mail you send and the documents you create and update are immediately transferred and updated on the server. However, when you work remotely, you must first create copies (or replicas) of the databases you want to use on your remote computer and save them to your local hard disk.
When you first copy (or replicate) the databases, they match the databases on the server exactly. As you work on the copied databases though, they begin to differ from the databases on the server. Not only are you making changes to your copy of the database, but other users are making changes to the original database back at the office. That’s why remote connections are necessary.
When you connect remotely to the server, Notes locates the changed databases and updates them with your changes (your new mail, newly created documents, and edited or deleted documents, for example). And of course, Notes also updates your databases to reflect the changes other people have made to the original databases.
Before you can connect to the network, you must modify some settings in your computer. The changes you need to make include enabling the communications port, setting up your modem, entering the server in your address book, and setting up Notes for Remote Mail.
Disconnect Call Waiting?When working with a modem, you use a phone line that’s normally used for verbal (voice) communication. Therefore, you should disconnect such phone services as call waiting so that your connection will not be interrupted and terminated.
Setting the Port
You use communications ports to connect to the network. When working at the office, as you have throughout this book, you use the LAN port. When working remotely, you use a communications port such as COM1 or COM2. To set the port (let Notes know which port you’re using), follow these steps:
 Encrypt?
Click the Encrypt network data check box if you’re transferring highly sensitive data and you do not want anyone to tap into it. Note, however, that using this option slows down the speed of the transmission and increases the chances of transmission errors and terminations.
You can—and should—also set your modem speed, dialing mode, and modem type, as well as a few other options from the User Preferences dialog box. To configure additional options, perform these steps:

| Setting | Description |
|---|---|
| Maximum port speed | Set the maximum bps (baud per sec- ond) speed your modem can use, such as 14.4, 19.2, or 38.4. (The setting 38.4 represents the port speed; use it if your modem is 28.8 bps.) |
| Speaker volume | Set the volume to off, low, medium, or high. The sounds you’ll hear are the dial tone, the dialing, and the two modems communicating. It’s a good idea to at least keep the setting on low so you can tell whether your modem is connecting and when in the sequence there’s a problem (for ex- ample, if there’s no dial tone or no communication between modems). |
| Dial mode | Indicate whether your phone uses Tone or Pulse dialing. |
| Dial timeout | Enter a number of seconds for Notes to continue to try dialing before hanging up. |
| Hang up if idle for | Enter the number of minutes of no activity that Notes should wait before hanging up. |
Setting a Location
You must set up a location when using a remote connection. For example, you can use Travel or Home instead of the Office location that you’ve used throughout this book. The only difference between Travel and Home is in the way you set them up. You can, for example, set up the Travel location so that you can use your calling card number when you’re in a hotel or remote office location. Additionally, you can set up the Home location with permanent settings for dial out numbers, area codes, and so on (but Travel location settings will change).
To set a location, click the location button in the Status bar (the second box from the right end) and choose either Home or Travel. Alternatively, you can choose File, Mobile, Choose Current Location, select the location from a list, and click OK.
Location SettingsYou should ask your Notes administrator for help setting up the location options if they are not already set. Creating locations is beyond the scope of this book.
Creating a Server Connection
Another setting you must complete includes the connection to the server. You’ll need to know the exact name of the server, as well as the phone number you need to connect to the modem on the server. You can get both from your Notes Administrator. Follow these steps to create the server connection.
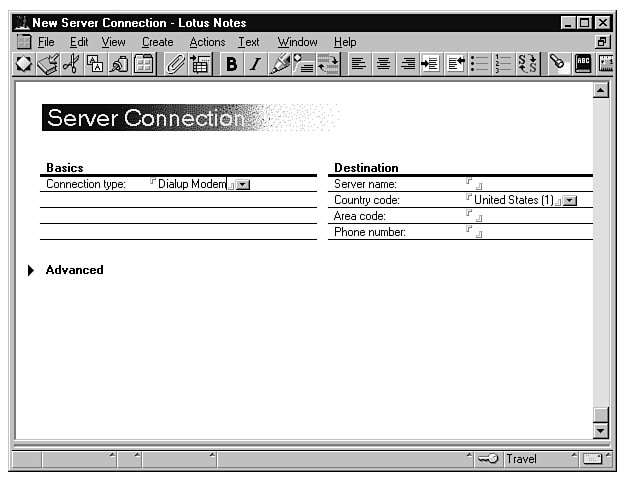 Trouble?
If you are unsure of any setting in the Server Connection sheet, ask your Notes Administrator for assistance.
Connecting to the network from a remote computer is simply a matter of calling the server. Notes takes care of the connection details so you can continue with your work. Disconnecting is also easy; however, make sure you save and close all databases before you disconnect from the network.
To call the network server, follow these steps:
To disconnect from the server, choose File, Mobile, Hang Up.
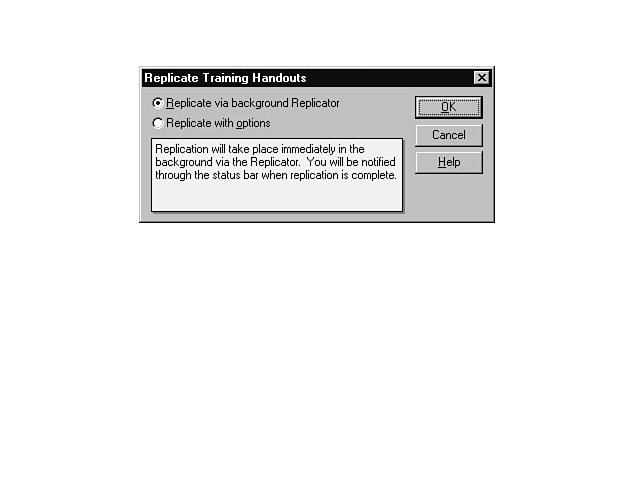
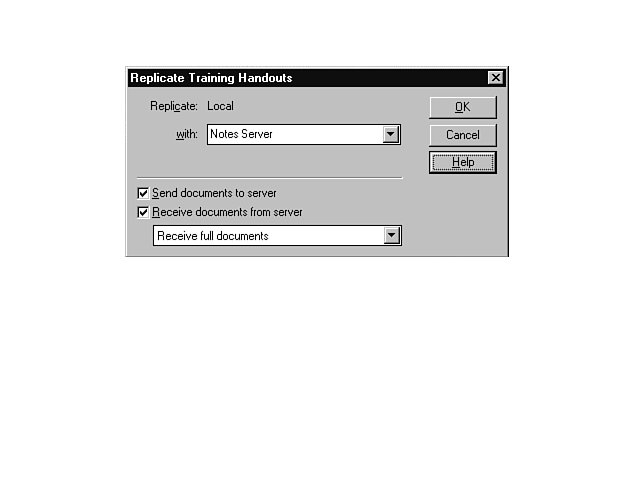
You can replicate, or copy, your databases to and from the server for use when you’re working remotely. Doing so ensures that you’ll always have up-to-date material with which to work and that your co-workers will have access to changes you make to the databases as well.
Follow the steps below to replicate a Notes database:
Notes’ replicate feature also works in the mailbox. When you replicate mail, you send mail to and receive mail from the network using a remote connection, and Notes updates your mailbox accordingly.
To replicate mail, follow these steps:
Send OnlyIf you want to send outgoing mail without receiving incoming mail, select the check box to the left of the Send outgoing mail icon and click the Start tool button. Notes sends your mail to the network.