-by Justin Couch
You've looked at a few browsers, tried a few of the creation tools in the previous chapter, and now would like to start creating your own. Where do you start? Well, the best place is to look at what makes up a VRML file. In this chapter, you'll start creating your own scene without the help of a modeling tool. After all, that's how most people started Web publishing with HTML-with just a handy old text editor.
To get you started, this chapter covers the following topics:
Once you understand the basics, then you'll look at some slightly more advanced areas:
By the end of this chapter, you'll be able to build your own VRML worlds with the same text editor you used to make your first Web pages, but don't abandon the other chapters in a burst of creative passion. There's still a lot to learn.
Throughout this chapter, you will develop a VRML world of a simple virtual tree. If this is your first VRML 2.0 file or even your first VRML file, don't worry-this chapter starts slowly and illustrates some of the common mistakes to watch out for.
After this chapter, things will speed up. If you've seen VRML before and already know something about it, then I suggest you still look through this chapter to see how much things have really changed with the 2.0 specification. You'll also find several important design tips that will help you when building VRML worlds.
VRML is similar to HTML in many ways. For the "backyard operator," it costs nothing to start creating-all you need is a text editor. In fact, even after you've used a modeling tool, you'll probably need to go back and hand-edit the file. Many of the worlds you see on the Web today were created with simple editors like Notepad or vi. Just like HTML, the VRML code can be viewed with the View Source command available in most browsers.
This isn't to suggest that you shouldn't use the modeling tools, but it's important to understand the details underneath the interface. The modeling tools were presented first in the previous chapter because that's where you spend most of your time, but get your text editors ready to take a look at the code at its base level for now.
The first line is known as the header for VRML files and must follow a fixed format for it to be recognized by the browser. Your header will always look like the following:
#VRML V2.0 utf8
What does it all mean? #VRML
says to the browser that it's about to start looking at a VRML-type
file; VRML uses #VRML to
distinguish this sort of text file from an HTML file. The next
bit tells the browser that it's about to deal with a Version 2
VRML file, which is important because the two versions aren't
compatible. The last part tells the browser what sort of character
set to use.
| Note |
Utf8 is an encoding that allows the file to be written with non-ascii characters. This is all part of the internationalization of computing systems. For example, a site aimed at Russians has the text descriptions in Cyrillic characters rather than English. You might have heard of the term "Unicode characters." Unicode and Utf8 are similar animals. The International Standards Organization has defined a set of characters that need to be represented, which is known as ISO 10646. Utf8 is one method of encoding these, and Unicode is another. HTML requires using special escape sequences to get non-ascii characters, but VRML does not. If you're Danish, then you just type away in Danish to create your VRML file. |
Except for the first line of a file, you can place comments by using the # character; anything after that character on the line is ignored by the browser. Comments are helpful when you're trying to debug one of your files and also when others are looking at your source code and trying to understand how you have achieved those amazing effects.
One term you'll see frequently throughout this section is node. Almost everything is a node, which is a predefined word describing a bit of the VRML scene. Nodes take many forms-from simple shapes to complex scripts-that are referred to as their type. You're probably familiar with the term tag to refer to the formatting code instructions in HTML; the VRML equivalent is called a node. To identify a node, notice that it's written in the file with the first letter of every word in uppercase characters, such as Cube, Material, IndexedFaceSet, and so forth.
Because you're writing this in a text editor-that is, "by hand"-rather than a modeling tool, you will no doubt spend a lot of time in the specifications reading up on what properties a particular node type has. Therefore, it's worth a bit of time to understand how a node type's definition is put together.
A node type has a number of fields to describe its characteristics. At this point, VRML starts to look a little bit more like a programming language, but don't be concerned. This is where VRML 2.0 gets its power. Each field must have a basic type, like MFString or SFFloat; a name, like url or speed; a default value, like 0 or FALSE; and some set of access privileges, like exposedfield or eventOut. (Access privileges will be discussed in depth in Chapter 19, "Using Built-in Animation Techniques.")
The basic field types help define the characteristics of the node. Types can be any kind of data, from integer numbers, strings, and booleans to time or even color values. You can learn more about these by dissecting the MovieTexture node definition, which looks like the following in the VRML 2.0 specification:
MovieTexture {
    exposedfield MFString url []
    exposedfield SFFloat speed 0
    exposedfield SFBool loop FALSE
    exposedfield SFTime startTime 0
    exposedfield SFTime stop'Time 0
    field SFBool repeatS TRUE
    field SFBool repeatT TRUE
    eventOut SFFloat duration_changed
}
The curly brackets are used to delimit the scope of the node in the same way that the angle brackets (< >) are used in HTML, but the name lies outside the brackets, rather than inside. The name for this node is MovieTexture. The other major difference is that VRML nodes can be nested inside other nodes. Everything that helps define this node is contained in a set of curly brackets; some nodes are longer and some are shorter, but everything within the brackets belongs to the node.
Notice that some types start with SF and others with MF. What's the difference? The first two letters of the field type specify how many of that type to look for. SF types can take only one value-so you can give an SFFloat only one floating point value. MF types can take any number of values.
If you're specifying more than one value, you need to enclose it in square brackets. Take the string field type, for example: An SFString could contain the value "Hello World", which is one value, but an MFString can contain "Hello" and "World" as two separate strings. The values are separated by commas inside the square brackets. The following are all legal declarations of the value 1 for a multiple-valued field:
1
[1,]
[ 1 ]
The default values are just that-values that are there by default. When coding VRML, you don't need to include all the fields, only the fields you need. Any fields that aren't listed assume the default value.
The 2.0 specification defines two groups of nodes (as compared to node types): group and leaf. A group node can contain any number of other nodes called child nodes, but a leaf node can include only specified nodes.
For example, the Transform node, which has a field called Children, is of type MFNode, meaning it can contain many other nodes. All nodes contained within this group node get the transform applied to it. The Shape node, on the other hand, has only two SFNode types in its definition: one that contains the appearance node and another for the geometry node. These are the only nodes that can be placed in the Shape node.
Now that you have enough knowledge to work out what's happening in somebody else's file, you want to start thinking about your own. But you haven't even seen how to write VRML yet? Good, because it pays to think first, then create. In the 1.0 version, it didn't matter so much, but now, with the ability to add programmable behaviors, the wrong method of structuring your nodes could lead to a lot of unnecessary work.
When designing a scene, the best way to think about how the nodes go together is to visualize how the individual parts fit. On the small scale, a hand is part of an arm. A body has two arms and two legs, but the body also exists within the world. From this, you get an idea of how to create a hierarchy of nodes for the scene. For those unfamiliar with 3D graphics, this is called a scene graph. A scene can be deconstructed into a series of elements with links showing how the parts relate together, as Figure 14.1 shows.
Figure 14.1: Scene graph for a simplified car.
In VRML 1.0, you could get away with a simple flat model in which every node existed at the same level, but this is definitely not the case for VRML 2.0. Remember the problem that inverse kinematics helped you out with back in Chapter 9, "Creating Advanced 3D Animations for the Web"? Well, the same problem exists in VRML. Take the simple case presented in the preceding paragraph. Each finger can move individually on the hand, but when the hand moves, the fingers move with it. If you use a flat object structure, then when you move the hand, you also have to make sure you move the fingers to stay with it. However, if you use a hierarchical structure, when you move the hand, the fingers automatically follow. This is particularly important in the later stages when you're involved in behavior programming-where the less you have to do the better.
There's no such thing as a correct hierarchy system or even some sort of system you could use to make one; it comes down to the individual situation and experience. For the example of the hand and fingers, it would be silly to make the fingers an object that wasn't a child of the hand, but in another case, you might want a model, such as a shaky car, in which all the parts jiggle whenever the horn is honked.
One last thing to consider before you start writing VRML files is the formatting. As in any other text document, formatting can make the difference between a readable file and an incomprehensible one. Similarly, there's no correct way to format a file, but the following guidelines should help you understand not only what's being written here, but also how to figure out what's wrong with your own file. These are only suggestions; you should use whatever works best for you.
Compared to HTML, VRML usually creates large files, and the actual contents of a VRML file are never directly viewed. These two factors mean that any excess formatting won't be to your advantage and will cause longer download times. A good example of this is using spaces for indenting. The code in this book uses four spaces of indenting for readability, but you shouldn't in your file. In a typical file, using four instead of two spaces can lead to a 30 percent difference in file size. Using tabs is better, but you usually end up having nodes written way off the right margin of your page-so use one or two spaces.
Whether you're creating scenes with a text editor or with a scene builder, there are always some basics you need to know. The first is the basic shapes. VRML offers a number of basic primitives, such as Cone, Box, Cylinder, and Sphere. There are also more complex primitives, such as Extrusion and the IndexedFace/Line/PointSet nodes.
It's best to use a collection of the basic primitives to form
the bulk of your scene. The basic primitives, like the sphere
and cone, are normally provided as part of the renderer at the
heart of the VRML browser. This makes drawing them go more quickly
than if you had created them as a big collection of polygons because
the browser can control the amount of detail to get the best performance.
| Tip |
You should strive to use the basic primitives whenever possible, instead of the more complex ones. This always leads to better performance. |
These primitives provide the basic complete shapes. If you want to create your own, then you should look at the section called "Advanced Primitives" later on in this chapter. All the VRML primitives are based on distances from the origin or center. A given height extends for half that value above and below the origin, so a cube with a width, height, and length values all equal to 1 would actually be 2 ¥ 2 ¥ 2.
OK, enough about definitions-time to build that tree.
This is really quite simple. You use nodes to define what you want to appear, and they appear in the browser when you load the file. The browser takes care of all the rendering and navigation.
#VRML V2.0 utf8
Listing 14.1. A first attempt.
#VRML V2.0 utf8
Cylinder {
    radius 0.25
    height 1
}
Sphere { radius 0.5 }
If you load this file into a VRML browser, it will complain. That's because you've forgotten something fundamental about VRML: A geometry node cannot exist on its own; there needs to be some node it belongs to. If you read the VRML specification closely, you will notice it says that the geometry nodes must exist as a child of the Shape node-specifically in the geometry field. Here's how you would represent Step 2 from above:
Shape {
    geometry Sphere { radius 0.5 }
}
Even when you do try to load it now, it doesn't look very much like a tree. In fact, you won't see anything. Hmmmm, where's the cylinder and sphere? Lesson number one for VRML. The background color and the object color both default to black-not very helpful. If you can't see an object, usually it's because you haven't given it a color. You need to figure out how to add materials to your objects, but you're in luck! That's the next example.
If you were to sit down with just the VRML specification, then adding color wouldn't be immediately obvious. VRML primitive nodes do not include color as part of the definition because your cube doesn't have to just be a plain color. The color-applying command is contained in the Material node, which is far more powerful. With the Material node, you could do things like applying texture maps or even a rotoscoped movie. These material properties are defined in a general node called Shape.
The Shape node has only two fields: the appearance and something called geometry. The appearance field can take only one type of node: an appearance node, one of those nodes that's always surprising you with something new it can do. For the moment, limit youself to just making it color your cylinder. To do this, you need to use the material field, which takes only one type of node-the Material node. Hey, this is pretty logical.
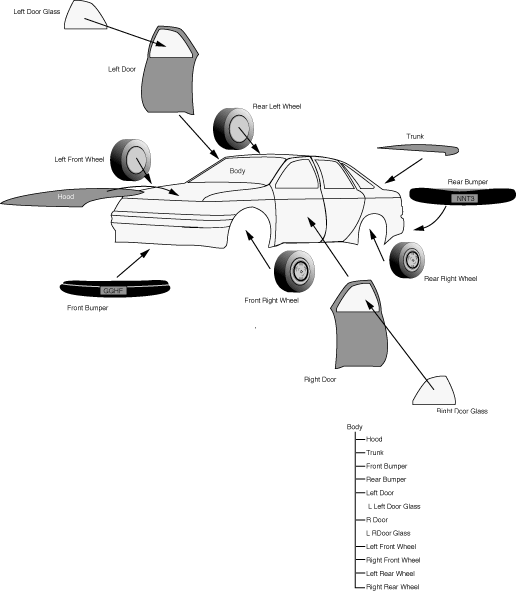
Listing 14.2. The tree trunk VRML source code with color added.
#VRML V2.0 utf8
#
# A Virtual Tree
Shape {
    appearance appearance {
        material Material { emissiveColor  .41 .40 .1 }
    }
    geometry Cylinder {
        radius .25
        height 1
    }
}
Figure 14.2: The basic tree trunk colored in brown.
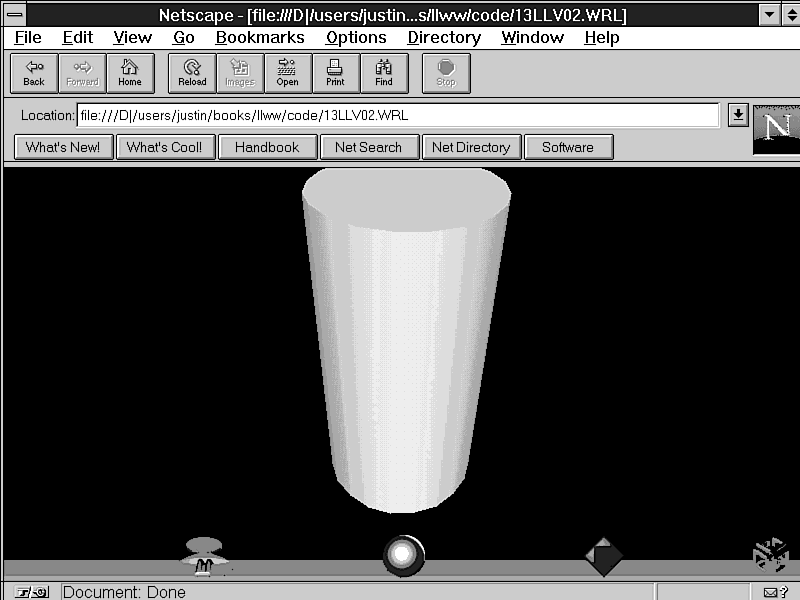
Shape {
    appearance appearance {
        material Material { emissiveColor .1 .6 .1 }
    }
    geometry Sphere { radius 0.5 }
}
If you view this file in a VRML browser now, you get what you see in Figure 14.3. However, it still doesn't look much like a tree. Ooops. Looks like you need to do something else, like move the sphere above the trunk. The next example shows you how to move objects around, so you can position the leaves above the trunk where they belong.
Figure 14.3: The trunk and leaves centered on top of one another.
So which of the color fields should you specify? There are so many of them! For general purposes, all you usually need is the emissiveColor field. The color fields are defined in the following list:
As you just discovered in the previous example, all new objects are positioned at the origin. Therefore, to create a world with several objects, you need to move some of them. Enter the Transform node. Like the appearance node, this is one of those multifunctional nodes with lots of surprises. To start with, you'll use it just to move some of the objects around. The Transform node has the following definition in the specification; it shows you all the fields that can be contained in the Transform node:
Transform {
  eventIn      MFNode      add_children
  eventIn      MFNode      remove_children
  exposedField SFVec3f     center           0 0 0
  exposedField MFNode      children         []
  exposedField SFRotation  rotation         0 0 1  0
  exposedField SFVec3f     scale            1 1 1
  exposedField SFRotation  scaleOrientation 0 0 1  0
  exposedField SFVec3f     translation      0 0 0
  field        SFVec3f     bboxCenter       0 0 0
  field        SFVec3f     bboxSize         -1 -1 -1
}
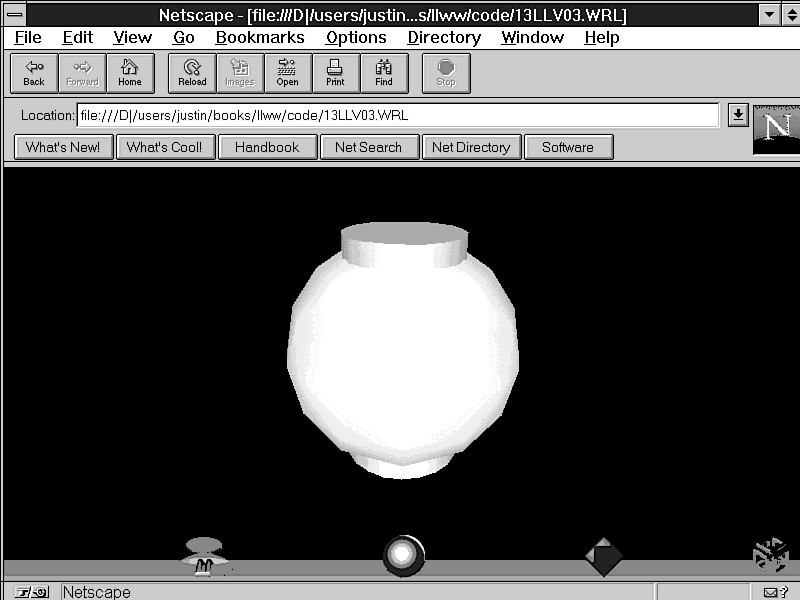
Transform is one of the grouping nodes discussed earlier. The children field is where you locate your child nodes, such as the Sphere. For the moment, look just at the translation. To move the sphere, just set the values of the translation to where you want to put the center of your collection of nodes specified in the children field. When nesting Transform nodes, the effects are in relation to the parent; this will be illustrated later when you produce the tree with the cone type top. Now, fix that tree:
Transform {
    translation    0 .9 0
    children [
        Shape {
            appearance appearance {
            material Material { emissiveColor .1 .6 .1 }
            }
            geometry Sphere { radius 1 }
        }
    ]
}
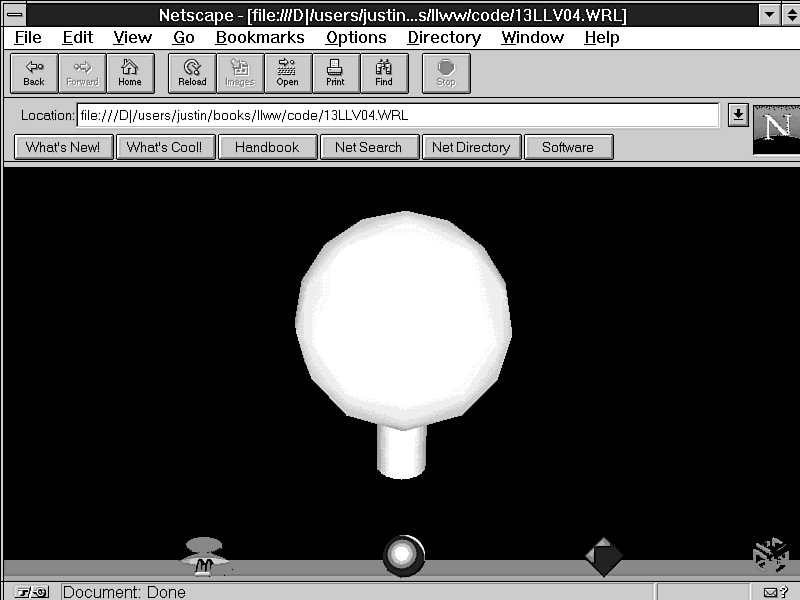
The tree top now looks like Figure 14.4. However, the Transform node can do a lot more than just translation. Who wants to just move around, when you can rotate and scale, also?
Figure 14.4: The complete tree (finally).
Several other fields in the Transform node were not covered in the previous section, but most of them are fairly self explanatory. A rotation rotates the object around the point that is defined as the center. Scale multiplies the values on each axis by the specified value. The scaleOrientation field is a little more confusing-it specifies an axis that the scale values then align themselves with. Once mastered, this is a very powerful tool because it allows you to do shears and other effects. However, first you need to understand how the SFRotation field type works.
When using scales, one of the most confusing aspects to understand is how the SFRotation field works. To examine how it works, first look at its use in the Transform node, which has the following partial definition:
Transform {
    exposedField SFRotation rotation            0 0 1 0
    exposedField SFVec3f     scale              1 1 1
    exposedField SFRotation  scaleOrientation   0 0 1 0
}
The SFRotation field type requires four numbers. The first three are the axis around which the rotation takes place, and the fourth is the angle, in radians, of the rotation. Specify the single axis by placing a 1 in one of the first three values, which represent X, Y, and Z. Try rotating a red cone object:
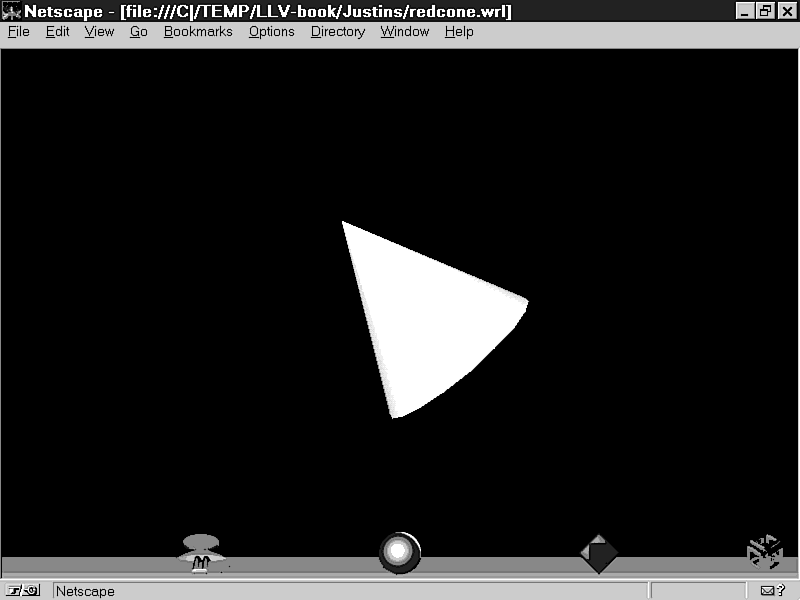
Transform {
        rotation  0 0 1 .707
        children [
            Shape {
                appearance appearance {
                material Material { emissiveColor 1 0 0 }
                }
                geometry Cone {
                    bottomRadius 1
                    height 2
                }
            }
        ]
}
Figure 14.5: A cone rotated around a diagonally defined vector.
rotation 1 2 1 .707
Using this format, you can perform several quite complex rotations in a single line. There are many ways you could specify the same amount of rotation; for example, the following two rotations achieve the same effect:
rotation 3 5 2 1.57
rotation -3 -5 -2 -1.57
Which one to use depends on the context. Normally, you would choose the first option because it contains four fewer characters-a factor not usually that important, but in a large file with hundreds of rotations and objects, the difference in the resulting file size could be quite large.
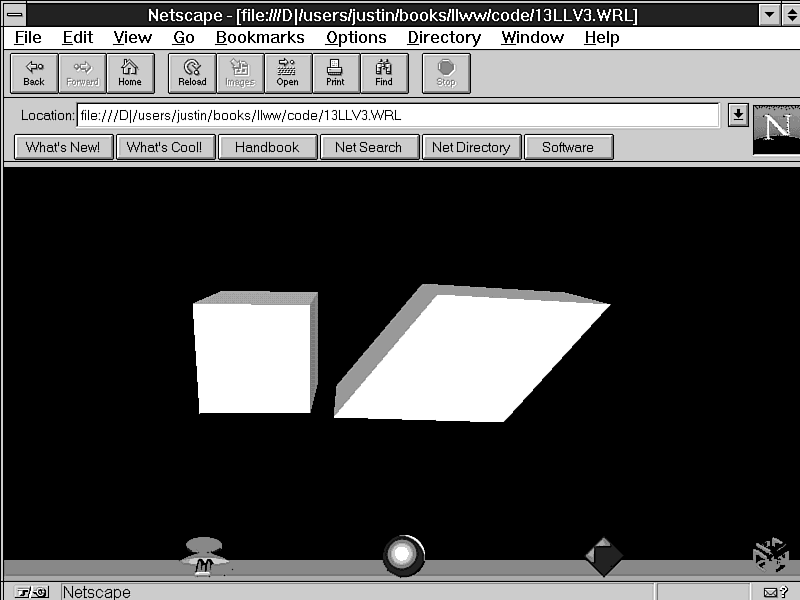
Now that you've mastered using SFRotation, you can start using it in more complex situations, such as creating shears. The scaleOrientation field uses the SFRotation type to specify an axis along which the scale is then applied. Take a look at an example of how a simple box can be sheared:
Transform {
    scaleOrientation    1 1 0 0
    scale               2 2 1
}
Shape {
    appearance appearance {
        material Material { emissiveColor 1 0 0 }
    }
    geometry Box {
        size 1 1 1
    }
}
Figure 14.6 shows the original cube to the left and the sheared cube to the right.
Figure 14.6: The original cube and its resulting shear.
Now you have everything you need to create some complex objects just from the basic primitives. In the next example, you'll build another tree that will use multiple levels of Transform nodes.
Transform {
    translation 0 1.5 0
    children [
        Shape {
            appearance appearance {
               material Material { emissiveColor .1 .6 .1 }
            }
            # Default cone values look good
            geometry Cone {}
        }
    ]
}
Transform {
    translation 0 1.5 0
    children [
        Shape {
            appearance appearance {
               material Material { emissiveColor .1 .6 .1 }
            }
            # Default cone values look good
            geometry Cone {}
        }

        # Now put in the second cone
        Transform {
            translation 0 .75 0
            children [
                Shape {
                    appearance appearance {
                        material Material { emissiveColor .1 .6 .1 }
                    }
                    geometry Cone {
                        bottomRadius .8
                        height 1.5
                    }
                }
            ]
        }
    ]
}
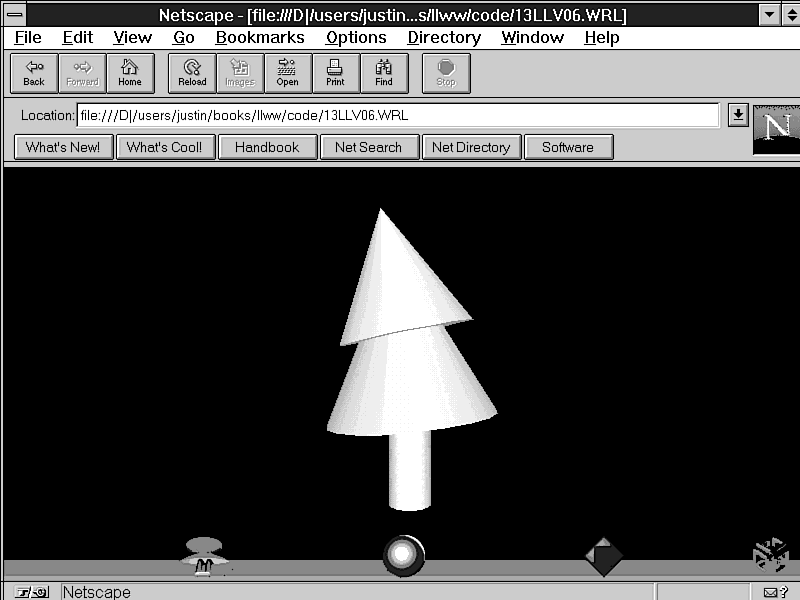
Figure 14.7 shows the results of this VRML file in the CosmoPlayer browser.
Figure 14.7: The pine tree standing too perfectly straight.
Okay, the tree is looking pretty good, but what if the wind is blowing? Trees don't tend to stand straight up most of the time because in nature, wind makes trees sway. To produce a little sway at the top, add a small rotation to the top cone. This illustrates a good reason for creating a hierarchy of objects.
then things would still look a little strange. This is because the rotation is based on the center of the object. What you really want to do is locate the rotation around the base of the cone.rotation 0 1 0 0.1
Figure 14.8: The final pine tree swaying in the breeze.
Listing 14.3. The code to produce a swaying tree.
#VRML V2.0 utf8
#
# A Virtual Tree
Shape {
    appearance appearance {
        material Material { emissiveColor  .41 .40 .1 }
    }
    geometry Cylinder {
        radius .25
        height 1
    }
}
Transform {
    translation 0 1.5 0
    rotation 0 0 1 0.1
    center 0 -0.75 0
    children [
        Shape {
            appearance appearance {
               material Material { emissiveColor .1 .6 .1 }
            }
            # Default cone values look good
            geometry Cone {}
        }

        # Now put in the second cone
        Transform {
            translation 0 .75 0
            rotation 0 0 1 .1
            center 0 -.375 0
            children [
                Shape {
                    appearance appearance {
                        material Material { emissiveColor .1 .6 .1 }
                    }
                    geometry Cone {
                        bottomRadius .8
                        height 1.5
                    }
                }
            ]
        }
    ]
}
Besides the basic primitives, VRML also has capabilities for defining your own models by using sets of points and connecting them to form faces. This is how modeling tools convert models into VRML models-by outputting a list of point coordinates and a list of which points are connected to form all the faces within the model. Coordinates can be connected to form faces, connected to form lines, or left as a group of points.
Advanced primitives also include the ability to specify different colors or textures for each vertex or face within the node. This makes it possible to create some interesting models. Look at some of the nodes used to create these advanced primitives:
Using these advanced primitives, you can combine models you've created yourself with lines to create unique worlds, like the one shown in Figure 14.9.
The advanced primitives are fairly simple to create by hand, but when creating a complex shape, they become unwieldy to maintain in a handwritten file. Normally, they're generated by some modeling package. For this reason, take just a brief look at how to construct a simple square and triangle with the IndexedFaceSet node.
At the heart of the face set, it really just consists of a list of 3D points and a series of connections through them. Here's the definition of the IndexedFaceSet node:
IndexedFaceSet {
  eventIn       MFInt32 set_colorIndex
  eventIn       MFInt32 set_coordIndex
  eventIn       MFInt32 set_normalIndex
  eventIn       MFInt32 set_texCoordIndex
  exposedField  SFNode  color             NULL
  exposedField  SFNode  coord             NULL
  exposedField  SFNode  normal            NULL
  exposedField  SFNode  texCoord          NULL
  field         SFBool  ccw               TRUE
  field         MFInt32 colorIndex        []
  field         SFBool  colorPerVertex    TRUE
  field         SFBool  convex            TRUE
  field         MFInt32 coordIndex        []
  field         SFFloat creaseAngle       0
  field         MFInt32 normalIndex       []
  field         SFBool  normalPerVertex   TRUE
  field         SFBool  solid             TRUE
  field         MFInt32 texCoordIndex     []
}
The list of points goes into the coord field, and the coordIndex field contains the list of connections. To specify a face, list the index of each point to be used in order, then terminate the list with the value of -1. The same set of points can produce two different figures, as demonstrated in the following steps:
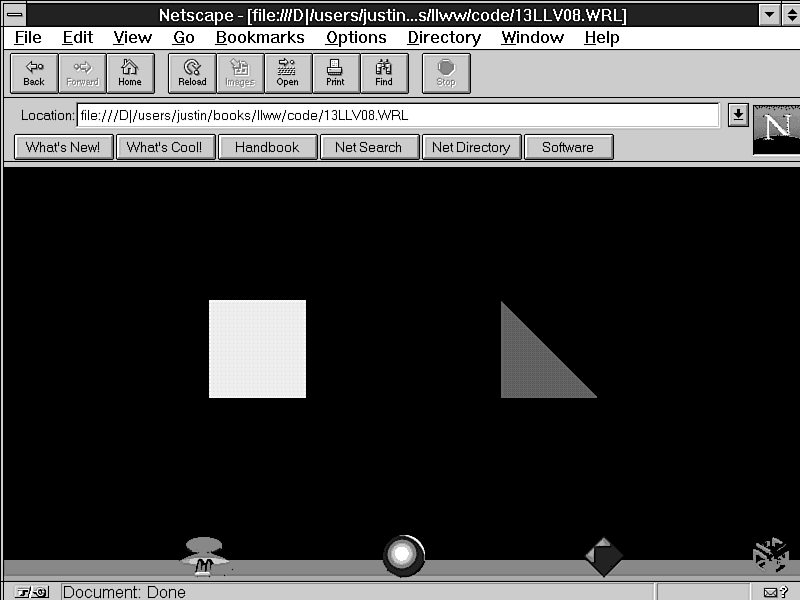
Figure 14.10: Two sets of identical coordinates but with different ordering of vertices.
Listing 14.4. VRML code to illustrate how the same vertices
can be connected differently.
#VRML V2.0 utf8
#
# Example of Two IndexedFaceSets
Transform {
    translation -1.5 0 0
    children [
        Shape {
            appearance appearance {
                material Material { emissiveColor 0.3 0.2 0.1 }
            }
            geometry IndexedFaceSet {
                coord Coordinate {
                    point [
                        0 0 0, 1 0 0, 1 1 0, 0 1 0
                    ]
                }
                coordIndex [ 0, 1, 2, 3, 0, -1 ]
            }
        }
    ]
}
Transform {
    translation 1.5 0 0
    children [
        Shape {
            appearance appearance {
                material Material { emissiveColor 0.1 0.2 0.3 }
            }
            geometry IndexedFaceSet {
                coord Coordinate {
                    point [
                        0 0 0, 1 0 0, 1 1 0, 0 1 0
                    ]
                }
                coordIndex [ 0, 1, 3, 2, 0, -1 ]
            }
        }
    ]
}
The ordering of vertices is very important. The list you define in the coordIndex field is the order in which the points are joined together. Joining points 0 1 2 3 0 produces a square shape, but the ordering of 0 1 3 2 produces a bowtie shape. Also, if you don't define the normals for each face, then the browser calculates them from these points. When you are behind a face, then it won't be visible to you. Effects like walls inside an object can be produced by using the forward and reverse ordering of points within the same coordIndex field.
VRML, like HTML, is a hypermedia system. Not only can you display 3D objects, but you can also include video and streamed 3D sound. However, you know the advantages of linking to other Web pages; VRML supports this and goes one step further. You can also link to other VRML worlds. All this magic is done with the Anchor node.
The VRML Anchor node works in a similar fashion to the anchor <A> tag in HTML. The Anchor is a grouping node, so it can contain objects like the good old Shape node with its primitives. When a user clicks on the primitive, the browser is sent to the URL that's linked. This is how the Anchor definition looks in the specification:
Anchor {
    eventIn      MFNode   addChildren
    eventIn      MFNode   removeChildren
    exposedField MFNode   children    [ ]
    exposedField SFString description ""
    exposedField MFString parameters  [ ]
    exposedField MFString url         [ ]
    field        SFVec3f  bboxCenter   0 0 0
    field        SFVec3f  bboxSize     -1 -1 -1
}
One of the handy fields is the description field. It was added so that a Text string could be used to describe what the link was to. When the user moves the mouse over the top of the object with a link, the text listed in the description field shows up.
First, start with a simple world made of two basic primitives. Each of these primitives will contain links, one to another VRML world and the other to a HTML document. Because you have two separate links, you need two Anchor nodes to contain the objects.
Listing 14.5. Linking your world to other VRML worlds and HTML
pages.
#VRML V2.0 utf8
#
# Using Anchors
Anchor {
    url      "another.wrl"
    description "A Link to another VRML world"
    children [
        Transform {
            translation 1.5 0 0
            children [
                Shape {
                    appearance appearance {
                        material Material { emissiveColor 0.1 0.1 0.6 }
                    }
                    geometry Sphere {}
                }
            ]
        }
    ]
}
Anchor {
    url      "another.html"
    description "A Link to another HTML Document"
    children [
        Transform {
            translation -1.5 0 0
            children [
                Shape {
                    appearance appearance {
                        material Material { emissiveColor 0.6 0.1 0.1 }
                    }
                    geometry Box {}
                }
            ]
        }
    ]
}
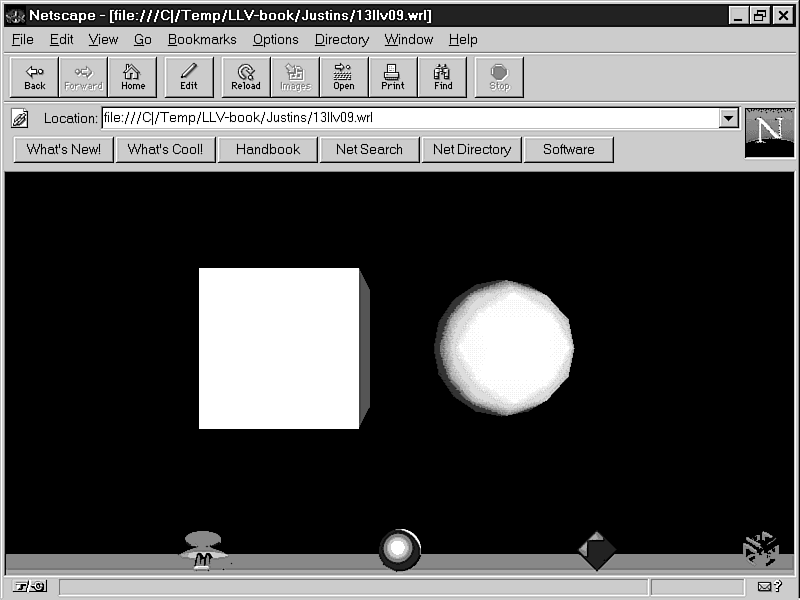
The two target files are very simple; both offer links back to the original VRML file to show you examples of how to link VRML and HTML together. Figure 14.11 shows the final VRML file in a browser.
Now you have enough knowledge to design some interesting worlds. It's time to take a step back and look at what you are about to create. Navigating VR worlds provides quite a different challenge compared to moving around a collection of 2D Web pages, so consider several of these tips when you're creating VRML worlds.
First, VRML worlds take a lot longer to download than most HTML pages. Therefore, users are likely to want to spend more time exploring before moving on to the next place. On the other hand, they don't want to have to explore too much to find what they are after. A clear concise world with objects that are easy to identify as having links should be the aim.
A good VR world should offer a series of readily identifiable landmarks to help navigation and also act as reference points in the initial exploration. In small worlds, this doesn't generally present a problem because all the available information is given within the current viewing area. However, with VRML 2.0 comes the capability to create giant seamless worlds that aren't displayed all at once, so the need for landmarks becomes more important.
There are two types of VRML conversion programs. The first, and largest group, is the type for converting other file formats to VRML, and the second type is the 1.0 to 2.0 converters.
Right from the very beginning, it seemed that VRML was destined to become popular. Within months of the start of the VRML development process, conversion programs for most of the major 3D graphics file formats were available.
One of the most used programs is Keith Rule's WCTV2POV. This shareware MS Windows-based program is capable of importing and exporting just about all the current common file formats and then exporting them to VRML 1.0 format. It has a simple, easy-to-use interface that makes file conversion as simple as two commands to open the file and then save it as a given format; specifically, this is how it's done:
Because VRML 2.0 is so new (still in draft at the time of this writing) and so different from VRML 1.0, the browsers being released also come with their own converters. When the browsers are used to view 1.0 files, they operate seamlessly but can also be used separately as a command-line program. The converters are included as part of their respective browsers, so you don't need to download them separately. Both follow this syntax:
vrml1to2 <VRML1.0 filename> <Output filename>
Currently, it would be wise to use only the converter that came with the browser because the browsers have varying levels of capability, and the converter is usually designed for that level. In the previous chapter, you looked at the two current VRML 2.0 browsers: Sony's CyberPassage 2.0 and Silicon Graphics CosmoPlayer. For either of these browsers, the process goes like this:
Then, hit the return key. The program will work on the conversion and come back with a message saying that the conversion was successful.vrml1to2 tree.wrl tree2.wrl
If you're using a non-VRML modeling package, then you need to first save the output in a common format like DXF, convert that to VRML 1.0, then use the browser's converter to change it to VRML 2.0 format.
One of the major problems with using modeling tools that aren't wise to VRML is that they don't take advantage of its primitives, which can lead to massive file bloating. If you're using 3D Studio, it doesn't save a sphere as a sphere but rather as a big collection of polygons. If you have the detail turned up high, you end up with a VRML file containing a few thousand more polygons than are really needed. In these cases, you need to hand-edit the file to remove the polygon mesh and replace it with the appropriate VRML primitives. If you have many of these objects, then it would probably be quicker to create the whole lot by hand.
Another major problem is the differences in color models used. This is not necessarily the conversion program's fault, but that of the software packages. The rendering libraries the programs are based on all use different color models. An attempt was made to fix this in the ill-fated VRML 1.1 specification, and work is underway to specify algorithms from the VRML color model to that of the major rendering libraries. Even at this early stage, it would be a good idea to check what your world looks like on as many different browsers as possible to ensure a reasonably good-looking world. Recently, it was reported that a color that looked gold on one browser turned out a very dark red on another running on the same machine.
The final problem is that many programs don't export to DXF properly, which often means missing object normals. If you're using a DXF model, you should first load it into a CAD program to make sure everything is correct, then resave it before trying to convert it to VRML.
Now you have a fairly good understanding of the basic concepts of VRML and how it works. Don't be surprised if a lot of it has gone over your head on the first reading. VRML is a large and relatively complex language that takes some time to learn. You can avoid some of this initial learning pain by using existing modeling tools and then running them through conversion programs. This introduction has gone fairly slowly, but from now on, it's assumed that you can create some basic worlds and would like to spruce them up a bit by using some of VRML's features.
So you've gone as far as you can with basic colors and links, even tried a few IndexedLineSets. What's left?
| I've been looking around the Web and some of the VRML files have something about a draft number in the header. What's this about? | |
| The draft #n in the header was used to differentiate files that conformed to the draft standards of VRML 2.0. At the time of this writing, Draft 2b was current, but by the time this book reaches the shelves, VRML 2.0 will be complete so you don't need to worry about this line. Your VRML browser should be able to understand its meaning. | |
| Which is the best browser to view these examples in? | |
| All the examples in this chapter and in the rest of Part IV were tested with Silicon Graphics's CosmoPlayer. At the time of this writing, the only other browser was Sony's CyberPassage, which came out before CosmoPlayer and supported only Draft 1 of the VRML 2.0 specifications. There were enough differences between the drafts that it couldn't be used for testing. |