


-by Justin Couch
Chapter 14, "Starting with Models," introduced you to the concept of the Material node, which allowed you to define some pretty colorful worlds. However, in the real world, no object is ever just one color. Therefore, this chapter introduces texture mapping to make your 3D world more interesting. Textures involve applying a picture to an object. In VRML, a texture could be anything from a plain image to an MPEG video.
Putting textures in VRML worlds is easy. However, getting them all to line up is another story. In this chapter, you'll see how to add that extra bit to your images with some of the following techniques:
The chapter finishes on a theoretical note to show you when to use, or not use, textures.
In the previous chapter, I introduced the appearance node as a way to get some color into your world. Now you'll take a more in-depth look at it to see all its capabilities. Here's how the appearance node is defined:
appearance {
    exposedField SFNode material          NULL
    exposedField SFNode texture           NULL
    exposedField SFNode textureTransform  NULL
}
In the previous chapter, you used just the material field, but now you'll get to play with everything. You'll start with the texture field.
The texture field is where you put a reference to the type of texture node you'll be using. VRML defines three types of textures: ImageTexture, MovieTexture, and PixelTexture. All three are nodes that can be placed here, but you can't place just any type of node. Usually, you will see this rule referred to as using a legal node, as opposed to adding a node that's not allowed. For example, a Shape node would be an illegal node because it's not allowed in this context.
PixelTextures are covered after this section and MovieTexture is covered later in the chapter; this is how ImageTexture is defined:
ImageTexture {
    exposedField MFString url     []
    field        SFBool   repeatS TRUE
    field        SFBool   repeatT TRUE
}
ImageTexture looks somewhat like the HTML <IMG> tag. To use an image as an texture map, simply supply the URL to the image in the url field. Once you have the geometry defined in the Shape node, you have an instant texture map. The VRML 2.0 specification requires that JPEG and PNG image formats be supported, but GIF is recommended. Both VRML 2.0 browsers supported GIF and JPEG images from their first beta release.
Any image can be used as a texture. It can be something simple, like the wood grain used in the example in Chapter 17, "Real Life Examples: The VRML Art Gallery: A VRML World by Hand," or more complex, such as a photo of your favorite basketball player. The first texture model will be a basic marble column; you'll wrap a marble texture around a basic column constructed out of a group of cylinders:
Shape {
   appearance appearance {
       texture ImageTexture { url "marble.jpg" }
   }
   geometry Cylinder {}
}
Not much has changed from the example of using color in the previous chapter; you just substitute the ImageTexture field for the Material field and give it a filename to use. The browser takes care of the rest. By applying a collection of Transforms and cylinders, you can create a whole Greek-style marble column, shown in Listing 15.1.
Listing 15.1. A basic texture-mapped marble column.
#VRML V2.0 utf8
#
# Example 1 Chapter 15
# A simple texture-mapped column
Group {
    children [
        Transform {
            translation 0 1.45 0
            scale 0.6 0.15 0.6
            children [
                DEF marblecylinder Shape {
                    appearance appearance {
                        texture ImageTexture {
                            url "marble.jpg"
                        }
                    }
                    geometry Cylinder {}
                }
            ]
        }
        Transform {
            translation 0 1.15 0
            scale 0.4 0.15 0.4
            children [ USE marblecylinder ]
        }
        Transform {
            scale 0.3 1 0.3
            children [ USE marblecylinder ]
        }
        Transform {
            translation 0 -1.15 0
            scale 0.4 0.15 0.4
            children [ USE marblecylinder ]
        }
        Transform {
            translation 0 -1.45 0
            scale 0.5 0.15 0.5
            children [ USE marblecylinder ]
        }
    ]
}
Now try applying texture mapping to a box, using a picture this time so you can tell what's happening. Notice as you play with the size of the box that the picture expands or shrinks to fit the object's size. For simple primitives, this is really handy.
Sometimes you don't want the picture filling the whole face of the object you're applying it to. Like the rest of the VRML system, you start with a collection of basic nodes, then add a modifying node. The textureTransform field allows you to add a TextureTransform node, which can be used only in the appearance node. You can use it to scale and rotate an image to fit the object as you please. Here's how the TextureTransform node is defined:
TextureTransform {
    exposedField SFVec2f center      0 0
    exposedField SFFloat rotation    0
    exposedField SFVec2f scale       1 1
    exposedField SFVec2f translation 0 0
}
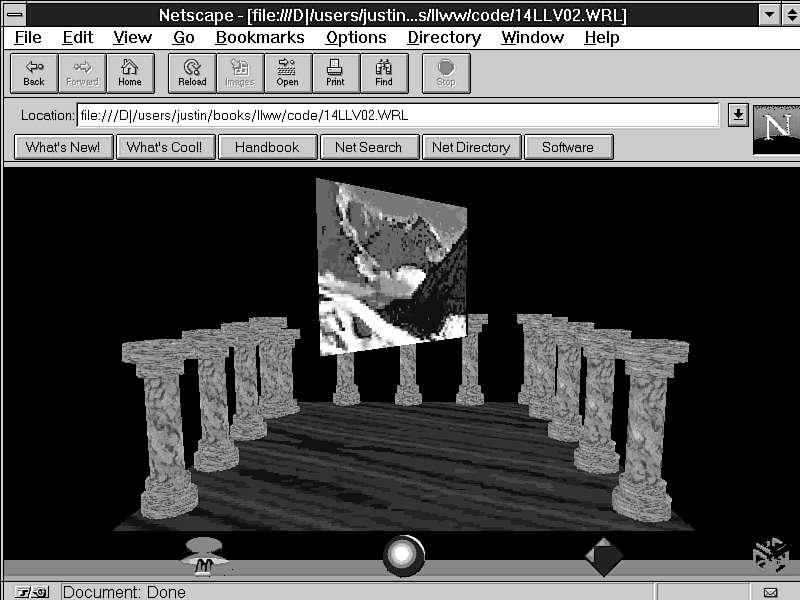
By using this node in the appearance node, you can control exactly how the texture looks. If you look at the floating picture in Figure 15.1, you can see the effects of the different fields, whose names are fairly self-explanatory. Center, for example, is used to specify a point that all the other fields act in relation to. A texture is a 2D image, which means the fields are much simpler. Each of the actions relate only to the picture itself. Therefore, a rotation rotates the picture around the point defined in the center field by the given angle, but doesn't rotate the whole primitive.
Figure 15.1: A finished scene, with texture-mapped columns and a floating picture.
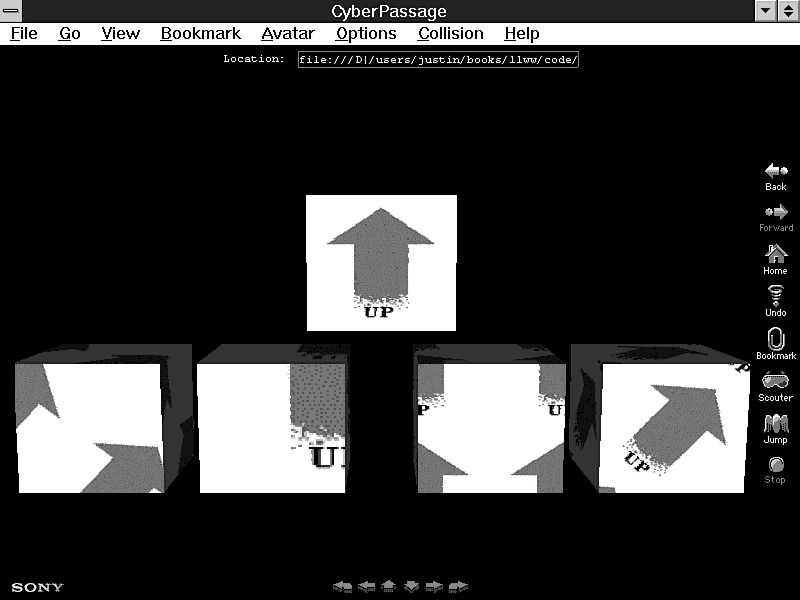
Figure 15.2 illustrates the effects of the different fields. On the far left, a rotation of 45 degrees (0.707 radians) is applied. Next is a scale in both dimensions of 0.5, then a translation by 0.5, and finally a rotation of 45 degrees around the point 0.5,0.5. An arrow image is used that points up so you know what's going on.
Figure 15.2: Illustrating the effects of TextureTransform's different fields.
The top figure is the reference image. Along the bottom row, from left to right, you see examples of rotation, scale, translation, and rotation around a point otherthan 0,0.
The end results aren't exactly what you were expecting, are they? The right-hand image probably illustrates what you were expecting the left-hand image to do. Read on for more about how textures work.
Unlike the rest of VRML, textures use their own special coordinate system. The coordinates of textures are relative to the size of the texture itself. Therefore, a value of 1 is equivalent to the length of that side of the image. In graphics terminology, there are two axes: S is the vertical part, and T is the horizontal. They actually measure how the graph is applied to the object itself.
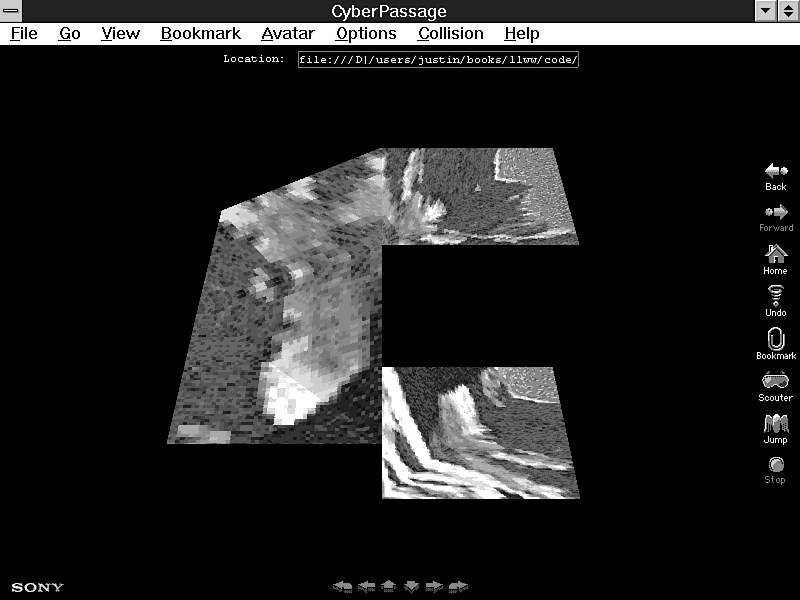
A coordinate of 2,2 would be the upper-right corner of the rightmost image in the top row, shown in the image on the right in Figure 15.3.
Going back to the images presented in Figure 15.2, you can now figure out what happened. In the rotated figure on the left, the default center is 0,0-the lower-left corner-which is why you get parts of four images on it. (Why you get four images is explained in the following section, "Including Images with PixelTextures.") The scaled image was doubled in size (scale by 0.5). Because it increased out from the default center, you got only the lower-left corner of the image.
With this in mind, the effect of a translation by 0.5,0.5 is easy to understand. The translation simply moved the origin into the middle of what the old picture used to be (the middle of the object's face). Because of the texture's wrapping effect, you end up with all four quadrants of the picture, just reversed. The last box probably showed the effect you were expecting to see from the first rotation. Since you specified a center of 0.5,0.5, which is really the center of the image, the image rotated around its own center.
By combining all these fields, you can get any effect of stretching and rotation to fit any object.
Apart from importing external files for images, you might want to include those pictures directly in the VRML source file. This saves the overhead of establishing extra HTTP connections for each file. However, adding pictures results in the file being much larger, slowing down the initial load times.
The PixelTexture node lets you use VRML's built-in format to include images in the source file. Naturally, this isn't usually done by hand, so you need to learn only the basic concepts of working with the SFImage field type. However, you might need to use this method of including images when you want to create a small grayscale or color image used as a tile, which would be too much work to add as an external file. Here's how the PixelTexture node is defined:
PixelTexture {
    exposedField SFImage  image      0 0 0
    field        SFBool   repeatS    TRUE
    field        SFBool   repeatT    TRUE
}
The first three values of the image define the height, width, and number of components in the image. A component value of 1 is grayscale, 2 is grayscale plus transparency, 3 is color represented in RGB space, and 4 is RGB images plus transparency.
The following declaration is a one-pixel-wide grayscale image, with the top pixel white and the bottom pixel black:
texture PixelTexture {
    image 1 2 1 0xFF 0x00
}
If you want to create a small grayscale tile, such as a herringbone pattern, then this method would be ideal. However, this is an uncompressed image format; for anything larger than a basic pattern, a normal compressed format like GIF, JPEG, or PNG should be used.
You might have noticed in the introduction to ImageTexture that I didn't explain the repeatS and repeatT fields, but you needed the information in the previous section to understand what these fields do.
In a nutshell, they tell the browser whether it should repeat the texture map to fill up the blank space on the surface. By default, they're set to TRUE. Setting them to FALSE means you end up with just a single image scaled, rotated, or translated on that particular face. Using a single image is especially handy if you want to put a small version of the image on the face, leaving a blank border around it. This can be done easily by transforming it to the middle of the face and scaling it to the size you want.
Many of your worlds will consist not of primitives, but of the more complex IndexedFaceSet that was introduced at the end of Chapter 13, "Exploring VRML Browsers and Development Tools." IndexFaceSets present a different problem than using a standard primitive for texture mapping does. Because you have many different sizes of sides and logical relationships between them (that is, how they are located in 3D space), mapping texture coordinates is also complex. To add a texture map image to an IndexedFaceSet, use the same method you do for the other geometry nodes, using the Shape node. Instead of a box or cylinder, you put the IndexedFaceSet declaration in the geometry field. The textureTransform field is also used if you have it defined in the appearance node.
Start with a basic shape that has four faces. So you can see where the edges of the faces are, they'll be arranged so they aren't in a plane. Three of the four faces have common edges, but the fourth is offset so that it doesn't touch them. Apart from that, everything else is the same as the previous examples-just a Shape node with a texture and the IndexedFaceSet as the geometry.
To illustrate a few points, the simple picture of the arrow on a couple of faces works better than a real-world object having a few hundred faces. Most of the applying textures to individual faces will eventually be done in a proper GUI VRML editor, rather than being done by hand. However, if you know the principles behind it, then you can create some wonderful worlds very quickly.
Listing 15.2. The test file for using textures and IndexedFaceSets.
#VRML V2.0 utf8
#
# Texture mapping an IndexedFaceSet
Shape {
    appearance appearance {
       texture ImageTexture { url "picture.jpg" }
    }
    geometry IndexedFaceSet {
        coord Coordinate {
            point [
                0 0 0, 1 0 0 , 1 1 0, 0 1 0,
                -1 1 -.5, -1 0 -.5,
                0 -1 -.5, -1 -1 -.5,
                0 0 -1, 1 0 -1, 1 -1 -1, 0 -1 -1
            ]
        }
        coordIndex [
            0, 1, 2, 3, -1,
            0, 3, 4, 5, -1,
            0, 5, 7, 6, -1,
            11, 10, 9, 8, -1
        ]
    }
}
When you load the example in Listing 15.2, notice that the picture is spread across all the faces. If you want to spread an image to fit some underlying framework without lining up vertices with strategic parts of the model, then this method is very handy; however, for many purposes it isn't satisfactory. Sometimes you might want to control the exact positioning of the texture on the faces. To do this, you need to define in texture coordinates how the image is mapped onto the individual faces.
Texture coordinates mirror what happens with the standard coordinate system used to define a face. The texCoord field contains a list of the texture coordinates you want to use. TexCoordIndex is then used to gather these texture coordinates into the correct relationships, much as the coordIndex field is used to associate relationships of points to form a series of faces. Each entry in this field corresponds exactly to that vertex in the coordIndex field. Each face must end with the value of -1, again, just like the coordIndex field.
To map a section of an image to an IndexedFaceSet, do the following:
coord Coordinate { point [ .... 20 25 10, 19 25 10, .... 19 20 10, 20 20 Â10, .... ] }
coordIndex [ .... 35, 36, 45, 44, -1, ......]
texCoord TextureCoordinate { point [ .... 0.4 0.5, 0.6 0.6, 0.6 0.5, 0.5
Â0.5, ....] }
texCoordIndex [ .... 10, 11, 12, 13, -1, .... ]
The end result is to place the texture coordinate 0.4,0.5 on the vertex defined as 20, 25, 10.
If you leave the texCoordIndex field empty, then the browser matches each vertex in coordIndex to the texCoord values by using each one for the vertices of each face, as declared in the coordIndex field. You must have one more texCoordIndex value than the number of texCoord values. This matches the definition for the coord and coordIndex fields. As you can see from the result, it's not very useful most of the time. What you want to do is control the way each face is rendered individually.
If the texCoordIndex field isn't empty, then it's used to define the texture coordinates that belong to each face. The values you put in will correspond to each vertex for the corresponding face. Likewise, you must end each face with the value of -1. The order in which you declare the faces must be the same order you used for the texture values.
Figure 15.4: The full use of textures on IndexedFaceSets.
As you've seen, a texture map can be anything you want. The marble columns used a standard background available from the Internet, the picture was just one I had lying around from an old Web page, and the arrow I created myself in Paint Shop Pro. What makes a good texture?
Producing a texture for VRML uses the same techniques as producing a texture for any other type of 3D graphics, so if you have a collection of textures from previous examples in this book or from a ray-tracing program like POVRay, then you can use them here. In Chapter 17, you'll start developing an art gallery that shows off many of the pictures Kelly developed in the first half of this book. You will find that I use the terms picture, image, and texture interchangeably throughout the book. In terms of VRML, there's very little difference among them.
If you're planning to hang your picture up as a photo, then it doesn't really matter what size or type of primitive you use. You won't even need to worry about using a TextureTransform. The picture always stretches to fit the object. As long as you have the proportion of each dimension the same for the image and object, it will work out.
If you're using a texture map that will be tiled across a surface, rather than just a single image used to produce a photo, then you might run into another problem. VRML is the same as any other 3D or 2D image production with tiled images-getting the edges of the tile's texture to line up can be quite frustrating. As any 3D model maker will confirm, this is one of the most time-consuming tasks you'll face. Usually, you're modifying other textures and background images rather than building your own.
If you decide to build your own images-as Mr. Bubsy wanted you to do for his shop-then you should already have the tools you need from the first part of this book.
For most general-purpose work, you can't beat Paint Shop Pro for
the first two steps. Applying textures to models then falls into
the realm of the VRML modeling tool. Software like Pioneer and
V-Realm Builder do this work for you in a nice GUI environment.
| Tip |
If you want to create more stunning texture maps, then use trueSpace to produce a 3D image. Import the resulting Targa file into Paint Shop Pro, and save it as a JPEG file. This method gives you some attractive effects when you use the 3D image to replace VRML geometry. |
Once you've created a few standard images, then try experimenting more. Most of today's standard image formats include more than just the basic image. Interlacing, transparency, and multiple-image files (for example, animated GIFs) can be used. Interlacing works the same way as it's used on 2D pages, and the animated formats are covered in the next section, "Adding Movies."
Transparency has several different uses, depending on the combination of image transparency and the underlying primitive's transparency. Follow these steps to use transparency:
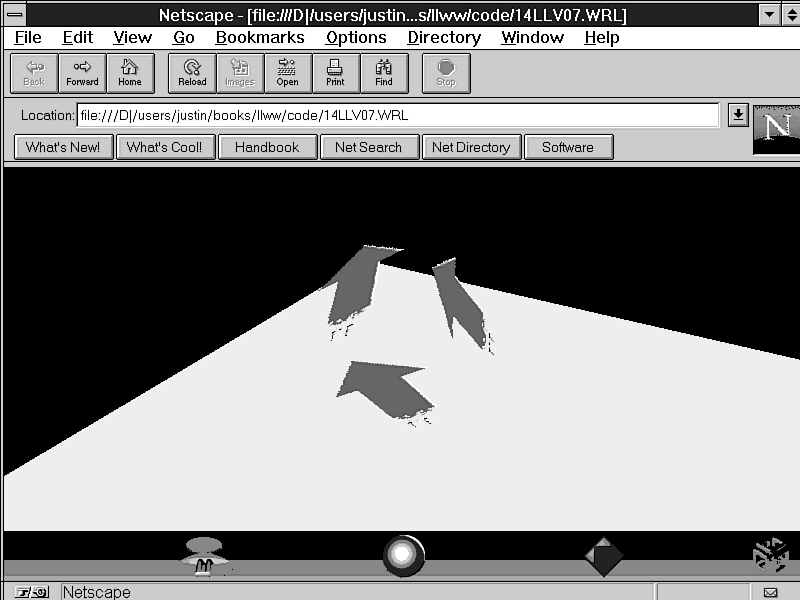
Notice that the whole primitive seems to have disappeared except for the texture map; the picture looks like arrows just floating in space. The effect is shown in Figure 15.5. You can use transparency for all sorts of things, such as creating floating signs in space; it can save you the work of trying to build the geometry of a sign.
Figure 15.5: A set of arrows hanging in space, courtesy of the transparency effect.
| Tip |
Always put your signs on a box rather than an IndexedFaceSet. This way, you have to declare the image only once, and it's displayed on both sides of the sign. Watch out for arrow-type signs, however. The one on the back will point the wrong way! |
I mentioned before that you could declare both a texture and a material for one appearance node, and here's how you do it:
When you define both a material and a texture, the texture has priority. Normally, the object is created with the material color, and once the texture has been downloaded, then the texture is displayed instead of the color. You could use this effect when creating a grass surface, for example:
One of the nice features of VRML is the ability to add animated textures just as easily as you can add ordinary ones. You can also put a movie wherever you can have a standard image. This means you could wrap your favorite MPEG movie around a sphere or hang it on a floating flat screen.
To start with a familiar example, take a flat face formed from an IndexedFaceSet and apply a movie to it so it looks like an ordinary movie screen. Instead of the ImageTexture node used in the previous examples, now you'll use the MovieTexture node:
MovieTexture {
    exposedField SFBool   loop       FALSE
    exposedField SFFloat  speed      1
    exposedField SFTime   startTime  0
    exposedField SFTime   stopTime   0
    exposedField MFString url       []
    field        SFBool   repeatS    TRUE
    field        SFBool   repeatT    TRUE
    eventOut     SFFloat  duration_changed
    eventOut     SFBool   isActive
}
The MovieTexture url field is a pointer to the movie file. VRML requires that MPEG1-Video and MPEG1-Systems be supported. Animated file formats, such as GIf89a, are not specifically mentioned in the specification, but it would be reasonably safe to assume that when GIF is supported, these animated formats will be too, under the standard ImageTexture node. However, this isn't enough to play the movie; you need to set the start and stop times.
RepeatS and repeatT are the same as the ImageTexture fields. The speed field controls the relative speed of the movie compared to its original speed. This relative speed setting is handy for doing fast forwards, once you learn how to control the film from external input with scripting and from user input through sensors.
A full discussion of how time runs in VRML isn't presented until Chapter 19, "Using Built-in Animation Techniques," so I don't want to tread on my own toes. For the moment, to play a movie, just set the loop field to TRUE and the startTime field to 1. These settings give you a continuously looping movie. To add a movie into your scene, all you need to do is declare the following:
Listing 15.3. Adding an MPEG movie to the scene.
Shape {
    appearance appearance {
        texture MovieTexture {
            url "mymovie.mpg"
            loop TRUE
            startTime 1
        }
    }
    geometry IndexedFaceSet {
        coords Coordinate {
            point [ -1 0 0, -1 1 0, 1 1 0, 1 0 0 ]
        }
       coordIndex [ 0, 1, 2, 3, -1 ]
    }
}
Earlier in this chapter, I mentioned that you can use textures to replace parts of the scene graph's geometry. This is a fairly common tactic in VR systems. By using 3D textures like the ones my co-author has created in the first half of this book, you can save yourself a lot of work. In a VR world, not everything must conform to reality.
Buildings are a good example of using textures to replace geometry. A simple box wrapped with the texture of the building's exterior is much simpler than actually modeling the whole building. Although textures make the world slower to navigate in, the same highly detailed building made by using geometry would have exactly the same effect. For a good example of using textures to replace geometry, have a look at Planet9's Jackson Square world at http://www.planet9.com/worlds/jacksq.wrl. It has many good examples of how a cool world can be built with very little effort.
Modeling realistic-looking trees is another good use of textures. I will be the first to admit that the trees developed in the previous chapter didn't look very realistic. If you want realism, then have another look at the trees in the Jackson Square site. They're made from a pair of faces that mimic the outline of the tree texture on them. By placing these two faces at right angles, it's very difficult to tell they're not real, highly detailed trees until you get up close and look at the bases of the trunks, where you notice the cross shape of two planes rather than a properly modeled tree.
You need to be careful where you use textures and where you use colored geometry. As a good rule of thumb, textures should be used when you have a highly detailed object that would be time-consuming to model properly. Small items, like doorknobs, are another good use for textures. It's really up to your judgement, but be careful about overusing them because they slow the VRML world down considerably. Colored geometry is better when you need to show the detail structure of an object the user may walk around in. You could summarize this as saying: Use textures for small objects and geometry for large objects.
By combining primitives and textures, you can get some very realistic worlds-the Jackson Square example being one of them. You can also use textures to create some fantastic-looking places that look far from real. Textures are a common technique in VRML worlds for creating anything from tiled floors to movies hanging in space.
The previous chapter and this one is where you'll spend a good portion of your time when developing VRML worlds, so it's important you understand the basics before you head into more advanced topics.
| Apart from creating my own, where can I find predefined textures? | |
| Many Internet sites offer large collections of predefined textures. One of the Internet search engines, like Yahoo!, will give you a list of sites to visit. Netscape has quite a selection of them at its site, which you're free to use. Also, just about every modeling package now comes with a smaller collection of textures. | |
| Is it possible to use streamed video with the MovieTexture node? | |
| The VRML 2.0 specification doesn't say anything about streamed video. However, if the browser of your choice does support it, then you should be able to use it. With the use of streamed audio and video increasing on the Internet, I expect it won't be long before browsers support streamed video by default. | |
| How can I put a different texture on each face of my box? | |
| You can't. To do this, you must declare a collection of individual faces and give each one a separate texture. |