-by Justin Couch
So far, you've learned to populate your VRML worlds with primitives and models. You've also learned some tricks for painting objects, but using basic colors is just the first step. With textures, you can make your VRML objects much more visually appealing, but there's still a lot to do to make your worlds realistic. What's missing? Well, there are no lighting effects. Another effect that's missing is not being able to walk through walls, and you also need a way to show details when you get close to an object. Luckily, VRML addresses each of these problems.
This chapter introduces the basic techniques for adding that extra touch of realism to your world:
By the time you've finished this chapter, you should be able to create some very believable worlds. Just remember that the more detail you put in, the longer it will take to download and the slower the world will run.
If you have spent any time ray-tracing images for your Web pages, you will have no problems with the VRML light source models. However, you might notice some other differences. Unlike ray-tracing, there are no ambient light settings. If you don't specify an emissive or diffuse color value for your objects, you can't see them.
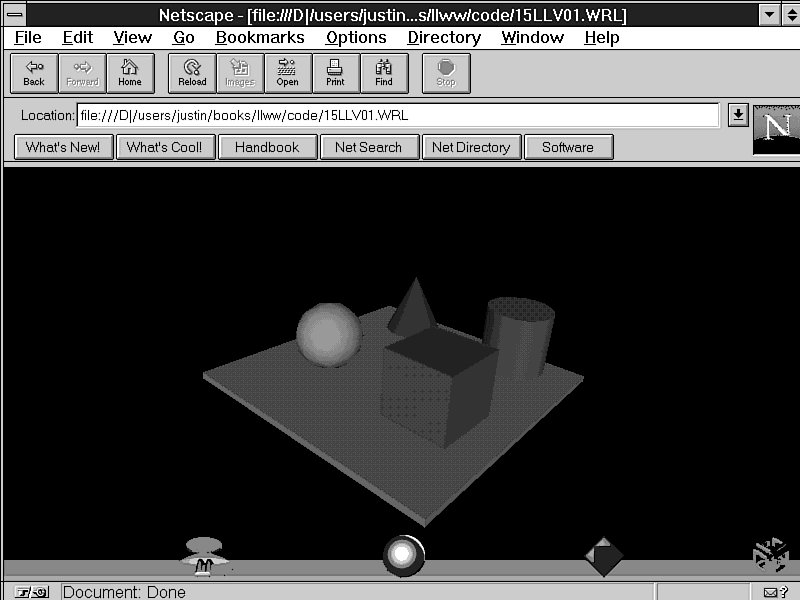
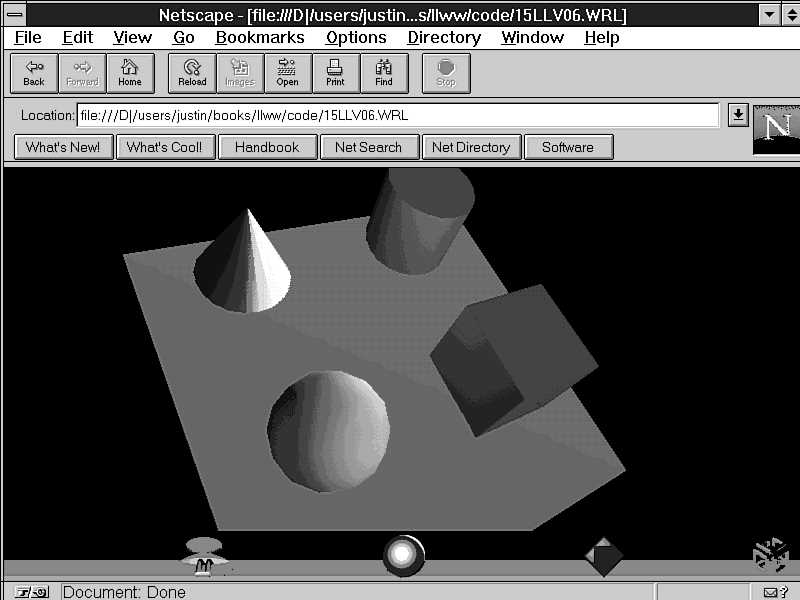
VRML defines three types of light sources: SpotLight, DirectionalLight, and PointLight. Their names are pretty self-explanatory. You'll look at examples of each, using a basic test scene that's shown in Figure 16.1 without any lights except the headlight.
Figure 16.1: The basic test scene with the headlight turned on.
| Note |
To show the effects of the light sources, define only diffuseColor values on all your objects. Chapter 13 briefly outlines the effects of the various color types used in the Material nodes. For this example, you'll define only diffuseColor values because emissiveColor would ruin some of the lighting effects. Emissive light sources emit their color even without other light sources in the scene. To see the effects of external lights, you need to make sure that the only lighting effects are produced by the lights themselves. |
Although I mentioned that there were no ambient light sources, this isn't completely correct. There are no separate ambient light sources, but within each light node, there's a field value that can control the ambient light intensity. The resulting ambient light is the sum of all the values defined in the light nodes.
For each of the examples, you'll see what the light looks like in the scene, as well as commentary on the effects.
DirectionalLight specifies a direction along which the given light color travels; it's the equivalent of a distant light like the sun. All the rays of a directional light are parallel.
Listing 16.1. Extract from the file illustrating DirectionalLights.
#VRML V2.0 utf8
#
# A world to show the effects of various light sources
# The directional light sources
DirectionalLight {
    direction  -1 -1 -1
}
# The basic scene
Transform {
    translation 1 .5 1
    children [
        Shape {
            appearance appearance {
                material Material { diffuseColor 0.7 0.1 0.1 }
            }
            geometry Box { size 1 1 1 }
        }
    ]
}
etc....
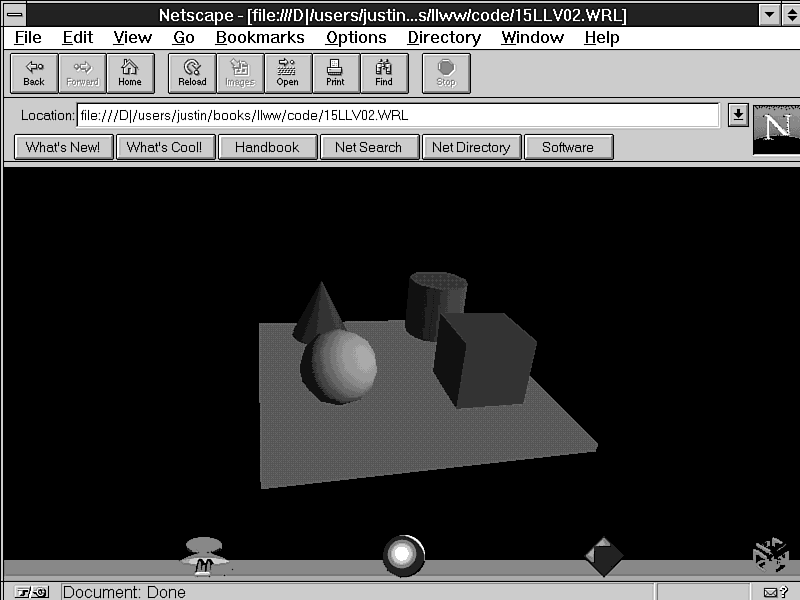
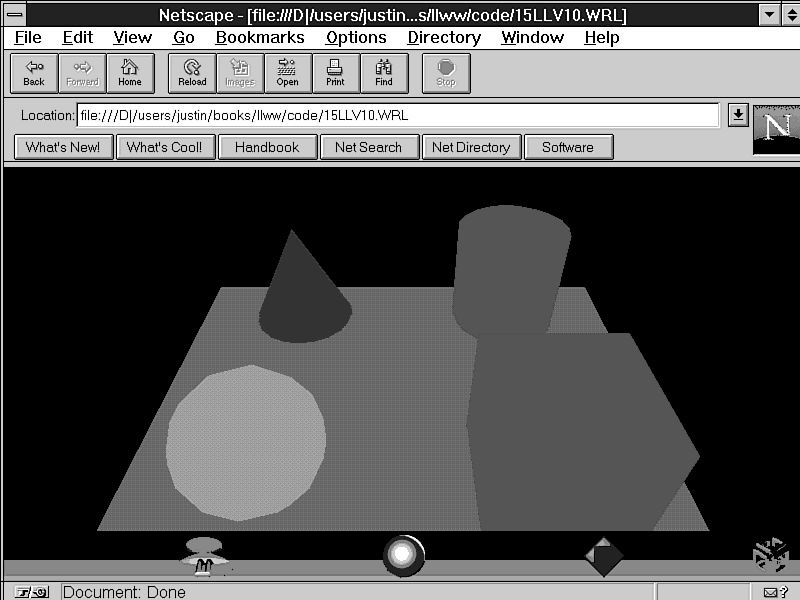
The same scene is shown again, this time with the DirectionalLight added, in Figure 16.2.
Figure 16.2: Directional lighting for the entire scene. The headlight has been turned off.
Now look closely at the scene, particularly at the floor. What do you notice? That's right-there are no shadows. In VRML, everything is lit equally, regardless of whether there's another object between it and the light source.
OK, try experimenting a little bit. Add another directional light, this time coming from over your other shoulder, but place it within the Transform node that holds the sphere. To increase the effect, the intensity of the first light is turned down to 0.2. If you're using the CosmoPlayer browser, it will light up all the objects, but if you look at the world with the CyberPassage browser, it will light up none of them. Which one is correct? Strictly speaking, neither of them.
According to the VRML specification, the DirectionalLights are limited in scope to the parent grouping node. In this case, there should be light only on the sphere, nowhere else. The VRML specification has a small rider saying that some low-end rendering engines won't support lighting on a per object basis, so lights should be placed as high as possible in the scene graph.
If you want to highlight a particular object, then DirectionalLights aren't the technique to use. You should be using a SpotLight to provide a focused beam of light aimed at a particular direction from a given point. In this example, you want to highlight the sphere, so add the SpotLight node into the Transform node where the sphere is located:
Now if you look at the world, it's very dark. The SpotLight doesn't seem to have taken effect. If you look closely at the SpotLight definition, it has a default radius of 1. You have placed the light at a distance of more than 10 meters from the object, so the objects aren't within the SpotLight's radius. Anything outside this radius results in no light, so you need to increase the radius a bit:
Listing 16.2. Using a SpotLight in place of a DirectionalLight.
Transform {
    translation -1 .5 1
    children [
        SpotLight {
            direction 1 -1 -1
            location -5 5 5
            radius   30
            beamWidth 1.57
            cutOffAngle 1.57
        }
        Shape {
            appearance appearance {
                material Material { diffuseColor 0.1 0.7 0.1 }
            }
            geometry Sphere { radius 0.5 }
        }
    ]
}
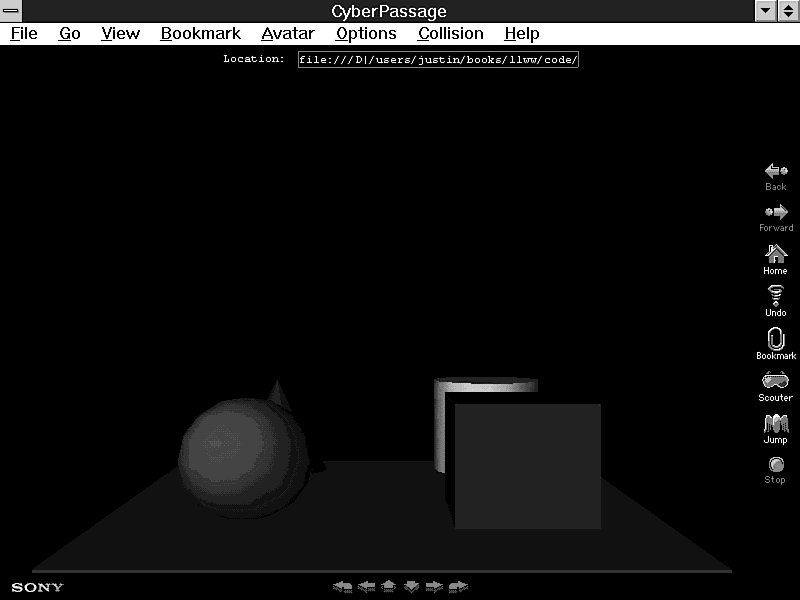
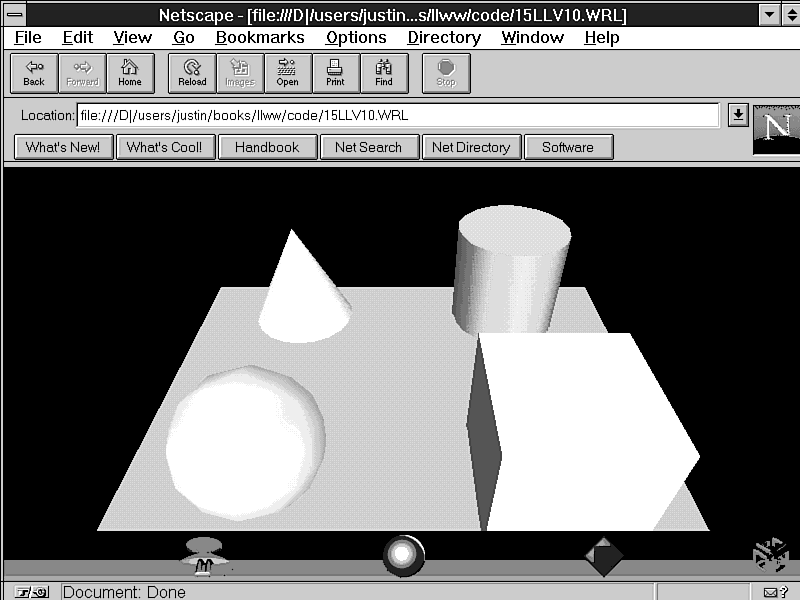
Figure 16.3 shows the results of the SpotLight on the sphere. Remember that different browsers have different rendering engines, so there may be some difference in the image quality between browsers.
SpotLights are one of those tricky nodes that need a bit of playing with to get the right effect. Generally, you won't use a SpotLight without any other lighting source. While testing the examples for this book, you've discovered that SpotLights aren't completely implemented.
The world seen in Figure 16.3 included a directional light, but with no headlight. Notice how dark the picture is. What really needs to be added to the scene is some ambient light to brighten the whole scene. The SpotLight can then be used to create highlights.
The last item of note about using SpotLights is that they aren't constrained by the parent nodes. Normally, you would place a SpotLight within a Transform if you wanted to keep it relative to some object. If this isn't necessary, then you should place them at the top of the file with the rest of the light sources.
When you're trying to create a scene normally, you want to model a lightbulb that sends light in all directions. To do this, you would use the PointLight node. Try placing a PointLight in the middle of the four objects to show its effect:
PointLight {
     radius 10
     location 0 1 0
}
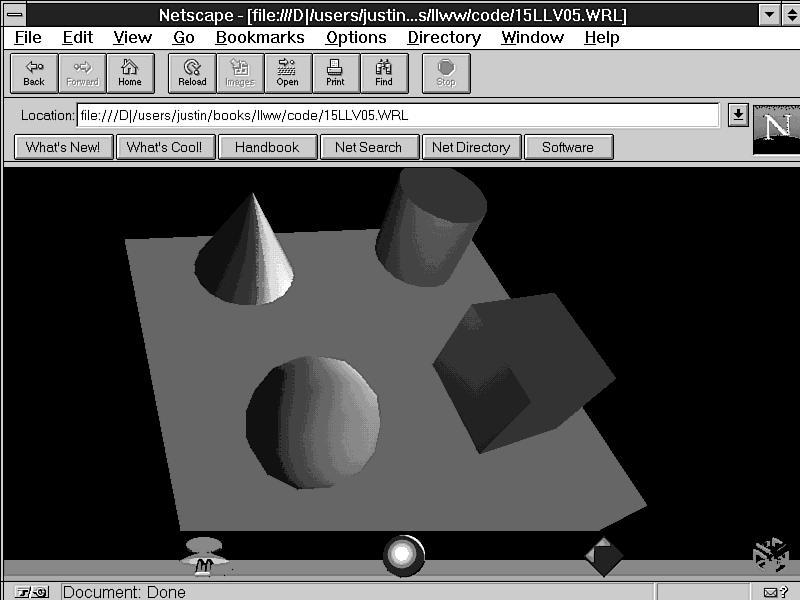
Figure 16.4 shows the results of the PointLight placed in the middle of all the objects in your scene; notice that again, no headlight is used.
A radius of 10 is used to make sure the lighting effect is used over the whole scene. You should experiment with the radius to see how it affects the lighting. As with the SpotLight, there's also an attenuation field to control the drop-off of light intensity. The same comment about its use also applies; that is, attentuation is not really usable because most pc browsers aren't supporting it.
Now that you've explored the various light source types, this would be a good time to try combining them all into a single scene. Using the same sample scene, put all the lights in; the results are shown in Figure 16.5.
Figure 16.5: The result of turning on all the lights.
Note that the effects of the SpotLight are hardly visible; directional lights contribute the majority of lighting to the scene. Look at the cube for the best illustration of the two lighting sources. The sphere, which showed most of the SpotLight effect, has had this all but removed by the domination of the DirectionalLight.
One of the biggest problems in VRML 1.0 was that you couldn't stop people from wandering through objects. This really became a problem when you were building houses. There was no need to put a front door in because people could walk straight through the wall! This had to be fixed, so in Version 2.0 a Collision node was added. It works like any of the other grouping nodes. By simply adding the Collision node as a parent, you get instant solid walls.
Listing 16.3. The simple cylinder you can no longer walk through.
#VRML V2.0 utf8
#
# Using Collision Detection
Collision {
    children [
        Shape {
            appearance appearance {
                material Material { emissiveColor 1 0 0 }
            }
            geometry Cylinder {}
        }
    ]
}
| Tip |
You can create collision detection on a group of separate objects by putting them all in the children field. You won't be able to walk through the objects, but you can walk around them. This effect can be used to create doorways, so that you can walk through the doorway, but not the walls. |
Listing 16.4. An expanded collision detection field, with a
sphere added around the cylinder.
#VRML V2.0 utf8
#
# Using Collision Detection
Collision {
    children [
        Shape {
            appearance appearance {
                material Material { emissiveColor 1 0 0 }
            }
            geometry Cylinder {}
        }
    ]
    proxy Sphere { radius 2 }
}
Now you can no longer get anywhere near the cylinder. In the previous
example, you could walk up and touch it, but now you can't get
anywhere near it. This is because the proxy field defines the
shape of the collision detection field. Any drawing node can be
specified here, but obviously it makes no sense to define a complicated
shape since it has no visible geometry. The idea is to create
a simplified detection radius, not a more complex one.
| Tip |
The proxy field can contain any type of node, allowing you to create any sort of collision boundary around your objects. For example, you could place a Group node around the object and put a collection of IndexedFaceSets in it to get exactly the behavior you want. |
One thing guaranteed to slow down your VRML world is excessively high levels of detail. However, when you're close to an object, you want to see some detail. The problem is deciding what to put in and what to leave out. By using the Level Of Detail (LOD) node, you can get the best of both worlds.
LOD allows you to define a set of ranges and what you want the object to look like in each range. In a way, this approximates reality, as you gradually discern more detail the closer you get to an object. This technique is helpful when you're using textures. Texture mapping always slows down a world, so it's a good idea not to use it until you're close to an object. Start with a simple model: a cube that turns into a sphere.
Listing 16.5. A quick LOD demo: A cube that turns into a sphere.
#VRML V2.0 utf8
#
# A simple LOD
LOD {
    range [ 5 ]
    levels [
        # first level for greatest detail - a sphere
        Shape {
            appearance appearance {
                material Material { emissiveColor 0 0 1 }
            }
            geometry Sphere { radius .5 }
        }
        # second level minimum detail
        Shape {
            appearance appearance {
                material Material { emissiveColor 0 0 1 }
            }
            geometry Box { size .5 .5 .5 }
        }
    ]
}
| Warning |
When you view this file in a browser, you might notice that it always stays a cube-it never swaps to being a sphere. This is because the specifications allow the browser writers a lot of leeway to optimize the rendering speed. If the browser thinks it can handle a higher level of detail, then it will use that. The situation you get is that the cube is simpler to render than the sphere, so it gets used all the time. |
Detail levels are always defined as being the most detailed first, then fewer details as you go down the file. This doesn't stop you from declaring the most detailed as the last item, but it would sure confuse both your visitors and the browser. The specification suggests you should declare as many levels as you need to get smooth transitions, but this can create an awfully large source file just for a simple smooth change. However, there are ways around this; they will be covered in Chapter 18, "Tricks to Optimize Your VRML Worlds for the Web."
Another way of getting the same effect is to create nested LOD systems. A building might consist of one overall LOD, but within the highest detail setting, there would be another LOD node controlling the details of the windows and doors. A nested LOD structure uses the same syntax as before. In each child, instead of putting a grouping node like Shape in the previous one, you put in another LOD node, as shown in Listing 16.6. Just because you have a nested LOD at one range doesn't mean it needs to be in all of them.
Listing 16.6. Nested LOD outline example.
LOD {
    range [ 5 ]
    levels [
        # first level for greatest detail - a sphere
        Shape {
            appearance appearance {
                material Material { emissiveColor 0 0 1 }
            }
            geometry Sphere { radius .5 }
        }
        # second level minimum detail
        LOD {
            levels [2.5]
            # first level in nested LOD
            Shape {
                appearance appearance {
                    material Material { emissiveColor 0 0 1 }
                }
                geometry Box { size .5 .5 .5 }
            }
            #Seconnd level in nested LOD
            Shape {
                appearance appearance {
                    material Material { emissiveColor 0 0 1 }
                }
                geometry Cone {
                    bottomRadius .5
                    height 1
                }
            }
        }
    ]
}
So far, you're viewing every file from the default position the browser gives you. Often, this isn't convenient, so you might like to define your own viewpoints; at other times, you might want to offer a collection of different places to view the world from. Using the Viewpoint node, you can do this and more.
Viewpoint {
    position 0 3 3
    orientation 1 0 0 -.785
    description "default camera"
}
The world seen from the default viewpoint you set up is shown in Figures 16.6a and 16.6b. The browser recognizes these extra viewpoints and allows you to change the predefined viewpoint, typically by clicking the right mouse button. In the CosmoPlayer browser, click the right mouse button and select the Next Viewpoint option from the pop-up menu to move to the next viewpoint position, or you can use the Page Up/Page Down keys.
Figure 16.6a: The default entry view of your earlier model.
Figure 16.6b: The same scene now viewed form the second viewpoint.
Another handy field in the Viewpoint node is the jump field. If the jump field is specified as false, the browser gives you an animated sequence from your current position to the next viewpoint. This is especially effective when you're giving guided tours.
The last field to experiment with is fieldOfView, which lets you
control the amount of the world that's visible at once. A small
value acts like a telephoto lens; a large value produces a wide-angle
lens effect. Most of the time, you use only the default value
because it gives a fairly good view of things.
| Tip |
From this first view, you will notice quite a pronounced perspective on the objects. If you want to create an orthographic (that is, no perspective) camera effect, you can set the fieldOfView to a very small, almost non-zero, value (but definitely not zero) and set the distance fairly far away. |
You've now been introduced to many of the effects used in VRML worlds to make them more believable. Using them depends on what sort of machine you expect people to be viewing your file with. In the experience of the Terra Vista community, using the LOD node had too many problems, both with its implementation (it didn't like being used as a child of Transform) and also the performance penalty it imposed.
You now have some reasonable-looking worlds, but there's still a lot more for you to learn:
| I tried loading some of the examples in this chapter, but they look completely different, especially the ones on the lighting model. | |
| Usually this is because you have the headlight turned on. The headlight is a spotlight mounted just above where your virtual head should be and always points in front of you. This can be turned off either by clicking the right mouse button to get a pop-up menu in CosmoPlayer or using the View menu in CyberPassage. | |
| What happens if I nest collision nodes? | |
| You've jumped ahead of everybody else! Nested collision nodes are allowed and are very useful when it comes to behavior programming in a later chapter. When you collide with something, each collision node produces its own event notification to the system, so it's useful and sometimes necessary to have nested collision nodes. | |
| When I have multiple child primitives within a Collision node, what defines what can and cannot be collided with? | |
| Only the primitives themselves can be collided with. If you have two cylinders located some distance apart, then you can walk between them with no problems, but you still can't walk through the individual cylinders. |