
-by Justin Couch
Once you've started using the built-in animation techniques you learned in the last chapter, you'll soon find yourself wishing for more functionality. For instance, in the last example in Chapter 19, "Using Built-in Animation Techniques," (when you controlled behaviors in response to mouse clicks on an object) there was no way to toggle the button click event. However, these limits can be overcome by building your own behaviors. If you've never programmed before, then here is a chance to jump in feet first. Scripting is a simple technique to understand. If you've ever written a macro for MS Word or a DOS batch file, then you're almost there.
Scripting can be considered a subsection of behaviors programming. On one side, you have the simple built-in system described in the previous chapter, and on the other, you can create your own behaviors. If you felt like it, you could write your own scripts that do the same job as the interpolators, but this is a waste of time because the language for built-in systems has already done that work for you. Generally, you use scripting to add more complex behaviors on top of the ones provided for VRML. In this chapter, you'll explore the following topics:
As in the rest of the book to this point, you still need only a basic text editor to create interesting VRML worlds.
If you're interested in just using Java for the scripting, then you should still read the section on the browser interface and the basic introduction to the Script node. These two sections describe the generic interface for controlling the scene graph itself through the browser. In Chapter 21, "Using Java to Add Behaviors to VRML," it will be assumed that you already understand these browser interface basics.
As you already know, CGI produces documents read in by the browser that are built dynamically in response to user input. CGI can be used several ways under VRML 2.0. If you're responsible for writing C or Perl scripts, then you also need to be familiar with how VRML works, which is why you're reading this book in the first place. Explaining how to develop a CGI script to produce a VRML model is beyond the scope of this book, but there are a few pointers provided to help you on your way.
The first method of producing dynamic worlds is to use the standard HTML/CGI form input, which then generates a VRML output file. If you're familiar with writing CGI programs, then you should have no trouble producing output. For VRML files, you need to send the MIME type as the following:
x-world/x-vrml
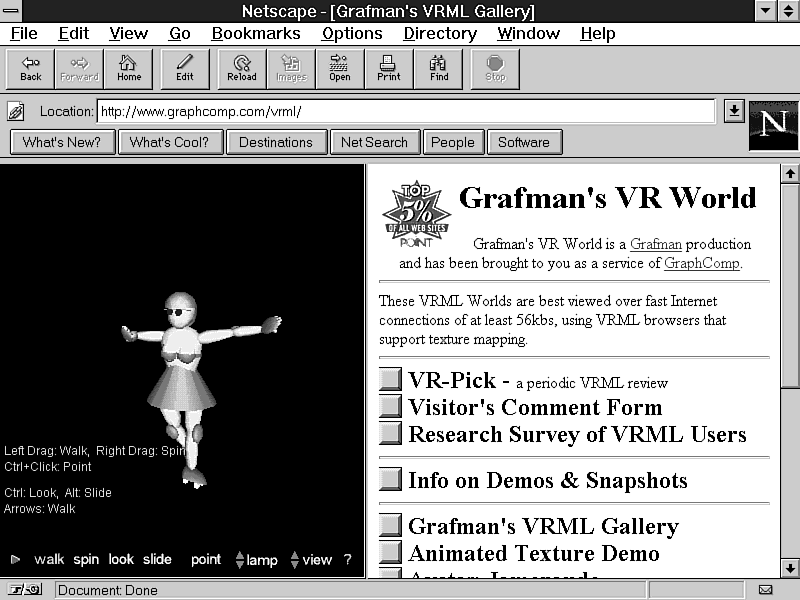
There are many examples of this style of work. A good one to look at is The VRML Roller Skater by GraphComp's Bob Free, which is shown in Figure 20.1. If you take a look at http://www.graphcomp.com/vrml/, you'll see an example of combining a number of Web technologies. This site combines VRML and HTML with frames and CGI input. Using standard frames, you can keep the form on frame, then have the CGI script deliver the contents to another frame by using the TARGET field in your anchor tag. The end result of the query is then shown in Figure 20.2. See how the output of the CGI script is kept in the left-hand frame, instead of taking over the whole page?
Figure 20.1: The introductory page, including the CGI form interface.
Figure 20.2: The result of the CGI query; now you have your own customized roller skater.
A second option is using CGI within the VRML world. Besjon Alavandi's Outland part of Terra Vista (http://www.webking.com/outland) dynamically generates a world on-the-fly, using values for the lengths of the world's sides. It also encodes that information into the VRML file itself so that a single script can be used to generate any part of the world. This is particularly handy for large worlds, when you don't want to give the user the whole world at once because downloading would be too slow. Take a look at how this is done:
Anchor {
    url "/cgi-bin/myworld.cgi LENGTH=50,WIDTH=35"
    children [ # child list here
    ]
}
| Tip |
You can use the parameters field to send the output to another frame. To do this, set the field value to "TARGET=destination_frame". You'll see how this is done in Chapter 21, when you produce a frames-based document with both VRML and HTML static content, rather than CGI scripts. |
In the last section of this chapter, you'll look at another method of using CGI, in which CGI is used as part of the scripts themselves to control the world. However, before you can do that, you need to learn about using scripts first.
The biggest problem with using CGI is that your whole world gets replaced when you use it. For example, if you're just trying to control the state of a button, then there's no point to using it. Your users won't bother using your world just to change the color of a single object. However, with the Script node, you can add programmable behaviors within the scene graph. By placing them within the scene, you get direct access to every node you could place a ROUTE command to.
In the previous chapter's last example, you could run the animation only while the mouse button was held down over the switch. To start with a basic examination of how to use scripting, you'll add a toggle switch in the section "Creating a Toggle Behavior with Scripts."
Script nodes are a little different from the rest of the nodes in VRML. When you're using them, you have the ability to specify your own fields and event interfaces. The basic Script node is defined as the following:
Script {
  exposedField MFString url           []
  field        SFBool   directOutputs FALSE
  field        SFBool   mustEvaluate  FALSE
  # And any number of:
  eventIn      eventTypeName eventName
  field        fieldTypeName fieldName initialValue
  eventOut     eventTypeName eventName
}
| Note |
Note that exposedFields are not permitted in Script nodes. If you want to create the equivalent of exposedFields, then you need to provide an eventIn and an eventOut field, as well as some scripting. |
The url field is used for specifying where your scripts are located. Currently, there's support only for Java and a derivative of Netscape's JavaScript with some of the functionality cut out. The url field will be a reference to the Java .class file or the JavaScript file. JavaScript is dealt with in more depth in the next chapter.
The other two fields are directions to the browser on how this script interacts with the world. Normally, you won't need to change the values for these fields. The mustEvaluate field is used to tell the browser that as soon as it receives an event for this node, it must evaluate the event. Set this field if you are writing scripts that deal with hard real-time constraints. If you aren't, then you don't need to worry about changing the default value. The directOutputs field is used to tell the browser whether this Script node is writing directly to the inputs of another node. Until now, you've been told that the way to pass events is through the node's event interface. The browser API section in this chapter explains how it is possible to pass information directly to a node from within a script.
Apart from these three fields, the rest of the node definition is up to you. You can place whatever combination of fields you like. You can add ROUTE commands to them just as you would to any other predefined node, pass events to them, and do anything else that's legal.
Script nodes, because they don't affect the drawing of any node, can be placed anywhere you want in the scene. They don't need to be located in the same place as the nodes they communicate with. There's no rule as to where they should be placed in your file, but usually they're placed at the end so they can have access to every other node that has been defined with the DEF keyword.
Adding the toggle behavior is as simple as slotting a Script node between the TouchSensor and the TimeSensor. The behavior you need to add is toggling the TimeSensor for each click of the mouse button. The first step is designing a script to work out what inputs (eventIns) you're going to take and what outputs (eventOuts) the script will deliver to other parts of the scene. Although the majority of scripts have both inputs and outputs, not all do. In the next chapter, you'll see how to use Java to act as a gateway with the outside world.
DEF toggle Script {
    field SFBool active FALSE
    eventIn SFBool isClicked
    eventOut SFBool click_changed
    url  # not done yet
}
The scripting part is explained in the following section,
but the framework shown in the preceding paragraphs illustrates
how the script connects with the VRML fields.
ROUTE touch.isActive TO toggle.isClicked
ROUTE toggle.click_changed TO time.enabled
| Tip |
Leave the url field to last if you're using JavaScript to do your behaviors. JavaScript is embedded within this field, and it makes the code much easier to read if all the field definitions are first, then the code to deal with them is presented later. |
Start with a FALSE value for the internal value of the button state. When the user clicks the mouse button, it toggles the output to the TimeSensor, thereby starting and stopping the animation. In the examples from Chapter 19 that this code is based on, you have already set the TimeSensor-enabled field's default to FALSE, so everything is in sync.
Once you have the outline for the Script node done, the rest becomes easy. What language do you write it in? Obviously, VRML has no built-in scripting language, so you need to use another language. The specification allows you to write behavior using JavaScript, which gives you some flexibility. Chapter 21 deals with the Java issues, so you'll focus on JavaScript here. All you need to do is learn how JavaScript fits with the VRML scripting environment.
If you haven't used JavaScript before (just another language like Visual Basic), then here's a quick overview. If you haven't done any programming before, the overview won't be much help. It's in no way a comprehensive guide but should be enough to get you up and running so that you can understand the rest of this chapter. There are several good books on JavaScript, such as Sams.net Publishing's Teach Yourself JavaScript in 21 Days, or you can check out the Netscape site at http://home.netscape.com/comprod/products/navigator/version_2.0/script/script_info/.
The standard operators +, -, *, and / all have their usual meanings. A single equal sign (=) is used for assigning values. JavaScript also borrows heavily from C for a few extras. By putting the operator just in front of the equal sign, you can adjust that variable by the value afterward. For example, the following line means that you add the value of 5 to that of a and leave the result in a:
a += 5;
Conditional operators are represented by double characters. For example, a logical AND is && and OR is ||. As always, there's an exception to every rule, so NOT is a single !. To compare two values for equality, use a double equal sign (==). Be careful, though, because many a programmer has become stuck by using a single equal sign, rather than a double equal sign, in a conditional statement. When you assign one value to another, it's always evaluated to mean TRUE.
There are no types in JavaScript, so a variable just takes the type of when it's first assigned something. This is very handy when playing with the defined types from the VRML fields. You don't need to do anything special to incorporate specific types from VRML.
JavaScript is somewhat object-oriented in nature. When you want to access functionality declared outside the current script, use the object name and the function name separated by a dot. For example, to assign the sine of 30 degrees to the value z, use this:
z = math.sin(30);
To create your own function, just enter the function name followed by a list of parameters enclosed in brackets. Because there are no object types, you need to put in just the variable names. This is normally very useful, but you must remember to make sure that the types of values you're passing are the same as what you're interpreting within that function.
JavaScript is embedded within the VRML source file, this time in the url field of the Script node. Instead of putting in the normal URL-style reference, you're giving the browser the MIME type directly. To start your url field, you need the following:
url "javascript: "
For each eventIn you've declared in the VRML declaration of the script, you must also have a corresponding function. You can have any number of parameters you want; however, only the first two are used when the function is called by the browser. The first parameter is of the same type as the field type, and the second is the timestamp value (a floating point number indicating the number of seconds since midnight GMT, January 1, 1970).
Sending values to eventOuts is as simple as assigning values to them. Naturally, the value should be the same type as that of the eventOut.
DEF toggle Script {
    field SFBool active FALSE
    eventIn SFBool isClicked
    eventOut SFBool click_changed
    url  "vrmlscript:
        function isClicked() {
            if (active == 0)
                active = 1;
            else
                active = 0;
            click_changed = active;
        }
    "
}
What happens when you try this? The behavior is still the
same! Ooops. What did you do wrong?
Looking back at the definition of the TouchSensor node, notice
that the isActive field is TRUE
when the mouse button is pressed down and FALSE
when the mouse button is released. The script is receiving two
events for each button click. What really needs to happen is to
have the script look at only one of these two events, and then
look at alternating mouse button ups or downs.
function isClicked(button_pos) {
   if(button_pos == 0)  // button up so exec
   {
       if (active == 0)
           active = 1;
       else
           active = 0;
       click_changed = active;
   }
}
Listing 20.1. The final script for toggling behavior.
DEF toggle Script {
    field SFBool active FALSE
    field SFBool pointer_over FALSE
    eventIn SFBool isClicked
    eventIn SFBool isOver
    eventOut SFBool click_changed
    url  "javascript:
        function isClicked(button_pos) {
            // the following two if statements should be combined
            // together with && but CosmoPlayer did not like it -bug
            if(button_pos == 0)
            {
                if(pointer_over == 1)
                {
                    if (active == 0)
                        active = 1;
                    else
                        active = 0;
                    click_changed = active;
                }
            }
        }
        function isOver(value) {
            if(value == 0)
                pointer_over = 0;
            else
                pointer_over = 1;
        }
    "
}

ROUTE touch.isActive TO toggle.isClicked
ROUTE touch.isOver TO toggle.isOver
The simple scripting introduced in the previous section gives you the ability to do many things. The problem is that objects must already be existing in the scene, so although you can control the actions of a robot within the scene, you can't add more robots. To add more robots, you need to be able to get inside the scene graph by telling the browser to perform some action. In this section, you'll look at the browser interface that allows scripts to control the contents of the scene graph.
The browser interface is defined in a language-neutral approach, which then allows individual languages to produce a binding to the interface. At the time of this writing, bindings were available for JavaScript and Java in the form of a class called, appropriately, Browser. In the next few paragraphs, I will outline how the different available functions work; you can get more detailed descriptions from the VRML 2.0 specification.
Sometimes you might want to include browser-specific behavior. HTML doesn't allow you to do this, but the getName() and getVersion() functions return strings with information about the browser environment. There is no defined format, so you need to find out what each browser returns.
In heavily loaded scenes, you might want to adjust the behavior so that it doesn't load down the computer too much. You can use the getCurrentSpeed() function to return what speed the user is moving at to control the actions of other objects. There is no point in having fine-tuned behavior control when the user is screaming by at 100 units per second. Heavy behavior calculations mean that less time is spent doing the rendering, so that affects the updating of the screen image. You can modify behavior depending on what the current frame rate is by looking at the return value of getCurrentFrameRate().
The getWorldURL() function
returns a string holding the URL of the currently loaded world.
If you want to load in a new world, then pass a list of URL strings
to the loadURL() function,
which will try to load one of them. The order they appear in the
string defines the loading order preference.
| Tip |
Because loadURL() replaces the whole world with the new one, it may or may not return. Don't count on it returning in your behavior. |
The function loadURL() is more flexible than just being limited to loading VRML worlds. With this function, you can call any valid URL, which could be a CGI script call, a normal HTML page, or even things like FTP or news.
One of the features of VR programming is the ability to build the scene graph on-the-fly. Two functions do this in the browser interface. The first, CreateVRMLFromString(), takes a string that's the equivalent of what you would write in the .wrl file and returns a node. You don't need to put in the header, though.
node = Browser.createVRMLFromString("Box { size 2 3 1 }");
The other way to add new nodes to the scene is to grab the values from some predefined VRML scene by using the createVRMLFromURL() function. It's different from the string function because, for arguments, it takes a node reference and a string that refers to an eventIn. As you know, fetching something with an http call isn't instantaneous. To alleviate this problem, createVRMLFromURL() starts the call and then returns right away. When the file has been retrieved and converted into the internal format, the nominated eventIn is then called with a list of the nodes (MFNode).
If you want a delayed loading of the world, then you can call one of the create functions and pass the list of nodes to replaceWorld() at your own convenience. This function performs the same task as loadURL() of replacing the entire world with the given contents but adds the ability for you to control when this happens.
Once you have a list of nodes, you might also want to adjust the event handling, too. The functions addRoute() and deleteRoute() let you add and delete event routes between nodes. You pass the node instance and a string referring to the event field name for each end of the route.
Building on the previous scene using the animation, you'll delve into using behaviors. Using the browser interface in JavaScript, a series of controls will be added across the front of the test world from Chapter 19 to show the various actions. The same things can be done with the Java version, too.
The first new control will use the createVRMLFromString() function. Touching the control will add a new box to the system. Each additional box you create will pile on top of the previous ones. To do this, you need to add another script, a few more objects, and routes.
# A purple box to produce the stacked cubes when clicked on
Transform {
    translation 3 0.5 4.5
    children [
        Shape {
            appearance appearance {
                material Material { emissiveColor .5 .4 .5 }
            }
            geometry Box { size 1 1 1 }
        }
        DEF box_touch TouchSensor {}
    ]
}

DEF box_stack Transform {
    translation 0 0 -4.5
}
Listing 20.2. Code portion showing the script to dynamically
add a box to the scene in response to user input.
DEF add_box Script {
    field SFBool pointer_over FALSE
    field SFVec3f position .5 0 0
    eventIn SFBool isClicked
    eventIn SFBool isOver
    eventOut MFNode new_child
    url "javascript:
        function isClicked(button_pos) {
            // the following two if statements should be combined
            // together with && but CosmopPlayer did not like it.- bug
            if(button_pos == 0)
            {
                if(pointer_over == 1)
                {
                    box_string = "transform { children [ ";
                    box_string += "Shape { appearance appearance { ";
                    box_string += "material Material { diffuseColor";
                    box_string += "0 0 .6 } }";
                    box_string += "geometry Box { size 1 1 1 } }";
                    box_string += "] }";

                    node = Browser.createVRMLFromString(box_string);
                    node.set_translation = position;
                    new_child = node;

                    postion[1] += 1;
                }
            }
        }
        function isOver(value) {
            if(value == 0)
                pointer_over = 0;
            else
                pointer_over = 1;
        }
    "
}
# The box addition routes
ROUTE box_touch.isActive TO add_box.isClicked
ROUTE box_touch.isOver TO add_box.isOver
ROUTE add_box.new_child TO box_stack.add_children
The second way to modify the scene graph is to load in other files. If you go back to the workshop from Chapter 2, "Up and Running: First VRML Creation," you'll see that all the cars were in the scene right from the beginning. Now, by using scripts, you can load one car at a time whenever you want. In this case, loading the cars will be a one-shot affair. After you've loaded the car a first time, you won't allow it to be loaded again.
Listing 20.3. Code portion for adding an external file to the
scene.
DEF car_position Transform {
    translation -4 2 0
}
Transform {
    translation -1.5 .5 4.5
    children [
        Shape {
            appearance appearance {
                material Material { emissiveColor 0 0 .6 }
            }
            geometry Cylinder {
                heigth 1
                bottomRadius 0.5
            }
        }
        DEF car_touch TouchSensor {}
    ]
}

DEF add_car Script {
    field SFBool pointer_over FALSE
    field SFBool done FALSE
    field MFString car_url "p51.wrl"
    field SFNode car_pos USE car_position
    eventIn SFBool isClicked
    eventIn SFBool isOver
    url "javascript:
        function isClicked(button_pos) {
            // the following two if statements should be combined
            // together with && but cosmoplayer did not like it -bug
            if(button_pos == 0)
            {
                if((pointer_over == 1) && (done == 0))
                {
                    Browser.createVRMLFromURL(car_url,
                                              car_pos, "add_children");
                    done = 1;
                }
            }
        }
        function isOver(value) {
            if(value == 0)
                pointer_over = 0;
            else
                pointer_over = 1;
        }
    "
}

# The car addition routes
ROUTE car_touch.isActive TO add_car.isClicked
ROUTE car_touch.isOver TO add_car.isOver
The final example for this chapter shows how to load a new world on demand by using the combination of createVRMLFromURL() and replaceWorld(). They will respond to two separate objects in the scene that are clicked on. After clicking on the first object, it will start to load in a world. When the world has finished loading, it will be indicated by a new object being added to the world. When this object has been added, then you can click on it to replace the current world with the new one. In this example, you'll use all the features of the previous sections plus the last few calls left from the browser interface.
Listing 20.4. Code fragment to produce a dynamically created
and loaded world in two stages.
# the final example using replaceWorld()
Transform {
    translation -4.5 .5 4.5
    children [
        Shape {
            appearance appearance {
                material Material { emissiveColor 0 0 .6 }
            }
            geometry Sphere { radius 0.5 }
        }
        DEF replace_touch TouchSensor {}
    ]
}

# this is the Transform where you will put the new object
DEF new_object Transform {
    translation 4.5 0.5 0
}

DEF replace_script Script {
    field SFBool pointerOver       FALSE
    field SFBool pointerOver_new   FALSE
    field SFBool done              FALSE
    field SFNode myself            USE replace_script
    field SFNode secondObject      USE new_object
    field MFNode new_world         NULL
    field MFString externalFile   "p51.wrl"
    eventIn SFBool isClicked
    eventIn SFBool isOver
    eventIn SFBool isClicked_new
    eventIn SFBool isOver_new
    eventIn MFNode newNodesReady
    url "javascript:
        function isClicked(button_pos) {
            // the following two if statements should be combined
            // together with && but CosmoPlayer did not like it -bug
            if(button_pos == 0) {
                if(pointer_over == 1) (
                   if(done == 0) {  // same problem as above :(
                        // call create the external file
                        Browser.createVRMLFromURL(externalFile,
                                                  myself,
                                                  "newNodesReady");
                        done = 1;
                   }
                }
            }
        }

        function isOver(value) {
            if(value == 0)
                pointerOver = 0;
            else
                pointerOver = 1;
        }

        // when the final click comes, then replace the world
        function isClicked_new(button_pos) {
            // the following two if statements should be combined
            // together with && but CosmoPlayer did not like it. ????
            if(button_pos == 0) {
                if(pointer_over == 1) {
                    Browser.replaceWorld(new_world);
                }
            }
        }

        // same as the ordinary isOver but just for your new object.
        function isOver_new(value) {
            if(value == 0)
                pointerOver_new = 0;
            else
                pointerOver_new = 1;
        }

        // the function that really does all the work. Now that the
        // new world has been loaded, you need to create another object
        // with a TouchSensor and place that in the scene
        function newNodesReady(node_list) {
            shape = "Shape { appearance appearance {} }"
            material = "Material { emissiveColor .2 .2 .2 }"
            box = "Box { size 0.5 0.5 0.5 }"
            sensor = "TouchSensor {}"

            shape_node = Browser.createVRMLFromString(shape);
            shape_node.material =
                            Browser.createVRMLFromString(material);
            shape_node.geometry = Browser.createVRMLFromString(box);
            sensor_node = Browser.createVRMLFromString(sensor);

            // update the internal field with the newly created
            // list of nodes
            new_world = value;

            // now add the nodes to the scene
            secondObject.add_children = s_node;
            secondObject.add_children = sensor_node;

            // finally add routes between the newly formed
            // TouchSensor and the inputs to this script
            Browser.addRoute(sensor_node, "isActive",
                             myself, "isClicked_new");
            Browser.addRoute(sensor_node, "isOver",
                             myself, "isOver_new");
        }
    "
}

# The replaceWorld script routes
ROUTE replace_touch.isActive TO replace_script.isClicked
ROUTE replace_touch.isOver TO replace_script.isOver
So how did it go? Did I lose you? For the non-programmer, it can be easy to get bogged down in scripting. The last example is probably one of the more complex scripts you will ever have to write. If you ever need to do anything more than this, you will need to learn a full programming language like Java. Now, where do you go from here?
| It seems like scripting is very powerful-what can't you do with it? | |
| JavaScript is limited to working with objects already in the scene or added after a VRML file has been retrieved across the network using HTTP. There's no way of writing your own functionality to deal with the network, so you couldn't build a real-time external information feed into your world with JavaScript. If you switch to Java, then you can do things like that. | |
| If there is no networking, what other functionality is available to JavaScript? | |
| JavaScript also includes the JavaScript date and math objects. With these, you can create some very complex behaviors. Using the date object, you could, for example, load a file depending on what the phase of the moon is. With the math object, you could define a complex path or shape using Bézier curves to model the real world. | |
| Where can I learn more about JavaScript? | |
| There's not much more to learn. I have deliberately left out the description of the event processing and execution model because they can get highly complex. When you're dealing with scripting, it's a good idea not to change them. If you believe you need to look at understanding and using these, then you should probably look at using a proper programming language like Java for adding behaviors. The event-processing model is covered briefly in the next chapter. | |
| Sometimes I see references to VRMLScript. What is that? | |
| VRMLScript was the working name for the JavaScript section when VRML 2.0 was being developed. At the time, there was some debate about whether VRML could use the name JavaScript for copyright reasons. This has since been cleared, and the name has returned to JavaScript. |