-by Justin Couch
In Chapter 17, you created a VRML art gallery. It wasn't bad but it was still very, ummmm, uneventful. You could walk around, browse some pictures, go to a few other pages, but that was it. You could have created the site with any modeling package you saw in Chapter 13, "Exploring VRML Browsers and Development Tools," and exported it as a VRML 1.0 file.
Over the past few chapters you have been learning how to use the more advanced features of VRML 2.0-now you get to put them in practice.
If you open the VRML file from Chapter 17, "Real-Life Examples: The VRML Art Gallery: A VRML World by Hand," you'll notice that it's a rather large file, about 500 lines long. When you start to create large worlds, the file sizes can get unwieldy to work with. Another drawback to large worlds is that users must download the whole world before they can even start wandering around. Since you learned how to inline other files in Chapter 18, "Tricks to Optimize Your VRML Worlds for the Web," you'll apply that technique to the art gallery.
How should you divide up the world? Some general rules of thumb should be used:
Following those rules, the world can be split into the following groups:
Once you have each of these parts, you can inline them back into the main file. Besides the islands and the picture definitions, you just have a series of Inline and Transform nodes to worry about.
Some things you must do when creating a world. In this example, Cindy Reed has lent me her pig from her online VRML texture tutorials (http://www.ywd.com/cindy/texture.html), which I then converted to VRML 2.0. Having pigs in cyberspace? Well, I just had to make them fly. The first animation, then, isn't particularly useful, but it is fun and will also introduce a few important concepts about combining multiple scripts and interpolators to get complex behavior.
At the center of the middle island will be a collection of controls for the pigs' movement-one control to start and stop the pigs and two other controls to select their flying behavior. The pigs will have two different flying formations.
When the pigs stop flying, they need to rest somewhere; even in cyberspace, you need to let them rest. Having the pigs follow a circular flying path means they would continually crash through the resting point, so you need to add lead-in and lead-out paths. Here's where the fun begins. You may remember, from the section on events in Chapter 18, the idea of connecting the output of one node to many inputs of another node. You also used interpolators to control movement, starting and stopping it by controlling the enabled field. You'll use those methods now-and go one step farther.
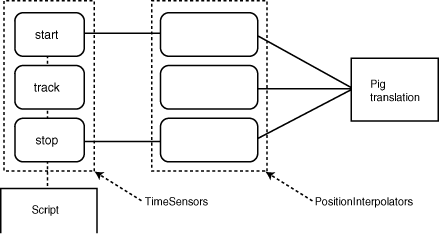
A complex path for an object doesn't necessarily mean you need a complex script to control the path. There are three parts to the flying-pig problem: the pig taking off, the track during normal flying, and the track leading back to the take-off point. For each part of these paths, you can create a separate interpolator, then control which one is active by using the script to enable and disable the paths. The basic interactions of the scene's parts are shown in Figure 23.1.
Figure 23.1: How the script controls the behavior of the pigs flying.
Now putting in the three parts of the pigs' journey will be fairly easy-just define the three paths you want them to take. However, getting things to match up and being nice in response to user input are important factors. For example, you should ignore a command to start a new flight if the pigs are still trying to land from the previous one.
When you start creating complex behaviors, you need to define exactly what's going to happen where in the flight. For example, the logic for controlling the flight path is as follows: When the user first clicks the Go button, the animation begins with the start flight path. When the pig gets to the end of the start flight path, the script checks to see whether the Stop button has been clicked by looking at the field that checks for this value. If it has, then the pig begins the stop flight path. If it hasn't, then the pig continues on its normal flight path. At the end of each cycle (cycleTime event generated), the script again checks to see whether the Stop button has been clicked. If not, then the pig continues to orbit; if it has, then the stop flight path is executed. Any further commands are ignored until after the pig has landed.
That's it-now you can turn this logic into a script.
First, you need to insert the code for the toggle action switch developed in Chapter 19, "Using Built-in Animation Techniques," into the new script. The button will be a simple colored square and serve as both the start and stop for the animation. However, you can't just stop the pig dead in the middle of space.
As a result of clicking the switch, an event is sent to the script, which sets everything in action. In previous animation examples, the behavior was looped so that starting and stopping the animation was no problem. This time, however, the behavior lasts for just a set amount of time. To do this, set the loop field to FALSE for the TimeSensor node. Making an animation happen, then, becomes a matter of setting the startTime field. After setting the start time, the pig takes off on the first part of its journey, which is defined in startInterpolator. The start time is taken from the timestamp given in the parameters to the isActive event.
Listing 23.1. The outline of the code for the reaction to an
isActive event
(a mouse click on the switch).
function isActive(val, ts) {
    if(pointer_over == 1) {
        if(val == 0) {
            if(isRunning == 0) {
                isRunning == 1;
                isStarting == 1;
                startTime_changed = ts;
            }
            else
                isStopping == 1;
        }
    }
}
To make the transition smooth, you need to know when the first part of the flight is finished. The easiest way to do this is keep track of the isActive eventOut field of the TimeSensor. When the TimeSensor has reached the end of its time, it will send the isActive eventOut a FALSE value. However, this same field is set to TRUE when it first gets activated from the code in Listing 23.1.
Within the function, you must check to see whether the event changes to FALSE. If so, then all you need to do is change a few internal condition variables and set the start time for the next TimeSensor. This time, you want the behavior to continue forever, so the loop field is set to TRUE. In Chapter 19, you learned that if the startTime was greater than the stopTime, the action would loop forever. Perfect! All you do is set the start time to be the same value as the timestamp, and all the flight paths merge together nicely.
Listing 23.2. The function called in response to the first
TimeSensor's isActive
field changing value.
function set_Started(val, ts)
{
    if(val == 0)
    {
       isStarting = 0;
       isTracking = 1;
       trackTime_changed = ts;
       track_changed = 1;
    }
}
Maintaining the flight is the easy part. Because you've set the loop field to TRUE, then the pigs will fly around happily on the path forever. The problem is you need to be able to tell the pigs when to stop. There's no way to just break a loop and substitute your own behavior. What you want to do is check the flying behavior at a known point and then run the last part of the flight.
Like the start of the flight, you'll always be joining in the same place. You can do the same thing to end the flight, and the best place is at either the start or end of the loop. The TimeSensor node has one particularly nice feature: The cycleTime field sends out an event each time a new cycle starts, so you know not only the time, but also the object's position (the fraction value would be 0.0, making that the start of the interpolator position). When the event is received, check to see whether the flag telling you to stop has been set. If it has, just disable the TimeSensor input for the interpolator dealing with the current section of the flight and fill in the start time of the TimeSensor responsible for the last part, where the pigs fly back to the landing position.
Listing 23.3. The response to the cycleTime
eventIn of the trackTime TimeSensor.
function trackCycleTime(ts)
{
    if(isStopping == 1)
    {
        isTracking = 0;
        track_changed = 0;
        stopTime_changed = ts;
    }
}
The final section of the flight is the landing. At this point, the pigs are on their way, using the path given in the final interpolator. Unlike the other parts of the flight, there's no need to stop the flight; you just need to clean up a few internal variable values and re-enable the switch. The final part of the flight is triggered by looking at the isActive field of the final TimeSensor.
Listing 23.4. The final cleanup code for when the landing stops.
function set_Stopping(val)
{
    if(val == 0)
    {
        isRunning = 0;
        isStopping = 0;
    }
}
Now you have pigs that will take off, circle in flight, and land at your instruction. Try it out and see what happens!
When you tested out the flying pigs, what did you notice? If you saw nothing other than pigs flying around in a circle, run it again and take a close look at the pigs. Notice they're always pointing in the same direction, which isn't good. Not only can these pigs fly, but they can also fly backward and sideways-they're very talented pigs! However, you should change this behavior so that the pigs' noses are always pointing forward.
This is a fairly simple task. By now, you should be one step ahead of me, looking up the spec for an interpolator that works for rotation fields. You need to use the OrientationInterpolator, which takes a series of key/value pairs and works out return values from there. There's already a Transform node above the Pig node, so you can pass the SFRotation values straight into the rotation field of the Transform node. For consistency, you need to drive the new interpolator from the same TimeSensor as the tracking value.
You don't need special values for OrientationInterpolator; all you really need are three values for the two extreme points of the path and the part that smoothly links between repeats. If you remember back to the first couple of animation examples in Chapter 19, the OrientationInterpolator works in the same way as the sphere moving backwards and forwards-except it's dealing with a rotation rather than a position. There's not much need to do more than this. The OrientationInterpolator then looks like this:
DEF pigorientation OrientationInterpolator {
    keys [ 0, 0.5, 1 ]
    values [
        0 1 0 0,
        0 1 0 3.142,
        0 1 0 0
    ]
}
ROUTE tracktimer.fraction TO pigorientaion.set_fraction
ROUTE pigorientation.value_changed TO pigcontrol.rotation
You've seen how easy it is to create a basic world, but you've also seen the extra work needed to add behaviors. World behaviors, however, generally aren't that complex; a simple animation of an object in response to user input is fairly common. Whether behaviors are complex or simple, however, learning the basic interactions between the interpolators, sensors, and scripts is essential.
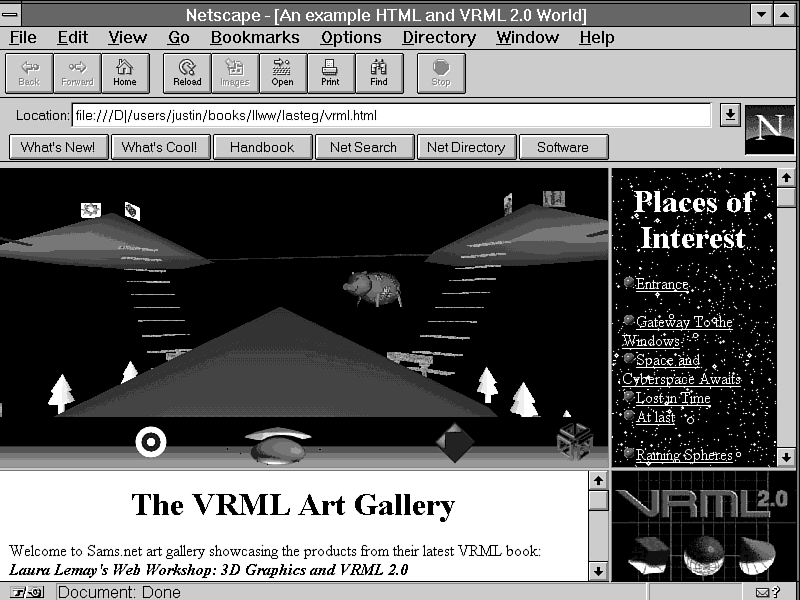
In the previous chapter, I introduced the use of multiframed documents that combine VRML and HTML. Now you're going to combine them again so that you have a Web site that uses the best of both technologies. (See Figure 23.2.)
Figure 23.2: The final gallery with the flying pigs and the HTML frames.
In the Chapter 17 workshop, each picture was linked to an HTML document that explained how the picture was created and supplied other details. For this workshop, you'll use the same frame setup. The upper-right frame will contain a list of viewpoints to visit in this site. The lower frame will be the target for HTML files referred to in the VRML world. The only change you need to make is adding a Back button on each of these target pages so that the user can get back to the Intro page, if necessary.
I have resisted temptation until now, but it's time to make this world really interesting by adding some sound. The virtual gallery is very quiet at the moment, so it needs something to liven it up a bit. First, I'll add some background noise, and then I have convinced my co-author to put a microphone in his hand and speak to you about the work.
Adding sound to a scene is relatively easy; it requires two nodes that work together because VRML splits multimedia capabilities into two parts. For both video and sound, one node handles the individual file format and another controls how that format (either sound or movie) appears in the world. For video, the MovieTexture and appearance node are combined; sound uses the combination of the Sound and AudioClip nodes. Here's what the Sound node looks like:
Sound {
    exposedField SFVec3f  direction     0 0 1
    exposedField SFFloat  intensity     1
    exposedField SFVec3f  location      0 0 0
    exposedField SFFloat  maxBack       10
    exposedField SFFloat  maxFront      10
    exposedField SFFloat  minBack       1
    exposedField SFFloat  minFront      1
    exposedField SFFloat  priority      0
    exposedField SFNode   source        NULL
    field        SFBool   spatialize    TRUE
}
The Sound node is used to place sound in a scene. Basically, it controls how to put sound in by setting the direction and intensity of the noise. To put in the background music (this is an art gallery, after all), make it an ambient source of music. Ambient sound is created by setting the spatialize field to FALSE and the minimum values (minFront and minBack) to cover the area you want the sound to be heard in.
In complex worlds, there might be too many sounds for the user's computer to handle. The priority field lets you organize which sounds should be heard in preference to others. A value of 0 is the lowest priority and 1 is the highest.
If you wanted to create a "speaker effect" with directional sound, then use the direction field. Sound is oriented around this direction. By combining the direction field with the min/max fields, you can create directional sound. The minFront and minBack fields control the minimum distance that you can hear the sound at full volume, both in front of the location and behind it. The front is the side that the direction field points to. The maxFront and maxBack fields control the outer limits of the sound's audibility. To add to the effect of ambient sound, if you set minBack equal to minFront and maxBack equal to maxFront, you get sound with no direction at all, which gives you the full ambient effect.
Notice how the Sound node has no ability to reference the sound file. That ability is left to another node that's placed in the source field. Chapter 15, "Sprucing Up Models with Textures and Materials," mentioned using MPEG sound in the scene. Here is where it gets used. To use the audio capabilities of MPEG1-Systems, place the MovieTexture node in the source field. Normally, you use the DEF keyword for the node in the appearance field and then insert the USE keyword in the source field. That way, you're guaranteed to get proper synchronization of sound and video.
The other option for adding sound to a world is to use the AudioClip node, which looks like this:
AudioClip {
    exposedField   SFString description  ""
    exposedField   SFBool   loop         FALSE
    exposedField   SFFloat  pitch        1.0
    exposedField   SFTime   startTime    0
    exposedField   SFTime   stopTime     0
    exposedField   MFString url          []
    eventOut       SFTime   duration
    eventOut       SFBool   isActive
}
You can play either MIDI or WAV files with the sound nodes because support for their file formats is required by the specification. As usual, you place the filename(s) in the url field, and the loop and description fields follow the normal rules for VRML that you have seen in other nodes. The startTime and stopTime fields are used for controlling when the sound plays. If you hook these time fields up to a TouchSensor node and add some scripts, you can make the sound play almost like a CD player. There are some limitations, like not being able to start at the middle of a sound file, but even that may be possible with a clever use of TimeSensors, scripts, and other nodes, such as Switch.
One method around this problem of starting halfway through a sample is the equivalent of the Fast Forward button. The pitch field controls how quickly the source should be played in relation to the original recording. If you set the pitch field to 2, then the sound plays twice as fast. For the more musically inclined, that means the sound is played up an octave, as well.
Therefore, you can create a fast forward option by connecting a sensor to a script that modifies the pitch field in response to user input.
I suppose I need to make up for the flying pigs example, so the background music will be a bit more traditional. Since this is an art gallery, I'll choose Mozart's "Eine Kleine Nachtmusik." Being such a popular piece of music, you can find literally hundreds of versions on the Internet.
The background music is added by including the code from Listing 23.5.
Listing 23.5. Code to put background music in the scene.
Sound {
    minFront 100
    minBack  100
    maxFront 150
    maxBack  150
    spatialize FALSE
    source AudioClip {
        description "Eine Kleine NachtMusik"
        loop TRUE
        startTime 1
        url "mozart.midi"
    }
}
The other way of using sound in this demo world is to have it respond to user input. Again, you'll use the same basic TouchSensor and Script node combination to trigger the sound. Background music requires continuously playing the sound file without user intervention, but for a talking demo you need to just play it once. Therefore, the loop field is left at the default value of FALSE, and most of the other values are left at their default, too.
Starting the sound file requires that the startTime be set. It also means that the stopTime is set, too, because this isn't a repetitive sound source. Remember from Chapter 19, in the explanation of the input parameters for events, that the second field is the timestamp of when the event occurred. The AudioClip node contains an eventOut that gives the value of its sound file's duration. By combining these two, you can set the startTime (the event's timestamp) and the stopTime (timestamp + duration). The duration is an eventOut, which means that you need a corresponding eventIn for the script; it takes the value and stores it internally for later use.
The complete code to produce the Sound node is given in Listing 23.6. A small square acts as the switch to control the sound. The sound file could be anything, but in this case it's the voice of my co-author, explaining one of his images. By simply changing the file in the URL, you can put that sound in front of any picture in the scene.
Listing 23.6. Controlling a Sound node in response to user
input.
Group {
    children [
        DEF soundsensor TouchSensor {}
        Shape {
            appearance appearance {
                material Material { emissiveColor 0. 0.5 0.1 }
            }
            geometry Box { size 0.7 0.1 0.7 }
        }
    ]
}

Sound {
    source DEF audioout AudioClip {
        url "explain.wav"
    }
}

DEF soundscript Script {
    field SFBool   pointerOver FALSE
    field SFTime   duration   0
    eventIn SFBool isOver
    eventIn SFBool isActive
    eventIn SFTime set_duration
    eventOut SFTime soundStopTime
    eventOut SFTime soundStartTime
    url "vrmlscript:
        function isOver(val) {
            pointerOver = val;
        }
        function isActive(val, ts)
        {
            if(pointer_over == 1)
            {
                if(val == 0) {
                    soundStartTime = ts;
                    soundStopTime = ts + duration;
                }
            }
        }
        function set_duration (val) {
            duration = val;
        }
    "
}

ROUTE audioout.duration TO soundscript.set_duration
ROUTE soundsensor.isOver TO soundscript.isOver
ROUTE soundsensor.isActive TO soundscript.isActive

ROUTE soundscript.soundStartTime TO audioout.startTime
ROUTE soundscript.soundStopTime TO audioout.stopTime
If you just read that last sentence in the previous section and despaired at having to cut and paste all this code every single time you want to put in a sound, don't worry. VRML gives you a mechanism for producing custom nodes within the specification; it's called PROTO. You can declare the code once at the top of the file with a specific name, and then use that name anywhere in the file, just as though it was an ordinary VRML node.
The syntax for using PROTO is a little different. First, you must tell the browser what fields and events it will handle; they're declared in square brackets. After that, declare how it works by using standard VRML syntax, which can include any legal combinations of nodes, scripts, and ROUTE commands.
Looking back at the previous section, controlling the music is definitely a candidate for being made into a PROTO. The basic implementation is the same; all you want to do is change the music file, which makes the interface to the PROTO easy. The design goes something along the following lines:
The sound can be any file you want, and it would be good to add the ability to change it on-the-fly. You can also change the geometry for the switch. Essentially, the PROTO should contain the behavior but let you do the customization on the visible parts.
Going through this and the code from Listing 23.6 shows that the fields need to be an exposedField MFString for the file URL and a field MFNode for the geometry. Now the Transform node also has add_children and remove_children events, so you need to replicate that.
From this description, you can work out that the PROTO definition needs to look like this:
PROTO NarrativeSound_X [
    field MFNode children []
    exposedField MFString url []
    eventIn MFNode add_children
    eventIn MFNode remove_children
]
{
    # the node definition in here
}
The most important part of the PROTO declaration is that it can pass values straight from it to the internal nodes. To pass these values, you just declare the following:
<target fieldname> IS <source fieldname>
Naturally, they need to be of the same type for this to work. You can do this with anything, even the eventIn or eventOut. It works whether you're connecting to a script or just an ordinary node. Going back to Listing 23.6, you can see that you want to set the children of the Group node. To do this, you need the following declaration:
Group {
    children [
        IS children
        DEF soundsensor TouchSensor {}
    ]
    remove_children IS remove_children
    add_children IS remove_children
}
A script is basically the same, except you have the extra declarations of the access type and field type to place in front. To connect an isOver eventIn for the PROTO to a script, you would use this syntax:
EventIn SFBool isOverNow IS isOver
All that's left is putting everything together, which is shown in Listing 23.7.
Listing 23.7. The completed PROTO
for the sound narrative.
#VRML V2.0 utf8
#
# A single-shot sound file player
#

PROTO [
    field MFNode   children        []
    exposedField MFString url      []
    eventIn MFNode add_children
    eventIn MFNode remove_children
]{
    Group {
        children [
            Group {
                add_children IS add_children
                remove_children IS remove_children
                children [
                    DEF soundsensor TouchSensor {}
                    IS children
                ]
            }

            Sound {
                source DEF audioout AudioClip {
                    url is url
                }
            }
        ]
    }

    DEF soundscript Script {
        field SFBool   pointerOver FALSE
        field SFTime   duration   0
        eventIn SFBool isOver
        eventIn SFBool isActive
        eventIn SFTime set_duration
        eventOut SFTime soundStopTime
        eventOut SFTime soundStartTime
        url "vrmlscript:
            function isOver(val) {
                pointerOver = val;
            }
            function isActive(val, ts)
            {
                if(pointer_over == 1)
                {
                    if(val == 0) {
                        soundStartTime = ts;
                        soundStopTime = ts + duration;
                    }
                }
            }
            function set_duration (val) {
                duration = val;
            }
        "
    }

    ROUTE audioout.duration TO soundscript.set_duration
    ROUTE soundsensor.isOver TO soundscript.isOver
    ROUTE soundsensor.isActive TO soundscript.isActive

    ROUTE soundscript.soundStartTime TO audioout.startTime
    ROUTE soundscript.soundStopTime TO audioout.stopTime
}
Once you have this PROTO declared at the top of your file, you can then use it like any other node. Since you have a Group as the first node, it means that this is a group node as well. To use this PROTO, you need to declare it at the top of the file. Within the file, you can use it like this:
Group {
    children [
        mynarrative {
            url "mozart.mid"
        }
    ]
}
A major use for PROTOs is the ability to select them from other files, which requires using the EXTERNPROTO statement:
EXTERNPROTO protoname [
    #list of fields here
]
[ http://your.domain.here/filename.wrl ]
The last section is the list of URLs and URNs to this PROTO. They
may also include the #anchor
value, too. The name after the #
is used to work out what the PROTO name is when you have a large
collection of PROTOs sitting in one file.
| Tip |
You need to declare only the fields you will use. If you don't declare the extras, that's OK, but if there are extra ones or if none exist, then the browser will complain. |
That's it. Except for a few extras, you've learned enough VRML to keep you going for quite some time. VRML 2.0 has the potential to do things that haven't even been thought of yet. Indeed, some of the examples in this book will become staple nodes for use in your own worlds.
You should now have enough insight into VRML 2.0 to create your own compelling worlds. VRML 2.0 offers enough flexibility to be used for anything from desktop VR for corporate demonstrations and products right down to an individual's home page.
There are a few sections of VRML that this book did not cover:
These are complex features that require a thorough understanding of how VRML works and the use of scripting to get the most benefit from them.
The last part of this book deals with other 3D technologies on the horizon. The appendixes also cover some of the basic VRML information you can use as references while trying build your own creations.
| I want to learn more about scripting and how to use it. Where else should I look for information? | |
| If you need to do heavy programming, then books on Java and JavaScript are a must. Sams.net has a number of books on these topics, including Tricks of the Java Programming Gurus, which gives you an in-depth look at how to interface VRML and Java. Coincidentally, that chapter happens to be written by me. | |
| Where do I go from here? | |
| Start writing your own VRML worlds. First, learn the basic worlds, and then head on to behaviors. There's always more than one way to approach a solution, particularly with the interaction between scripts and interpolators. | |
| What's likely to change in the future? | |
| This book was written when Draft 3 of the VRML 2.0 specification was current. Between Draft 3 and the official release of verison 2.0, the only differences will be clarification and rewording of parts.
You can sleep easily at night, knowing that what's in these pages won't go out of date too quickly.
Forthcoming revisions to the 2.0 standard will address parts of the specification that are still outstanding but don't affect the file format. The parts include things like the external API and binary file format, which means you can write your files now and still have them run on browsers in the future. |