-by Justin Couch
So far, all the worlds you've been developing are static; apart from clicking on links, nothing else changes as you wander around. However, now you'll explore some of the built-in animation techniques that VRML offers. Animation can be almost anything, from moving position to changing color. This chapter will cover the following areas:
Animation requires addressing many separate issues before you actually get to anything that will appear onscreen. So sit tight for a few pages of hand-waving discussions, until you have enough information to start creating worlds that move.
As you get into animations, you'll start working with constructs that look like a programming language. The real programming doesn't start until the next chapter, but many of the core issues for understanding the programming come from this basic introduction. Hold on and enjoy the ride!
Once you introduce motion into a previously static system, the main question is how to control the animations. In VRML, you do this by using events. An event is like a dialog box-the program is telling you that something has happened, forcing you to respond. Think of it as one part of your scene telling another part that something has changed, so it needs to respond.
VRML contains many nodes; some can generate events and others receive them. Some nodes can do both, and, as you'll see in the next two chapters, you can even create your own nodes that receive and generate events. Where do VRML events show up? Events are used as a way of passing data between two different nodes; this data takes the form of the field types you're now familiar with. Take a step back and have another look at the definition of the Transform node:
Transform {
  eventIn      MFNode      add_children
  eventIn      MFNode      remove_children
  exposedField SFVec3f     center           0 0 0
  exposedField MFNode      children         []
  exposedField SFRotation  rotation         0 0 1  0
  exposedField SFVec3f     scale            1 1 1
  exposedField SFRotation  scaleOrientation 0 0 1  0
  exposedField SFVec3f     translation      0 0 0
  field        SFVec3f     bboxCenter       0 0 0
  field        SFVec3f     bboxSize         -1 -1 -1
}
Remember the last time you saw this definition? I told you then not to worry about the first column. Well, now it's time to look at it. Notice that many of the fields are declared as exposedField. There are also eventIns, EventOuts, and ones called just field. Up to now, you've ignored the eventIn and eventOut fields, but you'll be dealing with them almost exclusively now.
The first column in all node definitions is referred to as the interface type. It controls what access the other nodes have to the contents of that field. They can be broadly classified into these categories:
Animation is all about changing the properties of nodes, which means that any field declared as having a field interface isn't much use to you when talking about animation. If you want to update a value in a node, then you have to pass an event to that node. You can pass events only to fields with either the eventIn or exposedField interface, and you can get events only from fields with eventOut or exposedField interfaces.
This is roughly how animation works: You translate objects with the translation field in the Transform node. The translation field has an exposedField interface, which means it can send and receive events. Later in the file, you have a timer that sends regular events. The last piece needed to produce animation is a connector that sends new translation values to the translation field when the event is signaled. These new translation values update the position of the object and it moves around as time passes. Voilà-animation!
So far, the discussion has been about passing events, not actually creating them; that's because there is no way to just "create" events. They must come from some other node in the scene graph. A single event may start a long chain of cascading events that eventually causes a change across the whole scene. But what causes the first event?
The first event is always caused by some external influence, since there's no method for directly generating events within the scene graph. An external influence can be anything from the passing of time to a user clicking on an object. These nodes are embedded in the scene graph, but they generate new events only when something changes. Once the initial event has been generated, it can trigger other events, causing a domino effect.
As mentioned previously, the scenes created so far in this book are very static. In a static scene, there's no need for any notion of time. Once you start to add motion that you don't control, however, then you need to give the scenes some sense of time.
One of the most valuable event generators is a timer node called the TimeSensor. It "senses" that some amount of time has passed, then passes this value on to other nodes. If you need time, then it is just another node you add to the scene graph. The TimeSensor node is defined like this:
TimeSensor {
  exposedField SFTime   cycleInterval 1
  exposedField SFBool   enabled       TRUE
  exposedField SFBool   loop          FALSE
  exposedField SFTime   startTime     0
  exposedField SFTime   stopTime      0
  eventOut     SFTime   cycleTime
  eventOut     SFFloat  fraction_changed
  eventOut     SFBool   isActive
  eventOut     SFTime   time
}
This node is the heart of any VR animated behavior, so first you'll learn the basics. You'll see an example later as you progress through the chapter.
You can see from the definition that you can specify the interval cycle, start and stop times, and whether the event loops. This gives you a lot of control over how events are generated.
The current time is available from the time field. StartTime and stopTime are also absolute values from the same point. They allow you to specify an alarm event to be set to happen at some point.
The TimeSensor node represents the way most of the sensor nodes work. Other sensor nodes covered later in the chapter include ProximitySensor and TouchSensor. Sensor nodes contain several fields that control its behavior and a collection of eventOut fields that define its behavior. EventOuts usually act in a group. For example, the isActive field says that this TimeSensor is currently active, so the values available from the time field are valid.
Now you have nodes like TimeSensor to generate events and nodes like Transform to receive them. How do you get them talking to each other? You use an explicit connection method defined by VRML. If you want to connect the output of one node to the input of another, then you must define this connection with the ROUTE command, which tells the browser how to pass events between nodes. If an event interface on a node isn't connected to anything, then the browser doesn't generate events for it.
This is the syntax for connecting two event handlers:
ROUTE node1.eventOutName_changed TO node2.set_eventInName
The node names are those defined with the DEF keyword, as discussed in the workshop in Chapter 17, "Real-Life Examples: The VRML Art Gallery: A VRML World by Hand." Naturally you can only connect an eventOut to an eventIn, and they must be of the same type. This is a very strict rule; you cannot, for example, connect a SFNode eventOut to an MFNode eventIn, even though they're both based on the Node type.
You do, however, have more leeway with exposedFields. They act as both eventIns and eventOuts, so if you had an eventOut connected to an exposedField, you could also have an eventIn from another node (or even the same one) connected simultaneously. For example, you can construct a chain of events and ROUTE commands so that if you tell a sphere to move when clicked by the user, then a box will rotate when the sphere moves, and a cone will change color when the box rotates…well, you get the idea.
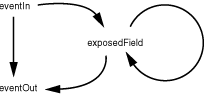
Figure 19.1 shows how this would be constructed. An alternative is connecting the one eventOut to two eventIns. In engineering terms, this is known as fan-out-one node's output can feed the inputs of many other inputs. The opposite of this is called fan-in. These techniques are useful for doing things like having a light switch turn on many lights simultaneously. Creating fan-in and fan-out is as simple as using the ROUTE command to declare a path between the nodes.
Figure 19.1: How eventlns, eventOuts, and exposedFields relate to each other.
Unlike the rest of VRML, ROUTE commands are independent of the scene graph structure. A ROUTE can be placed at any point in the file as long as it's declared after the nodes where the DEFs are declared. There are two common strategies for using ROUTE commands: declare them just after they're needed (within the nests of Transforms and other nodes), or place them all at the end of the file. How you do it is a matter of preference, but in this chapter the first option is used for clarity in the examples. In very large files, you might have well over one hundred of them.
When you start digging into how VRML functions (you've made it this far, so you must be interested), you'll notice that none of the objects seems to be aware of anything outside itself. Take the shape primitives, for example; they know only their shape attributes. They know nothing about what color they are or where they're placed in the scene. If you continue to dig, you notice they have no knowledge of time or motion, either. If a sphere is to move in a scene, then something higher up the hierarchy must cause it to move to a different position. But how does a Transform node know it's supposed to change the position of its children? It must have something else set the value of the new position.
On one side of the fence, you have a Transform node placing the sphere at a location; on the other side, you have a TimeSensor node saying that time is passing, so that sphere should be going round in a circle. You need a translator in the middle to facilitate communication between the nodes-enter the Interpolator nodes.
At last, no more theory-you finally get to develop some code. The Interpolator nodes are the glue in the scene graph; they translate the notion of time passing to actually make it look like that's what is happening. Interpolators come in many different forms and can be used to perform several tasks, anything from changing color to changing positions. Take a look at a simple example of moving a sphere across the floor.
As you start building this example,you'll use many of the concepts you've already learned. First, you build the basic file, then modify it to get some specific animation motion:
# First the floor
Shape {
    appearance appearance {
        material Material { emissiveColor .7 .7 .7 }
    }
    geometry Box { size 10 0.1 10 }
}
# now the red sphere.
DEF transform Transform {
    translation 4 0.5 0
    children [
        Shape {
            appearance appearance {
                material Material { emissiveColor .8 0 0  }
            }
            geometry Sphere { radius .4 }
        }
    ]
}
# put in a timesensor
DEF time TimeSensor {
    cycleInterval 8
    loop TRUE
    startTime 1
}
# Finally the interpolator
DEF position PositionInterpolator {
    keys [ 0  1 ]
    keyvValue [ 4 .5 0, -4 .5 0 ]
}
# now connect everything together
ROUTE time.fraction_changed TO position.set_fraction
ROUTE position.keyValue_changed TO transform.translation
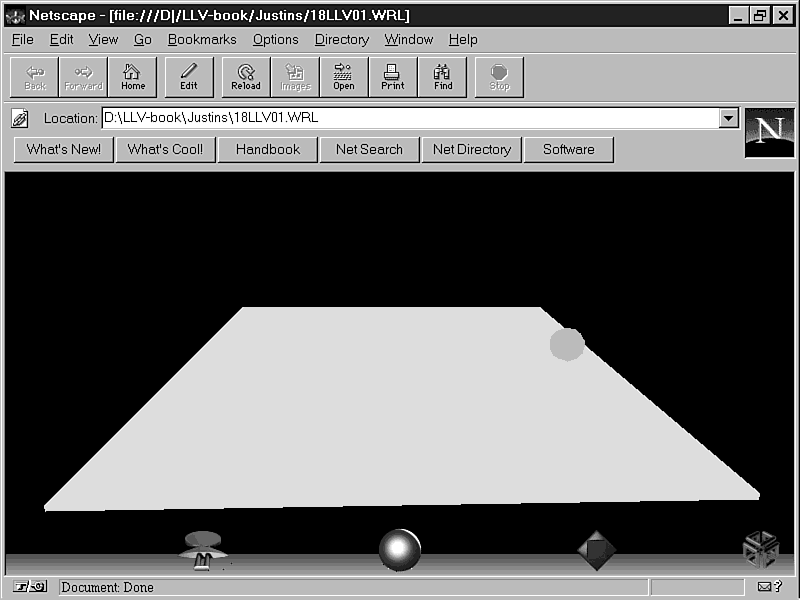
Figure 19.2 shows the resulting scene, even though you can't see the sphere actually move in the figure. See the CD-ROM for the actual file.
Figure 19.2: The sphere is animated in this scene with the help of event nodes.
Just like the sensor nodes, there are several different Interpolator nodes, such as ColorInterpolator, CoordinateInterpolator, and PositionInterpolator, among others. All the interpolators follow a very simple scheme: You give it a set of points defined in the keys field and a set of matching values belonging to these keys in the value field. The interpolator receives a value from the set_fraction field, and a value is returned from the value_changed field. The actual type of value returned depends on the type of interpolator used.
Keys can lie in any range, but you need to look at what is passing the data. Reviewing the TimeSensor definition shows that it displays the time by using the fraction_changed eventOut. This ranges in value from 0 to 1, so you must set up your keys values to fall in this range.
Next, you need to define a set of matching values for the keys. Since the start position in the previous example is (4 0.5 0), then it was made to match the value for 0. To make it nice and even, set the other key to be the opposite side of the floor at (-4 0.5 0).
Now you're getting into more detail about the time model used in VRML 2.0. If stopTime is set to be less than startTime, and the loop field is set to false (the default settings), then nothing will happen. The simplest solution to this problem seems to be setting the loop field to true; that should give you continuous animation that loops indefinitely. Wrong! There's something you've missed-that happens only when startTime is greater than stopTime, not equal to it. Therefore, you need to set startTime to some value other than 0. Since you're not likely to be visiting the 1970s again, the value of 1 used in the previous example does the trick (remember, a time of 0 is midnight GMT on January 1, 1970).
Besides the animation, what else did you notice about the sphere's behavior? That's right-when the sphere got to the left side of the floor, it jumped back to the right, which isn't particularly helpful behavior because you wanted it to travel backward and forward smoothly.
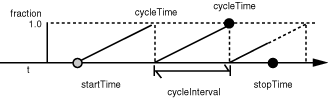
Have a look at Figure 19.3. The fraction_changed field goes only from 0 to 1, but never the other way. When the Interpolator receives values, it just sends the value out depending on what it receives. At the end of cycleTime, the fraction field jumps from 1 back to 0 again, which causes the jumping behavior. In animation, you want the jumps to be as small as possible, so why not set them to 0? If the Interpolator sends out the same endpoint as the start point, then there will be no jump. Here's the solution:
key [ 0 0.5 1 ]
keyvValue [ 4 .5 0, -4 .5 0, 4 .5 0 ]
With these changes, the sphere moves back and forth across the screen like a boring ping-pong game-still not a very exciting motion. What can you do to liven it up?
Applying a little bit of lateral thinking, you notice that the sphere is moving only backward and forward-that's because those are the only positions you defined. To make the sphere travel a square path, just add more points in positions outlining a square path.
DEF position PositionInterpolator {
    key [ 0 .25 .5 .75 1 ]
    keyvValue [  4 .5  0,
              0 .5  4,  # new value added here
             -4 .5  0,
              0 .5 -4,  # new value as well
              4 .5  0 ]
}
Yes, the object is now moving in a square, which illustrates that
the values are a linear interpolation between the defined points.
If you specify a value halfway between two keys, then you get
the middle value of the two corresponding value field items. Therefore,
to get more accuracy, you need to have more points so that the
linear bits between points aren't too long.
| Tip |
Time to dig out those pocket calculators. To calculate a circular path, take the number of points you want to use in the circle and divide that number into 360. The x and y value of each position is given in this formula: x = radius * sin(angle) y = radius * cos(angle) Keep doing this for each angle you need and place it in the values field with the corresponding number of entries in the keys field. Don't forget to put in the extra point that returns you to the original position. |
Using this combination of keys and values, you can define whatever
path you choose. For example, by a simple rearrangement of the
current points, you end up with a bowtie-shaped path.
| Tip |
You can create different speeds on the path by simply compressing or expanding the range between 0 and 1 that you devote to a particular part of the track. The object traveling a greater distance in the same time as one going a shorter distance moves more quickly. |
So far, so good. You have this red sphere that travels around in circles forever, consuming memory and valuable CPU time. Now you're going to add the ability to start and stop the animation on demand. To do this, you just need to click on something to tell the animation to stop; you can also use the reverse position of what you click on to make it start.
Earlier in this chapter, you learned that sensors are the only nodes capable of generating new events. You have a collection of seven sensor types to play with, and you've already seen how TimeSensor works. The Cylinder, Plane, and Sphere sensors are used to translate drag motions into a particular geometry. The three other sensors are Proximity, Touch, and Visibility.
Visibility sensors activate when something becomes visible. Proximity sensors activate when you get within a defined bounding box, which could be very useful. For example, the ball does nothing until you get near it. When the ProximitySensor is tripped, the ball scurries away until it's out of the proximity range; then ProximitySensor returns false, and the sphere stops moving. The final sensor, TouchSensor, is used in the next example.
TouchSensors relate any sort of touch-type input to an event. To add a TouchSensor to a scene, place it at the same level in the hierarchy as the objects you want to detect touches on. TouchSensor looks at the children of its parent node but doesn't contain children itself, which is unusual. In your current scene, you could place a TouchSensor directly into the Transform node containing the sphere. However, you don't want to try hitting a moving object with a mouse.
Listing 19.1. The finished file with animation and user-controlled
actions.
#VRML V2.0 utf8
#
# Animating a sphere - now with 5 points
# forming a bowtie path.

# Introduce a Viewpoint looking down from above
Viewpoint {
    position 0 5 5
    orientation 1 0 0 -.707
}
# First, the floor
Shape {
    appearance appearance {
        material Material { emissiveColor .7 .7 .7 }
    }
    geometry Box { size 10 0.1 10 }
}
# Now, the red sphere
DEF transform Transform {
    translation 4 0.5 0
    children [
        Shape {
            appearance appearance {
                material Material { emissiveColor .8 0 0 }
            }
            geometry Sphere { radius .4 }
        }
    ]
}

# Put in a TimeSensor
DEF time TimeSensor {
    cycleInterval 8
    loop    TRUE
    enabled FALSE
    startTime 1
}

# Finally, the Interpolator
DEF position PositionInterpolator {
    key [ 0 .25 .5 .75 1 ]
    keyVvalue [  4 .5  4,
              4 .5 -4,
             -4 .5  4,
             -4 .5 -4,
              4 .5  4
           ]
}

# Add the TouchSensor on a blue cone
Transform {
    translation 4.5 0.5 4.5
    children [
        Shape {
            appearance appearance {
                material Material { emissiveColor 0 .8 0 }
            }
            geometry Cone {
               bottomRadius .4
               height 1
            }
        }
        DEF touch TouchSensor {}
    ]
}

# Now connect everything together
ROUTE time.fraction_changed TO position.set_fraction
ROUTE position.keyValue_changed TO transform.translation
ROUTE touch.isActive TO time.enabled
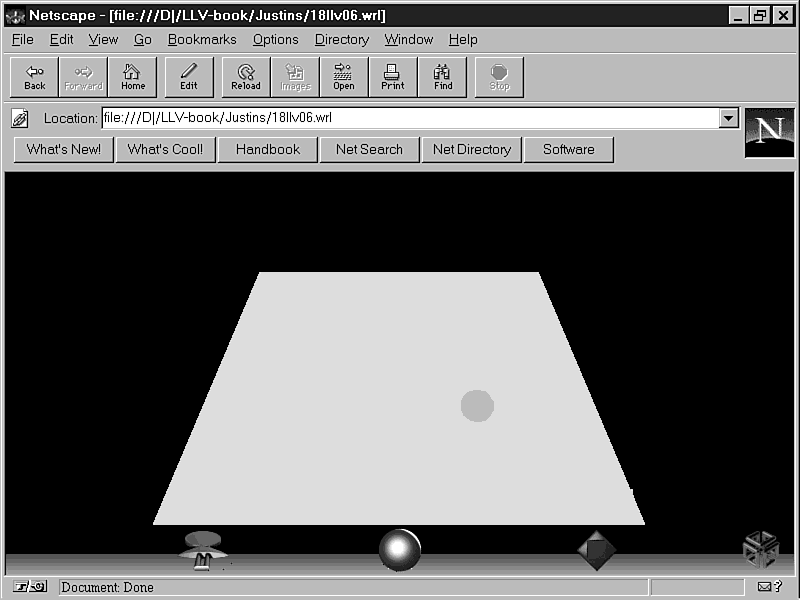
Figure 19.4 shows the finished file. When you run this file, you'll find that the object moves only while the mouse button is held down over the cone. This is because TouchSensor doesn't have a toggle action. Therefore, the isActive field is held true only while the mouse button is held down over the object. If you want to use a toggle action, you need to use scripts, which are covered in the next two chapters.
Figure 19.4: The sphere is animated and moves when the cone primitive in the corner is clicked.
Welcome to Moving Worlds. What you have seen here is only a small part of adding behaviors to VRML worlds. The topic is so large that a whole book could be devoted to the subject, but you got a chapter instead. However, you've learned almost everything there is to know about VRML nodes-there's only a few left. A few of these get covered in the next workshop in Chapter 23, "Real-Life Examples: A 3D Gallery: An Advanced VRML World."
In the rest of this book, you'll be looking at the following:
| All these behaviors are interesting, but they seem complex. Is there some way they can be automatically produced? | |
| At the time of this writing, there were no automated VRML 2.0 static scene creators, let alone one capable of doing behaviors. For the time being, learn to love your favorite text editor. Ideally, a good tool would consist of a GUI front-end, like Caligari's Pioneer or IDS-Software VRealm, and the point and click interface of Kinetix's Hyperwire. | |
| Simple interpolations are fine, but how do I create more complex interpolations, like turning effects for corners? | |
| Complex situations can be modelled either statically at creation time by getting lots of points that simulate the curve or by creating a script that dynamically calculates these position values. Scripting is covered in the next two chapters. |