


-by Justin Couch
When you first start creating worlds, you can get quite carried away with detail. A texture here and a mesh there-it all makes the world look nicer. Everything looks pretty, but as soon as you put it up for public consumption, you notice that it takes forever to download. What can you do about it?
Many of the basic tricks come straight from the high-end simulation market; after all, they've been trying to cope with this sort of problem for years. Making the world run faster also means it will download faster, too, so you win on both counts. The following topics are covered in this chapter:
I'm into flying, so I'll start with the P51 model from the Syndesis collection included on the book's CD-ROM. The file size is 93K before you convert it into VRML 2.0. There's no color or texture or even any scenery. Once you start adding those things, you can quite easily blow the file size up to 200K or more, which is way too big for the Web.
When you first create a lovely model of a plane in 3D Studio or AutoCAD, you want it to look professional, so you make every little detail perfect. The result is a perfect rendition with over 10,000 polygons. The rule of thumb for current hardware is that you can have an upper limit of 3,000 on polygon count if you want to keep the world operating smoothly. If you use this plane model in a VRML file, it will be a huge file that will take forever to download.
One of the problems is that you often generate complex models with some sort of authoring tool. If you try to edit complex models by hand, then all I can say is good luck-even this intrepid hacker isn't that game! The models you created in trueSpace for generating 3D effects in the first part of this book are much too detailed for a VRML world.
VRML modeling tools, to various degrees, allow you to control the amount of detail in the object. Each tool is different, but to reduce the object's complexity, look somewhere under the Options menu. Sometimes the ability to control detail comes in the form of an accuracy setting; at other times, it's found in a high/medium/low detail setting.
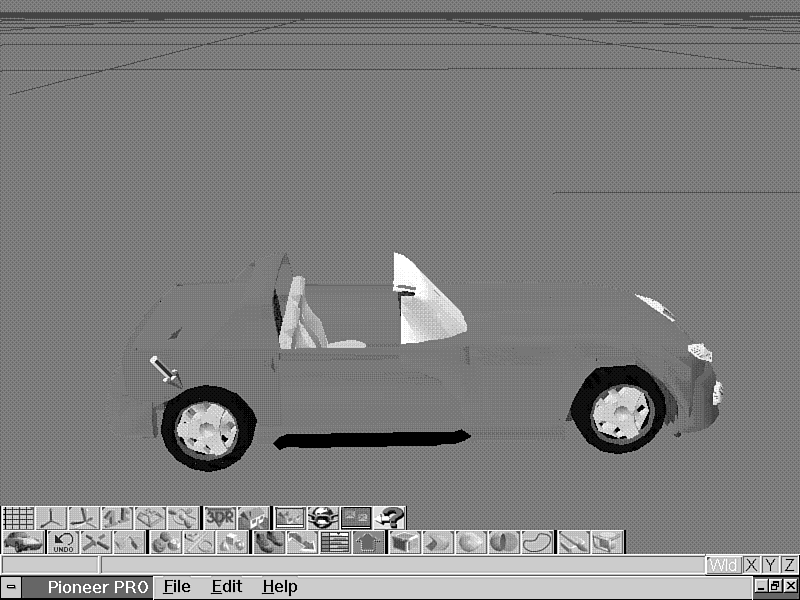
If you're planning to buy a VRML modeling tool, then Caligari's Pioneer Pro would be a safe bet, particularly if you have already settled on trueSpace2. In the Pioneer Pro version, there's an option to automatically reduce the polygon count of imported objects. If you create something in trueSpace2, save the object in its native format (.scn or .obj), then import it into Pioneer Pro to finish the job. An example of a model that's been imported into Pioneer is shown in Figure 18.1.
Figure 18.1: The original high-detail Viper model loaded into Pioneer.
| Tip |
Reducing your model's polygon count doesn't necessarily mean reducing the quality. With proper lighting and smooth shading, you can create similar effects. It's amazing what you can find when you spend a bit of time digging around in the specifications. For example, the IndexedFaceSet node has a creaseAngle field that specifies the maximum angle between faces that a browser should try applying smooth shading to. If you set this to a very small value, then the object takes on a faceted look, but a large value produces smoothing across even large angles. |
To reduce the polygon count of a model, you need to follow these steps:
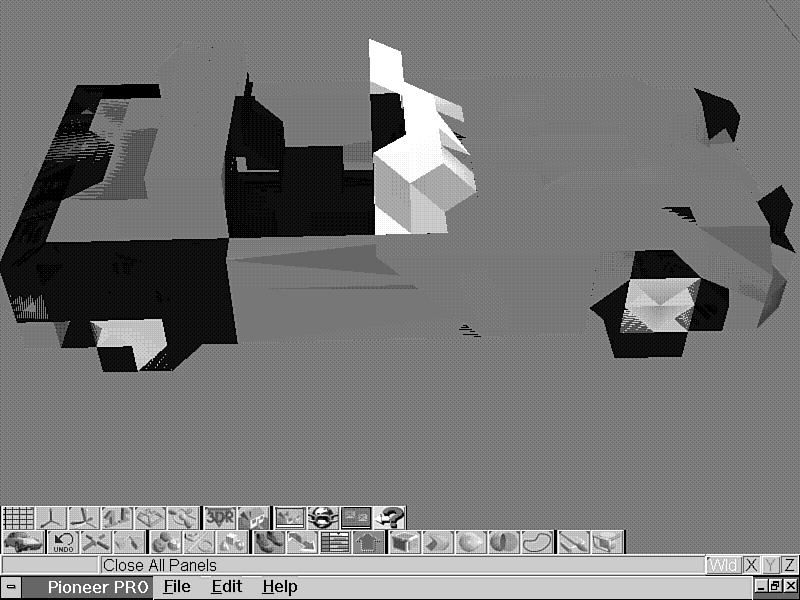
When producing the models for this book, Kelly first trimmed out most of the detail in trueSpace, then passed them to me. I did a little more trimming, using Pioneer Pro, then exported the files with a precision value of 1. You saw the "before" shot in Figure 18.1; now take a look at the "after" shot in Figure 18.2.
Another big waster of space in a VRML file is formatting. When you're hand-coding, formatting is essential for working out relationships between the file's parts. Once you have finished with the file, there's no need to keep the formatting.
One of the problems with converting other file formats to VRML is that other formats are unnecessarily precise. Unless you're building a very small-scale world, there's no point in being any more specific than three or four decimal places. Inaccuracy in the browser's rendering engine will often cause more problems than your lack of precision does. Many examples in this book with numbers like 0.5 have the leading zero missing; a file containing many points can save quite a bit of space this way.
Almost since the beginning of VRML, there have been several programs that allow you to remove all the formatting, reduce the precision, remove leading zeros, and other things to save file space. Recently, Alex Aveenendaal released a Java version of a utility called Cruncher. Since it's Java, you can run it on any platform to compress a VRML 1.0 or 2.0 file.
After running the original P51 model through the VRML 1.0 to 2.0 converter, the file size goes from 93K to 118K. If you use Cruncher on it, the file shrinks to 83K, so you save 35K just by removing a few tab characters and zeros.
Besides removing the file formatting, the other option is compressing the file with a compression utility. During the original specification work for 1.0, it was suggested that files be compressed with a UNIX utility called gzip. This utility caught on very quickly; now, large files can be compressed to reasonable sizes for transmission across the Internet. You can tell a gzipped file because its file extension is .wrl.gz.
To view compressed files, you don't need to do anything because browsers now come with an uncompression program. To compress your own files, you need to get a copy of a program that compresses files. Some programs, such as CosmoPlayer, come with the command-line version or you can get WinPack to do it graphically for you, from the following site:
http://www.winsite.com/info/pc/win95/miscutil/wpack32d.exe
Compressing the P51 file now results in a file size of a tiny 19K, a big difference from the original 118K.
During the proposal stage for developing VRML 2.0, Apple submitted a version of its 3DMF file format (used in QTVR and QT movies) for VRML 2.0. After some discussion on the development list, it was agreed that Apple's version would be a good format to have, along with the standard text format, as a binary file format.
Because of problems during the VRML 2.0 specification, the binary file format probably won't be released at the same time as the official 2.0 release. However, it should be released with the upgraded 2.1 specification a few months later.
When you start creating large worlds, it's difficult to maintain a single large file. It's much easier to split the world up into lots of manageable chunks. To do this, the Inline node lets you specify a URL to a file you want to include. You can, for instance, include files located on different servers. In Terra Vista, almost every world contains a small yellow globe with green and red planets flying around it (it can be seen in Figure 13.3 in my homeworld). It's always the same file, but it has been inlined into other worlds.
Inlined worlds allow you to create a small skeleton file, then tell the browser to download a number of other files and place those in the scene at a specific location. For example, you might create a basic world consisting of just a green plane and a whole series of inlined files representing each building.
Inlining has many advantages over having a single large file. Apart from being able to build your world piece by piece, it also means a user can start wandering around in your world much sooner. The common tendency among browsers is to load the main file, placing it on the screen, and then go look for inlined files. Once the basic outline is up, the user can move around and explore while the rest of the world loads, particularly if he or she is already familiar with the world. Any currently unresolved inlined files are usually represented by a wireframe box indicating the missing file.
Here's the definition for the Inline node:
Inline {
  exposedField MFString url        []
  field        SFVec3f  bboxCenter 0 0 0
  field        SFVec3f  bboxSize   -1 -1 -1
}
The size of the bounding box is specified in the bboxSize field.
The bounding box is a box covering the maximum size in
each dimension that the contents will take up. There's no checking
to see whether the bounding box is the same size as the node to
be inlined. The center field indicates where to position the inlined
field in relation to the current local coordinates. You could
also control this position as a child of a Transform node by setting
the translation field.
| Tip |
A number of times I have been caught by inlining someone else's world that was a completely different scale from mine, and it just filled up everything. If you run across this problem, then just put a Transform node above it and set the scale field to make it the correct proportions for your world. |
To use inlines, you need to do the following:
Combining LOD and Inline nodes is quite common. The browser gets the list of inlined files and then loads them from the lowest detail first. This way you can be guaranteed to get a nice quick load and a world that runs very quickly because the initial loads are the lowest in detail. This method combats the problem of the browser chewing lots of memory because it keeps the browser from loading everything right from the start.
The Billboard node is a handy node included in the new version of VRML. This grouping node turns its children so that they're always facing the camera. A simple but fairly common use of the Billboard node is simulating a tree.
By combining a single-face polygon mesh, a transparent GIF of a tree, and the Billboard node, you can get a pretty effective tree that doesn't require a set of transformations and primitives:
Billboard {
    eventIn      MFNode   add_children
    eventIn      MFNode   remove_children
    exposedField SFVec3f  axisOfRotation  0 1 0
    exposedField MFNode   children        []
    field        SFVec3f  bboxCenter      0 0 0
    field        SFVec3f  bboxSize       -1 -1 -1
}
The bboxSize, bboxCenter, and children fields all do what
you normally expect in a grouping node. The axisOfRotation field
allows you to specify an arbitrary axis for the Billboard node
to rotate around. This field is useful if, for example, you have
a tree on the side of a hill because you can specify an axis perpendicular
to the hill to make the tree behave properly.
There are other nodes that come in handy for speeding up your world. Chapter 14, "Starting with Models," had a quick introduction to the IndexedLineSet, and in Figure 14.7, you saw how this node was used to simulate a larger real-world type of structure. For example, a browser is slow at rendering a long, narrow pipe but renders a line very quickly. IndexedLineSets are useful anywhere you might need to display a long, narrow object, such as framework and fencing.
You can use an IndexedFaceSet in the same way to represent a very
thin surface rather than using a very flat box. In Figure 14.7
you can see how face sets are used in the roof. There is no thickness
to the roof; it's just a double-sided face. Double-siding faces
can save you lots of computing power.
| Caution |
Some browsers ignore options to turn double-siding on or off. One workaround solution is to declare two faces but with the edge order opposite, so that it looks like there's two distinct faces occupying the same set of coordinates, as shown in the following example: |
points [ 1 0 1, -1 0 1, -1 0 -1, 1 0 -1 ]
coordIndex [ 0, 1, 2, 3, -1,
             0, 3, 2, 1, -1 ]
Apart from being able to reduce the number of polygons in an object you also need to think how they are located in relationship not only to each other but also the rest of the world.
Take an L-shaped room, for example. If you examine both edges, you'll notice that most of the time you can't see both of them. If you declared them as being two faces within the one face set, then the browser must check both faces for redrawing every frame. If they were declared in separate faces, then for each frame, the browser needs to do only a single check for the overall visibility of that face set, rather than a whole heap of single face calculations.
In a simple example like the L-shaped room, there's really no need for this sort of detail. Where a complex object comes into it, such as a statue, then you should think about the arrangement of face sets. You'll see only one side of the statue, so breaking it into four sections (one for each quadrant) would make sense and help in the rendering.
You should be able to put up some pretty compact, high-performance worlds now. There are a range of techniques you can apply to do this. The biggest killer in most VRML files is overusing the IndexedFaceSet. Care should be taken when you're using this node to make sure that face bloat doesn't happen.
This part of the book covers some of the more advanced topics in generating VRML worlds. From now on, you'll start digging deeper and deeper into the underlying parts of VRML to see how it works. Worlds stop standing still as you examine the exciting realm of VRML 2.0.
| Is there any commercial software that can be used to automate these tasks? | |
| There are no standalone applications designed just for optimizing a VRML world. They either get packaged as part of another VRML program (for example, Pioneer Pro's reduce polygon count feature) or are do-it-yourself jobs. | |
| When should I use these optimization techniques? | |
| It's a good idea to get into the habit of optimizing every file. Every byte less that your world takes, the better, because it means the end users' download time is shorter, which increases your chances of them coming back. |