


-by Justin Couch
| Subject | VRML Showroom for Bubsy's Site Wanted! |
| Date | Monday, July 15 1996 16:44:04 -0500 |
| From | kmurdock@mail.mcp.com (Kelly Murdock) |
| To | justin@localnet.com.au |
Attention: Mr. Justin Couch
My name is Kelly Murdock and I've been fortunate to have the opportunity to oversee the development of a Web site for Bubsy's Sports Cars and Heavy Machinery. Bubsy is a great person who is always looking for the latest way to promote his successful business (like the time he tried to spell out Bubsy with fireworks).
Bubsy read this article about VRML and thought we could create a VRML showroom to show off some of Bubsy's latest models. To create a great showroom, Bubsy thought it would be best to pull in a ringer, and that's you. Please consider creating a compelling VRML showroom for this site. Bubsy will reward you plenty for your help and even give you discounts on his new line of bulldozers.
Thanks for helping out.
Kelly Murdock
Chief Web Developer for Bubsy
Hmmm. This looks like something interesting-a new virtual showroom. (Besides, I need a new family bulldozer, so this will be worth it.) Lucky for me he attached a whole heap of files he used for creating the Web pages to guide me in the style of the VRML model.
Creating a Web page is a fairly well-understood process these days, but creating a 3D scene you can wander around in on the Web is not so well understood. Before you delve into the wonders of VRML, you'll get a quick introduction to what it is and how to use it. In this chapter, you'll cover the following tasks:
The Virtual Reality Modeling Language (VRML) is the de facto standard for delivering platform-independent virtual reality over the Internet. VRML is to 3D graphics what HTML is to document formatting. With a simple text file, you can describe how a virtual world looks and behaves and navigate around it without restrictions.
VRML is a relatively new technology. Version 1 was completed in August 1995, and the next major version will be finished by the time you read this. A VRML file works a bit like HTML because it's all done in text. However, instead of working with 2D text documents, you're placing objects in 3D space, then wandering around in it.
However, the question you really want answered is, "What can I use it for?" Well, what would you like it to do? VRML can be used in a wide variety of situations. VRML 1.0 described purely static scenes, which meant it was good for producing virtual art galleries and designing mock-ups of buildings, but it lacked any real interactive element. For example, there was no way to watch a real-time virtual Wall Street. With the arrival of the second version, though, you'll be able to create worlds that respond to input of almost any form. You could create a complete VRML airline reservation system, design a virtual factory that controls a real one from a distance, or just have a great homeworld to impress your virtual neighbors.
To enjoy the wonders of virtual reality, you need a browser with VRML capabilities. With the current popularity of Netscape and its plug-in capabilities, many different browsers are available. Companies like BlackSun, IDS-software, and Silicon Graphics all offer VRML plug-ins for Netscape. The latest versions of Netscape now include their own VRML browser called Live3D. For most people, this is all they need to get VRML capabilities.
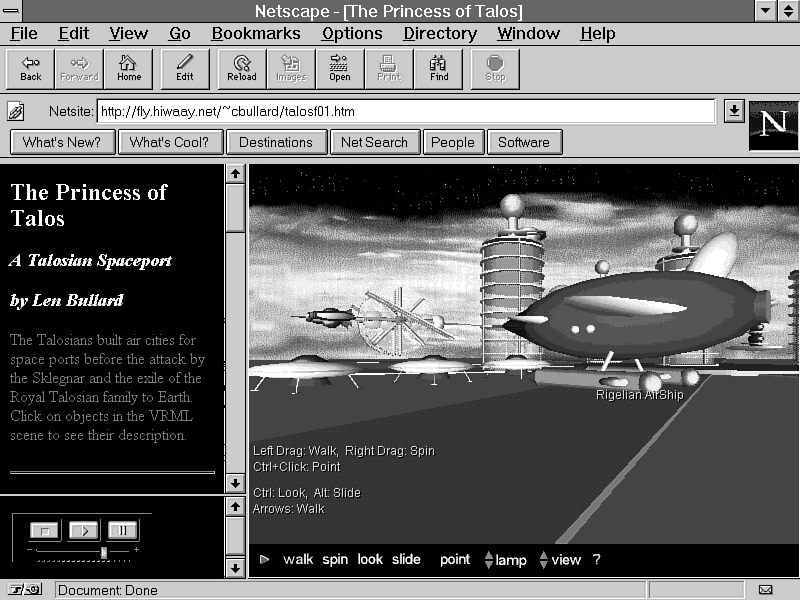
A typical session using Live3D is shown in Figure 2.1. The creators of Live3D were careful when they chose their navigation interface; they based it directly on DOOM. Now, if you haven't heard about DOOM or played it, then where have you been hiding for the past few years? To make your way around the scene, just use the arrow keys to move forward or backward and to turn. Other navigation options, including ones for the mouse, are covered in Chapter 13, "Exploring VRML Browsers and Development Tools."
Even though VRML is just over two years old, a wealth of content creation tools are already available. They vary in both cost and suitability. The first tools were just conversion programs from other file formats to VRML; they were followed by options to export VRML from existing programs. Finally, dedicated VRML editors are now available.
Since my partner developed all his logos with trueSpace, I'll use its sister product, Pioneer, to develop the VRML version of Bubsy's showroom. This makes my task easy because I can just import the original trueSpace file and export it as VRML. The Pioneer look and feel is almost identical to trueSpace, which means all the time you invested learning how to use trueSpace won't go to waste.
Despite his interesting choice in clothes, Bubsy is a pretty traditional sort of guy when it comes to his showroom. He wants his showroom to be a typically earthbound style-one large room for the cars and, of course, the heavy machinery stays outside. Like all business owners, he wants it done yesterday, so the showroom will have to be fairly simple.
What have I got to use? Well, Kelly gave me a copy of Bubsy's logo, so I can use that as a sign. There's a couple of models for the vehicles, and Bubsy wants a room to put the cars in. Sounds fairly simple to do. He also wants to link back to his HTML pages, so I have to accommodate that, too. It looks like the best way to tackle this job is to start with a basic showroom, then add other parts later.
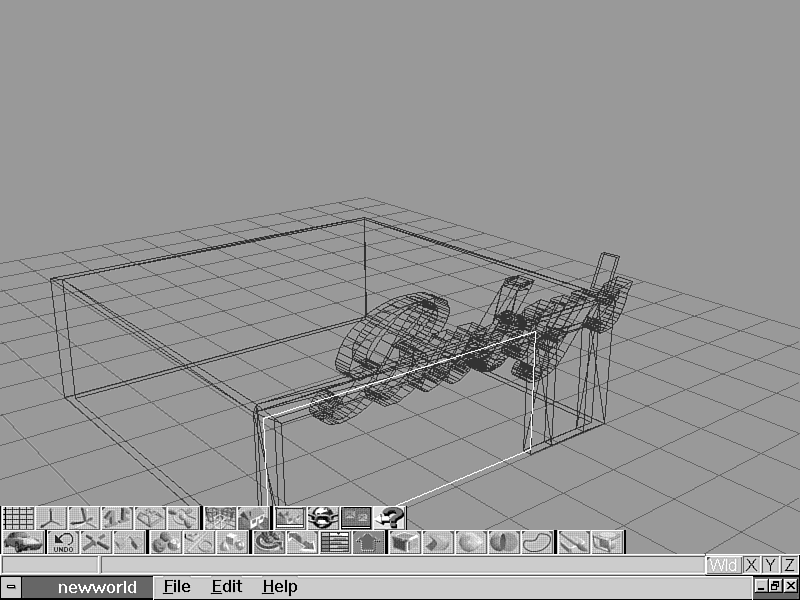
The showroom can be simply constructed from a box for the main part and a couple of polygons for the roof. On the outside, put the sign in the traditional place above the door.
The basic showroom is constructed by creating one box, then using
Pioneer's boolean functions to subtract other objects from it.
The outside of the showroom is created first, then the inside
box is subtracted from it to get the interior room. A large window
and door are created in the same fashion. Subtracting from the
box means there's no floor, so a plane is used for that.
| Tip |
Later on, when you add some grass outside the building, it will also cover the floor because it has the same height as the outside ground. To make sure the floor is visible, offset it by a very small amount, like 0.01. |
Now, Bubsy is fairly fussy because he wants the virtual showroom to look just like his real one, so follow these steps to accomplish that:
The real showroom has writing on the windows advertising the specials for that week.
At this stage, the roof has been left off so you can still see inside when the car is placed. However, the floor has been added to use as a reference later.
The loading of the logo is a very simple thing.
| Tip |
The models are very high detail, so when you save them, make sure you turn the precision down. A precision value of 2 should be enough to get reasonably accurate models. |
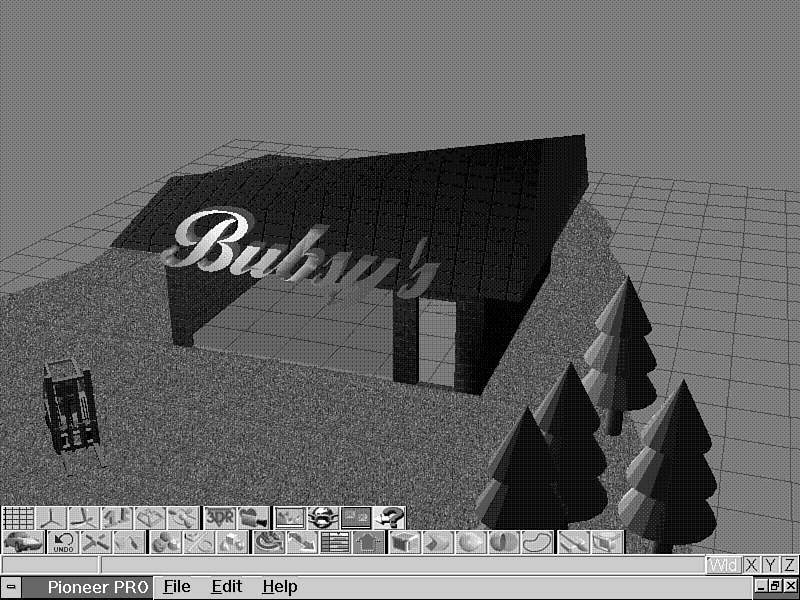
Now that you've placed some vehicles in the scene, you need to add a roof. The simplest method of doing this is to create a box and deform it to a pyramid shape by using the Deformation tool.
The end result is a roof pitched on all four sides just like a real one. To finish it off, use a gray tile for a realistic look in the same method as the brick texture was added to the walls.
If you look at this file with a VRML browser, then you'll notice that the forklift is floating in mid-air. To remedy that, you'll add a bit of surrounding scenery.
First, the forklift needs to have some ground to sit on. I made it from a normal polygon that I added a grass texture to. The default setting for the grass texture looks fairly ordinary, so you can increase the amount of wrapping as I did with the brick walls and roof, which produces a much better grass effect.
Trees were constructed by placing a cylinder and then stacking a few cones on top. Once you're satisfied with the first one, then add a couple more by collecting the primitives in the first one as siblings and then choosing the Edit | Copy function from the menu. This function places the copy on top of the original, so you'll need to move the copy to the location you want. For my scene, I made four trees and placed them in a clump on the right-hand side. (See Figure 2.3.)
Figure 2.3: The completed showroom ready to be put on the Web.
After creating your VRML world, you need to display it somewhere. The file extension for VRML files is .wrl, so from an HTML page all you need to do is make the anchor tag point to the VRML file.
The actual configuration varies depending on the brand of the Web server. Giving them this information should be enough to get you up and running. Once that's done, you should be able to load the file properly.
There's your first world, ready to be published on the Web. As you have seen, it's possible to create a great-looking world without even knowing what VRML is. Graphics editors make creating cool worlds easy. However, these worlds were all static. You haven't even seen the latest version of VRML, the real subject of this book. In this chapter, you used just version 1.0-still an effective tool for 3D content, but the real fun hasn't started yet!
Now that you've had your first taste of both 3D graphics effects and 3D worlds, you need to go and learn some more. You can learn how to create all sorts of wonderful 3D graphics effects in the next two parts of the book. My co-author, Kelly, will look at everything from simple 3D buttons to animated logos.
| What sort of tools did you use to create the VRML world? | |
| Apart from Caligari's Pioneer, no other tools were used to create the world. Some parts were given to me by my co-author as files created in non-VRML tools like trueSpace. They could just as easily have
been created in Pioneer, but a lot of VRML site design ends up being done this way. Often your client has a collection of 3D models and 2D images that he or she would like to use.
I have to admit I did cheat for one little section-including the Viper model. It came from a very complex original model that was just too big for Pioneer to handle when loaded in with other scenery. So I added it by hand-editing the text source file in Notepad. You'll probably find that this is the way much day-to-day work is done-the basic model is created with a modeling tool, then finished in a text editor. | |
| Besides Pioneer/trueSpace, is there any other combination of tools available? | |
| A difficult one to answer, because new products are coming out all the time. What's true today may not be true tomorrow. However, an increasingly popular choice is releasing a browser and builder
together. A number of companies, such as IDS Software, Sony, and Silicon Graphics, do this, and many of them can import external formats like DXF.
Chapter 13 looks at the different methods of generating VRML files. The good thing is that most of your standard 3D modeling tools now either directly or indirectly support VRML output. |