This is an old revision of the document!
Table of Contents
Android Boot Logo and Bootanimation
One of the favorite vanity customizations for an Android device, is to personalize the boot logo and the boot animation.
Here you find some notes about the Gretel A7, a phone based on the MediaTek MT6580 chip, running Android 6.0 Marshmallow. Operation should be rather similar on other devices sharing a similar MTK chip and similar O.S. version.
We used a GNU/Linux PC as the host to perform all the actions: download and upload of partition content, manipulation of image files, running of some scripts, etc.
log.bin
The boot logo is contained into a dedicated partition called logo, you can find the binary image called logo.bin packed into the stock ROM archive or you can download it from the phone using the SP Flash Tool program.
The partition image contains several different pictures (39 in our case!), some are at full screen size (720×1280 pixels), others are snippets used (before the actual boot stage) to represent e.g. the charging battery, the percentage, etc. The logo.bin has a rather simple structure:
| Content | Size (bytes) | Notes |
|---|---|---|
| MTK Header | 512 | At offset 0x08 there should be the string LOGO or logo. |
| Pictures Count | 4 | A little-endian 32bit integer. This is the number of pictures packed into the data block. |
| Total Block Size | 4 | A little-endian 32bit integer. This is the total size of the data, excluding only the 512 bytes of the MTK header. |
| Offsets Map | 4 x Count | For each picture there is a little-endian 32bit integer, indicating the offset of the picture into the data, after the 512 bytes header. The first offset is 4 + 4 + (4 * pictures count). |
| Pictures Data Block | Variable | Each picture is in raw RGB format, it is appended as a z-compressed file. |
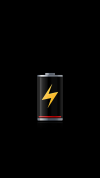
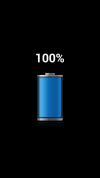
Here there are two full screen examples:
Here it is a 163×29 pixels snippet used for the “battery charging” animation:
Unpack and repack the log.bin
Unfortunately the mtkimg did not work with my logo.bin. The issue is about unsopported signature and RGB format. So I write a Python script, download it here: mtk-android-logo.
./mtk-android-logo unpack
Run the script into the same directory containing the logo.bin file; a logo.d directory will be created with compressed (.z) and uncompressed (.bin) files.
./mtk-android-logo repack
For repacking, the script needs the original logo.bin and a logo.d directory containing the pictures. If the z-compressed picture exists, it will be used, otherwise the .bin one is used after z-compressing it. The resulting image is saved as logo.repack.bin.
Pictures are expected to be raw RGB, stored with z-compression. The pixel size (width x height) of each picture must be guessed.
Suppose that th e screen size is 720×1280 and the biggest, uncompressed picture is 3686400 bytes:
3686400 / (720 * 1280) = 4
so we can desume that the picture is 4 bytes/pixel, i.e. a 32bit RGB. By trial and error we found that it is an BGRA (Blue, Green, Red and Alpha), we can convert it into PNG with ffmpeg, specifying the bgra pixel format:
ffmpeg -vcodec rawvideo -f rawvideo \
    -pix_fmt bgra -s 720x1280 -i "img-01.bin" \
    -f image2 -vcodec png "img-01.png"
Once edited, we can convert it back to raw BGRA with:
ffmpeg -vcodec png -i "img-01.png" \
    -vcodec rawvideo -f rawvideo -pix_fmt bgra "img-01.bin"
It is known that also 16bit raw formats are used (eg. bgr565le), you can guess it, if the size of the picture is 2 bytes per pixel. You can list all the pixel formats supprted by ffmpeg by running:
ffmpeg -pix_fmts
bootanimation.zip
The logo contained into the logo.bin partition is displayed in the early stage of the boot process. Once the system partition is available, an animation is played for some seconds. That animation is contained into a zip file. In our case it turned out that the file is stored in /system/media/bootanimation.zip. To replace it, being into the /system/ directory, root privileges are required.
Generally the animation is composed of two parts: the first is played just once, the second part is played in loop until the system is ready. This is controlled by the contents of the desc.txt file contained into the zip, here it is an example:
720 1280 15
p 1 5 part0
p 0 0 part1
The first line tell us that the animation is 720×1280 pixels, at 15 frames per second.
The second line tell us that there is a part p to be executed 1 time, followed by a pause of 5 (
The last line defines another part p to be executed in an endless (0) loop until the system is ready, with a zero 0 pause. The frames are into the part1 subdirectory.
Frames are actually PNG images, of the proper size (720×1280 in our case).
So the directories structure should be something like this:
.
├── desc.txt
├── part0
│   ├── img_000.png
│   ├── ...
│   └── img_196.png
└── part1
    ├── img_197.png
    ├── ...
    └── img_207.png
To pack eveything into a zip file you can use the command:
zip -r -Z store bootanimation.zip desc.txt part0 part1
Beware of the -Z store option: the zip archive must be created using the store compression method, not the deflate one.
Web References
- mtkimg Unpack/Repack boot.img, recovery.img and logo.bin for Mediatek


