This is an old revision of the document!
Table of Contents
Samsung Galaxy S4 Android Phone
| Codice modello | GT-I9515 |
|---|---|
| Features | 1.9 Ghz Quad-Core, 2 Gb RAM, 16 Gb Flash, 1080×1920 pixels. |
| Versione Android | 4.4.2 |
| Versione banda base | I9515XXU1ANI3 |
| Versione Kernel | 3.4.0-2882604 dpi@SWDD6017 #1 Fri Sep 26 17:54:02 KST 2014 |
| Versione build | KOT49H.I9515XXU1ANI3 |
| Stato di SE per Android | Enforcing SEPF_GT-I9515_4.4.2_0028 Fri Sep 26 17:53:52 2014 |
| Secure boot status | Type: Samsung |
The output of lsusb can be different, in normal mode it is:
ID 04e8:6860 Samsung Electronics Co., Ltd GT-I9100 Phone [Galaxy S II], GT-P7500 [Galaxy Tab 10.1]
while in download mode it is:
ID 04e8:685d Samsung Electronics Co., Ltd
Special Boot Modes


Boot in Recovery mode
- Spengere il telefono
- Premere Vol Up + Home + Power per 10 secondi
In alternativa si può usare il comando adb reboot recovery da un PC collegato tramite cavo USB. Per fare ciò è necessario aver abilitato il Debug USB dalle impostazioni del telefono ed aver installato il pacchetto adb sul PC GNU/Linux.
Boot in Download (Odin) Mode
L'Odin Mode è una modalità dei telefoni Samsung molto potente e pericolosa (il nome dal dio Odino) utilizzata di solito per flashare la recovery o il sistema principale.
- Spengere il telefono
- Premere Vol Down + Home + Power per 10 secondi
- Viene mostrato l'avviso di pericolo, con Vol Up si conferma.
Se si vuole uscire dal Download Mode senza effettuare alcuna operazione basta tenere premuto il tasto Power per 10 secondi.
Ottenere i permessi di root
KNOX WARRANTY VOID: 0x0
A partire da Android 4.2.2 Samsung fornisce sui suoi smartphone il sistem Knox: un sistema di sicurezza per i dati memorizzati sul telefonino. Questo sistema si basa anche sul fatto che il S.O. non sia manomesso, pertanto Samsung ha aggiunto uno speciale flag che viene definitivamente attivato quando si sostituisce il S.O. con uno non ufficiale (cioè ad esempio quando si installa una ROM con i permessi di root). Tale flag si chiama KNOX WARRANTY VOID e viene visualizzato nel modo Odin, un valore di 0x0 significa che il telefono non è stato manomesso.
Abilitare il debug USB
Il debug USB serve per poter impartire comandi al telefono da un PC collegato via cavetto USB; tutte le procedure di rooting guidate da PC hanno bisogno di questa opzione attiva.
- Applicazioni, Impostazioni, Altro…, Info sul dispositivo
- Toccare ripetutamente Versione build finché appare la notifica
- Nel menu Altro… appare la nuova voce Opzioni sviluppatore
- Abilitare la voce Debug USB
Eseguire programmi da sorgenti sconosciute
Consente di installare sul telefono applicativi scaricati da fonti diverse dal Google Play Store; alcune procedure di rooting (come quelle usate da SRS-Root) hanno bisogno che questa opzione sia attiva.
- Applicazioni, Impostazioni, Altro…, Sicurezza
- Abilitare Sorgenti sconosciute
1) Failed with SRSRoot
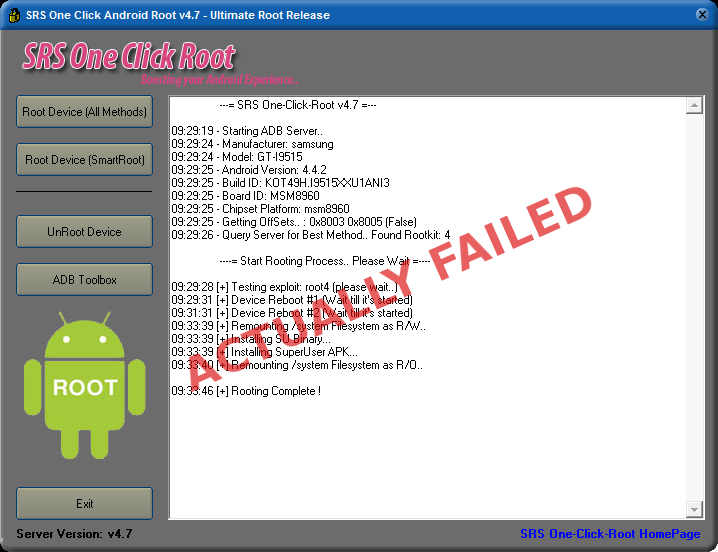 The first attempt in rooting this S4 was using SRSRoot. This is a proprietary Windows software, it is free for download but it is unknown if it contains malware, trojan, backdoors or if it stoles your phone data. It was our first choice only because it promises to root the device without flashing a new ROM, so it was expected to preserve all our data and do not touch the Knox warranty void flag. Our build version (KOT49H.I9515XXU1ANI3) is litesd under Tested models, but actually the procedure failed.
This is the (failed) procedure:
- Install the Universal Windows ADB driver. We used the ones by Koush, the setup package is UniversalAdbDriverSetup.msi. Before installing this driver it is advised to remove all the other USB drivers installed for other phones, an useful program for this operation is USBDeview.
- On the phone: enabled the USB debug and the unknown sources for program install (see above).
- Installed and executed the SRS-Root program
- Click on the Root Device (All Methods) button. WARNING: the phone asks if you want to allow the USB debugging, it is suggested to check Always allow from this computer because the operation is required several times.
- The procedure rebooted the phone a couple of times, you must follow the instructions on the PC screen. Despite the message Rooting Complete, no
subinary were installed, nor SuperUser package.
May be the problem is with the Knox software installed by Samsung on this device, should we disable/disinstall it before running SRS-Root? We don't know.
2) Success with CF-Auto-Root ROM flash and Heimdall
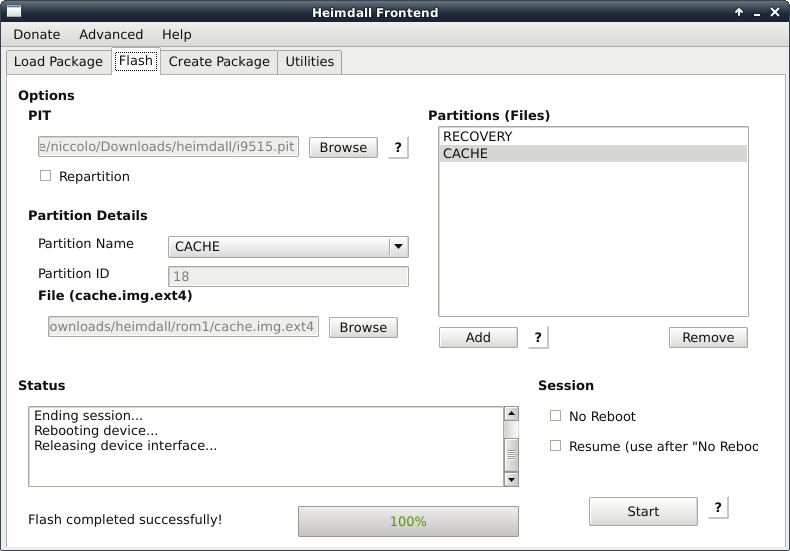 We used Heimdall on GNU/Linux to flash a custom recovery, when rebooted the device installed the
 su binary. At the first execution of SuperSU, the app asked if it should disable the Samsung Knox feature, answering yes allowed to have a full rooted phone.
 ATTENZIONE: In questo modo installiamo sul telefono un software che girerà con pieni privilegi di root, tale software è disponibile solo in forma binaria senza sorgenti, non è firmato e non ha un autore certo!
WARNING: this procedure altered the KNOX WARRANTY VOID flag, which now is 0x1. At the moment there are not know way to reset this flag to 0x0, so use at your risk.
Software per effettuare il flash
Esistono due software per flashare la ROM con i permessi di root: Odin e Heimdall. Il primo è un software proprietario solo per Windows, prodotto da Samsung e distribuito illegalmente. Il secondo invece è un software open source moltipiattaforma e gira anche sotto GNU/Linux.
La ROM giusta
Per Odin le ROM vengono fornite nel formato .tar.md5, si tratta semplicemente di un archivio tar con appeso in fondo il checksum M5S: è possibile togliere i byte in eccesso per ottenere il tar originale.
Abbiamo dato credito a questo articolo: Root I9515XXU1ANI3 Galaxy S4 Value Edition GT-I9515 Android, poiché riporta esattamente la stessa nostra versione di build. Tale articolo rimanda a questa ROM: CF-Auto-Root-jfvelte-jfvelteub-gti9515l.zip, che ha il seguente md5sum 2c2b59df8bea05509d84eb21fb2b310b.
Dall'archivio si estra il file .tar.md5. Come detto sopra da quest'ultimo è possibile tagliare la parte finale (che contiene il checksum MD5) e quindi scompattare il .tar. Finalmente otteniamo le due immagini recovery.img e cache.img.ext4, sono queste che vanno flashate con Heimdall.
La procedura
- Installare i pacchetti Debian heimdall-flash e heimdall-flash-frontend.
- Estrarre recovery.img e cache.img.ext4 dall'archivio CF-Auto-Root.
- Eseguire heimdall-frontend con i permessi di root (es. ricollegandosi in
ssh -X root@localhost). - Avviare il telefono nella modalità Odin.
- Collegare lo smartphone e dal tab Utilities cliccare su Detect, verificare che il telefono venga riconosciuto.
- Leggere e salvare la tavola delle partizioni del telefonino, sempre da Utilities cliccare su Save As… per dare un nome al file e quindi su Download. Questa operazione crea un file con lo schema delle partizioni specifica del nostro apparecchio. Ecco quella creata con il nostro modello: i9515.tar.gz.
- Dal menu Flash si clicca su Add, quindi bisogna indicare la Partition Name RECOVERY e con Browse indicare il percorso del file
recovery.img. - Ripetere la stessa procedura per la partizione CACHE e il file cache.img.ext4.
- Controllare che le opzioni No Reboot e Resume siano spente: vogliamo che il reboot avvenga al termine del flash.
- Cliccare su Start (vedi lo screenshot sopra).
Freeze Problems once Rooted
TouchWiz or phone hangs, Samsung logo reloaded: solved removing Knox software
After rooting the phone with CF-Auto-Root we experienced several problems: sometimes the graphical user interface (the Samsung TouchWiz) hangs, requiring to press the power button; sometimes it restarts displaying the Samsung logo; sometimes it hangs completely the phone, requiring a reboot pressing the power button for a long time.
The same problem is reported in this post: Galaxy S4 restarting and freezing after root.
According to this post, it seems that the Knox software is responsibile. Indeed, removing all the KNOX apps using App Master(Uninstall Master), the issue was solved in my case. Here it is the app names I removed: KLMSAgent, KNOXAgent, KNOXStore, KnoxMigrationAgent, KnoxSetupWizardClient and KnoxSetupWizardStub.
More phone hangs, removed other bloatware
The TouchWiz restart problem were solved removing the packages listed above, but another problem persist: every two days or so, the phone hangs more likely during the nightly charge. At the morning the alarm did not play, no repsonse to power or home button, the green LED (charge completed) remains steady, even when disconnected from the power adapter. Nope! To reboot the phone I had to keep the power button pressed for several seconds.
It seems that removing the FotaClient solved the problem. I also removed FWUpgrade, LocalFOTA and SPDClient. Removing SPDClient disabled the continous request from the Play Store to install the Samsung Security Policy Update, which can break SuperSU and root privileges.
After removing the above apps I still see from the Play Store what apps I installed should be upgraded. Indeed - almost certainly - the Samsung Firmware Update Over The Air (FOTA) are disabled, which is not so bad.
Special codes
| *#1234# | AP: I9515XXU1ANI3 CP: I9515XXU1ANI3 CSC: I9515ITV1ANK1 |
|---|---|
| *#0011# | Service Menu |
| *#06# | Show IMEI code |
- CP:
- CSC: Country Sales Code
CyanogenMod
 This paragraph is obsolete. It is preferable to install LineageOS instead of CyanogenMod, see this page: LineageOS su Samsung Galaxy S4 GT-I9515.
After more than one year of random freeze we decided to give-up with Samsung software: too much bloated, too much instable. There are some unofficial ports of CyanogenMod v.12.1 (based on Android 5.1 Lollipop) and 13.0 (based on 6.0 Marshmallow). See web links below for download links.
TWRP Recovery and Backup
 Using Odin mode on the phone and Heimdall program on the PC (see above) we flashed the TWRP Recovery image twrp-3.0.2-0-jfvelte.tgz (extract the archive and check the md5sum: 076c4a3bcc84e48308b6e9de5be8a43e).
Booting into TWRP Recovery (see above) we performed a full backup of the following partitions into the micro SD card:
- Boot (10 Mb)
- System (1.81 Gb)
- Data (2.28 Gb)
- Cache (4 Mb)
- EFS (4 Mb)
Then we moved the backup images to the PC using a standard file transfer.
Backup other data
The modem firmware can reasonably be called your baseband, Generally speaking: firmare updates should follow operating system updates, it is safe to not use newer firmware with old operating system.
| Partition | Content | How to get |
|---|---|---|
| modem.bin | Firmware for the 3G modem. | Original firmware (e.g. download from http://www.sammobile.com) |
| NON-HLOS.bin | Firmware for the LTE modem. | Original firmware (e.g. download from http://www.sammobile.com) |
| EFS | Radio signal info, IMEI, … | Saved by TWRP Recovery backup. |
Flashing CyanogenMod
The latest Samsung images for GT-I9515 are for Android 5.0.1, with modem baseband I9515XXU1BOJ3. So we preferred to install CyanogenMod 12.1 (based on Android 5.1) instead of newer versions.
First of all, we need to install TWRP Recovery, see above. Then follow theese steps:
- Backup contacts, call logs, SMS messages, bookmarks, etc. with some app (may require root e.g. for bookmarks). We used Easy Backup & Restore.
- Backup the current system with TWRP (including EFS partition, etc.).
- Copy your media content to your computer (e.g. using MTP protocol and jmtpfs on GNU/Linux).
- Download and put into the SD card:
- CyanogenMod cm-12.1-20160320-UNOFFICIAL-jfvelte.zip.
- Open GApps archive (we selected the open_gapps-arm-5.1-micro-20161013.zip flavour). If you don't install this, you will not have Google apps like Play Store, etc. We choosed the micro compilation because the stock one is too big for the system memory of this phone.
- SuperSU.zip file. This is an app which provides a special
subinary with a companion graphical app, used to grant superuser privileges to other apps requesting them.
- Reboot the phone in Recovery mode (i.e. TWRP).
- Wipe Dalvik / ART Cache, Data and Cache partitions (from Wipe ⇒ Advanced Wipe). This is a factory reset, because it deletes contacts, messages, settings and apps.
- Install the packages in this order: CyanogenMod, Gapps, SuperSU.
- Reboot the phone and follow the Android first time configuration.
- Restore the contents: App, personal data, media files (data stored into the SD-Card is not touched by this procedure).
Recording volume too low
SOLVED: At least with Easy Voice Recorder, we can select among three different microphones (Settings ⇒ Tuning ⇒ Microphone). The Main and Back options results in very low volume recording, instead the Generic (raw) seems to have a good automatic gain.
There is a problem with the mic level on recordings: with CyanogenMod 12.1 I get audio files that are lower in volume. An ambient voice recording is almost unaudible. To obtain approx. the same level of stock ROM, I have to amplify the track of about 12 dB (e.g. using the Audacity software on the PC). It seems that automatic mic gain is not enabled.
It seems the same problem reported in this post: Microphone Record Volume Very Low Jflte On S4. One solution suggested in that thread, requires to flash a new kernel with special tweak features: the kernel from Alucard developer.
Reinstallare il software originale
Se qualcosa dovesse andare storto con CyanogenMod, dovrebbe essere possibile reinstallare il software originale Samsung. Per il Galaxy S4 I-9515 si riesce a trovare il firmware Android 4.4.2 e 5.0.1 dal sito www.sammobile.com. Si tratta rispettivamente dei file I9515XXU1ANI3_I9515ITV1ANK1_ITV.zip e I9515XXU1BOJ3_I9515ITV1BOI1_ITV.zip. Grosso modo la procedura per l'installazione dovrebbe essere questa:
- Sul telefono: fare il backup, caricare la batteria, abilitare l'USB debug.
- Scompattare il file .zip, al suo interno c'è un file del tipo I9515XXU1ANI3_I9515ITV1ANK1_I9515XXU1ANI3_HOME.tar.md5. È in realtà un file .tar con appeso il checksum MD5, si potrebbe seprare le due componenti e verificare il checksum.
- Estrarre il contenuto (è possibile cambiare l'estensione da .tar.md5 a .tar), al suo interno ci sono tutte le immagini .bin, .img, ecc. necessarie.
- Mettere il telefono in Download Mode.
- Lanciare su PC il programma Heimdall.
- Collegare cavo USB.
- Leggere la “Partition Information Table” direttamente dal telefono o da un file salvato in precedenza.
- Eseguire il flash di tutte le immagini estratte.