This is an old revision of the document!
Table of Contents
Audio Recording With GNU/Linux
Choosing the right jack
The microphone jack
In the 70s - at the time of analog amplifiers, in the pre-computer age - the standard jack for microphones were the mono one, with the diameter of 1/4 inches (6,35 mm). Only two conductors were present: the tip for the signal and the sleeve for the ground. This is the so called TS jack:

The natural evolution of that jack, is the 3.5 mm TS mono jack:

These jacks have only two poles, because they were used mainly with dynamic microphones (see below) which do not require any external power supply, or with condenser microphones with an integrated battery, where the battery is sufficient to provide the required power to the mic.
With the advent of audio in personal computers, electret microphones have become very popular. Very often these microphones integrate a preamplifier that requires a supply voltage or they require a bias current necessary to power the internal Field Effect Transistor (FET) buffer; these currents are in the range of 2.5 - 5.0 volt. The solution adopted e.g. by the early Sound Blaster sound cards, was to use a three poles microphone socket, so requiring a 3.5 mm TRS jack (Tip, Ring and Sleeve) despite the microphone being mono.
Sometimes a separate pole for supplying the voltage is not available (e.g. when you want to connect a stereo microphone using a three poles TRS jack, or when you use a four poles TRRS jack for an headset with earphones and mic), so it is common practice to supply the bias voltage through the tip, on the same connector for the microphone signal.
In the following picture you see the de facto standard imposed by Creative Labs in the 90s on their SoundBlaster audio cards (from SB16 to AWE64), and the AC'97 standard proposed in 1997 by Intel. Notice that the bias current can be different, varying from 2.5 to 5 V, and sometimes it can be controlled in software.

Socket on modern notebooks and smartphones
Recent laptops and smartphones have a single 3.5 mm socket for the headphones and the microphone. It requires a TRRS jack (meaning tip, ring, ring and sleeve) because it have to accomodate two audio lines, one microphone line and the ground. Unfortunatelly there exist two competing standards about the jack pinout, the CTIA and the OMTP one:

The CTIA (Cellular Telephone Industries Association) pinout is the one used in modern smartphones, whereas the Open Mobile Terminal Platform was used by old Nokia, Sony and Samsung phones (till 2012).
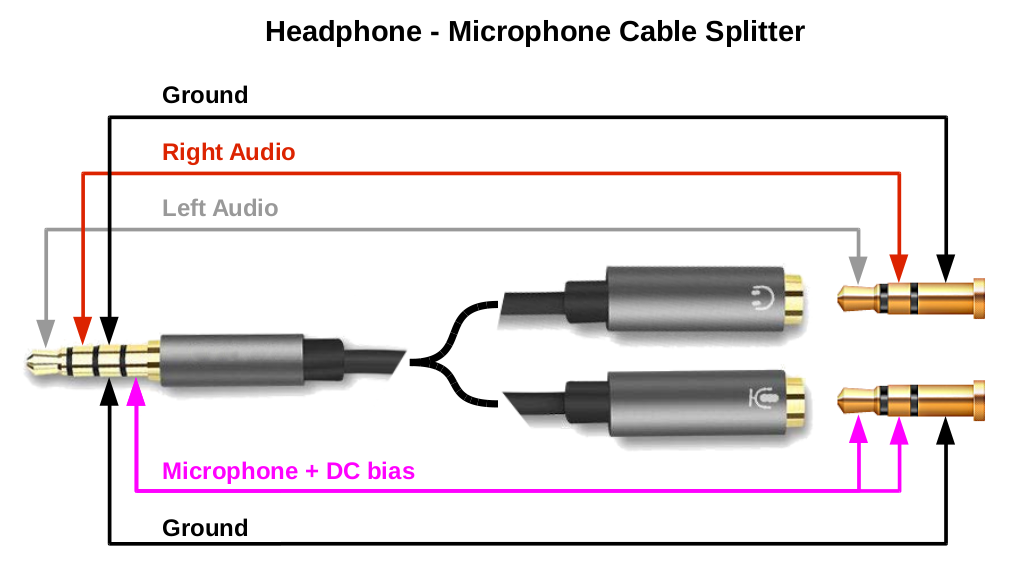
Headphone/microphone cable splitter
So if you have a recent notebook with the CTIA combined socket, yuo have to use a cable splitter to connect a standard microphone jack. Here it is the electrical schema of such adapter cable:
Dynamic, condenser and electret microphones
There are basically three types of microphones on the market: dynamic, condenser and electret ones. In the world of computers and smartphones, the electret ones are by far the most common type.
Dynamic
A small movable induction coil, positioned in the magnetic field of a permanent magnet, is attached to the diaphragm. The sound wave moves the diaphragm and the coil moves in the magnetic field, producing a varying current in the coil through electromagnetic induction. No power is required: the current is carried directly on two poles to the mic input. These microphones generally have a 1/4“ mono jack.
Condenser
The diaphragm acts as one plate of a capacitor, and the vibrations produce changes in the distance between the plates. The plates are biased with a fixed charge, so the voltage maintained across the capacitor plates changes with the vibrations in the air.
This type of microphone requires a power source, provided either as phantom power by the equipment via microphone inputs or from a small battery inside the mic. Generally these type of microphones have an XLR connector when they are intended to be connected to professional audio equipment, which will provide the phantom power. If they have an internal battery they may have the old 1/4” mono jack.
As it is easy to imagine, there are many possible problems regarding the supply of phantom power to dynamic microphones (which do not require it, but can be instead damaged by it) or to condenser microphones which have a power provided by a built-in battery. Problems are exacerbated in turn by audio devices that can supply or not such power and by mechanically compatible cables and connectors, but with incompatible electrical characteristics.
Electret
Unlike capacitor ones, electret microphones do not require polarizing voltage, but generally they contain an integrated preamplifier that does require power. In this cases a TRS jack can be used, where the ring carries power via a resistor from, normally, a 5 V supply in the computer (often incorrectly called polarizing power or bias). Generally these microphones built to be plugged into computers and electronic audio devices, have a TRS 3.5 mm jack, carrying the mic signal and the required current.
External mic on the Acer Travelmate TMB113-E
Running Debian GNU/Linux 10 Stretch, it seems that the use of the headphone/microphone split cable does not abilitate the use of the microphone. In fac, if you run the acpi_listen tool (from the acpid Debian package), you can see when you plug and unplug the split cable:
jack/headphone HEADPHONE plug
jack/headphone HEADPHONE unplug
but nothing is reported about the microphone. Beside that the bias current does not appear on the microphone jack. The solution is to run the hdajackretask tool (from the alsa-tools-gui Debian package), then force the connection of Pin 0x19:
- Enable the Show unconnected pins option.
- Click Pin ID: 0x19 ⇒ Override ⇒ Microphone.
- Apply now (it asks for the root password, as it has to run a script with superuser privileges).
the running acpi_listen will print:
jack/microphone MICROPHONE plug
Now you can also measure a bias current of 2.85 V between the ground (sleeve) and the ring or the tip.
In some cases the hdajackretask is unable to perform the Apply now function because the audio device is in use, so you get the following error message:
/sys/class/sound/hwC0D0/reconfig: Device or resource busy
The culprit can be some PulseAudio or ALSA process, or something else which is using the snd-hda-intel kernel module. I tried several commands to free the audio device, stopping user and system services:
systemctl --user stop pulseaudio.socket
systemctl --user stop pulseaudio.service
sudo systemctl stop alsa-state.service
I was unable to free the module on a Debian 10 with XFCE, so I tried the Install boot override button of hdajackretask. This option will add a modprobe configuration file /etc/modprobe.d/hda-jack-retask.conf containing the following line:
options snd-hda-intel patch=hda-jack-retask.fw,hda-jack-retask.fw,hda-jack-retask.fw,hda-jack-retask.fw
This will pass the patch option on module loading, using the content of the file /lib/firmware/hda-jack-retask.fw which is created by hdajackretask too. The file contains the hex values for the retask of each pin, something like this:
[codec]
0x10ec0269 0x10250748 0

[pincfg]
0x12 0x411111f0
0x14 0x90170110
0x17 0x411111f0
0x18 0x411111f0
0x19 0x03a19020
0x1a 0x411111f0
0x1b 0x90a70920
0x1d 0x40189b2d
0x1e 0x411111f0
0x21 0x0321101f
The pincfg hex values are shown on stdout by hdajackretask when you press the Apply now button, so you can take note and build different files for different scenarios to use during bootstrap. For the TBM113-E the normal status of pin 0x19 corresponds to the value 0x411111f0, whereas the override status (plugged microphone) is 0x03a19020.
I used the PulseAudio mixer pavucontrol to set the recording volume level: it turned out that a value of 16463 (corresponding to 25% of the slider, or -36.00 dB) is the best setting for normal speach. At the ALSA level (lower level interface used by PylseAudio) it means a Capture level of 100 and a Mic Boost of 0. This is a table of value correspondence between PulseAudio and ALSA:
| ALSA | PulseAudio |
|---|---|
| Capture 100, Mic Boost 0 | Volume: 16463 / 25% / -36.00 dB |
| Capture 100, Mic Boost 20 | Volume: 26092 / 40% / -24.00 dB |
| Capture 100, Mic Boost 51 | Volume: 41353 / 63% / -12.00 dB |
When you apply the pin override in hdajackretask, it is not clear how to disable the external microphone: re-setting Pin 0x19 to Not connected does not generate the ACPI microphone unplug event, and the bias current is not cleared. The bias power disappears from the jack after a poweroff or an hybernation, so the external microphone seems to be “unplugged” after these events.
If instead the override is made at bootstrap via the modules patch option, the settings survive after the hibernation: you can see the jack/microphone MICROPHONE plug ACPI event after the resume.
Problem: silence gaps using a cheap USB dongle
I was unable to use the microphone connector on my Acer TravelMate, so I tried to use an USB dongle, marked LinQ. The device was detected by the Linux Kernel 4.9.0:
usb 2-1.3: new full-speed USB device number 9 using ehci-pci
usb 2-1.3: New USB device found, idVendor=0c76, idProduct=1607
usb 2-1.3: New USB device strings: Mfr=0, Product=1, SerialNumber=0
usb 2-1.3: Product: USB Headphone Set
input: USB Headphone Set as /devices/pci0000:00/0000:00:1d.0
    /usb2/2-1/2-1.3/2-1.3:1.3/0003:0C76:1607.0004/input/input92
hid-generic 0003:0C76:1607.0004:
    input,hidraw2: USB HID v1.00 Device [USB Headphone Set]
    on usb-0000:00:1d.0-1.3/input3
 The USB audio adapter worked quite nicely at playing audio, I use it on a QNAP TS-120 NAS, transformed into a media player installing Debian GNU/Linux on it. The Linux kernel and the ALSA audio subsystem works well on setting the levels for playback.
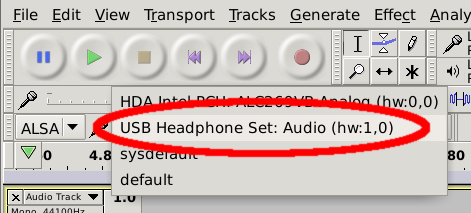
Once started Audacity, I was able to select the microphone line of the USB dongle as a capture device:
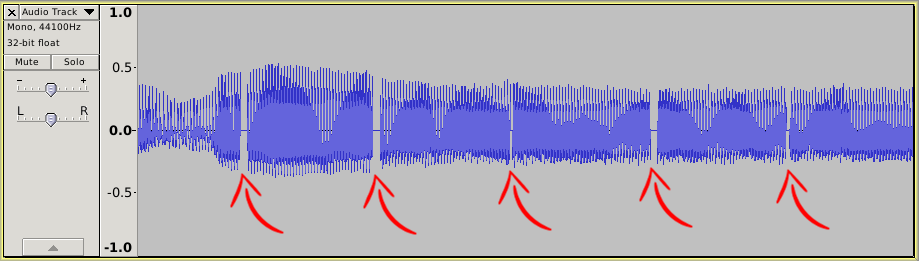
Recording a sample track revealed an annoying problem: about every 0.4 seconds you can see a gap of silence in the audio track of about two hundredths of a second. The audio track is unusable!
Ugreen USB audio adapter
The device is detected by the Linux Kernel 4.9.0 in this way:
usb 2-1.3: new full-speed USB device number 5 using ehci-pci
usb 2-1.3: New USB device found, idVendor=0d8c, idProduct=0024
usb 2-1.3: New USB device strings: Mfr=1, Product=2, SerialNumber=0
usb 2-1.3: Product: USB Advanced Audio Device
usb 2-1.3: Manufacturer: C-Media Electronics Inc.
input: C-Media Electronics Inc. USB Advanced Audio Device as /devices/pci0000:00/0000:00:1d.0
    /usb2/2-1/2-1.3/2-1.3:1.3/0003:0D8C:0024.0004/input/input18
hid-generic 0003:0D8C:0024.0004:
    input,hidraw2: USB HID v1.11 Device [C-Media Electronics Inc. USB Advanced Audio Device]
    on usb-0000:00:1d.0-1.3/input3

Launching alsamixer and hitting F6 you can select the USB Advanced Audio Device sound card. Hit F4 to view the only one capture device, i.e. the microphone input line. Press Space to enable/disable the capture and Up/Down arrows to increase/decrease the gain.
It seems that the best setting for audio recording through the mic, is to keep the capture mic gain to 100:

The microphone socket is a 3.5 mm TRS type (three poles), it provides a bias current of 2.6 V on both the tip and the ring, so it is advisable, as reported in the device manual, to NOT use a simple two poles mono jack (TS type), because it will short-circuit the bias current on the ring with the ground on the sleeve.
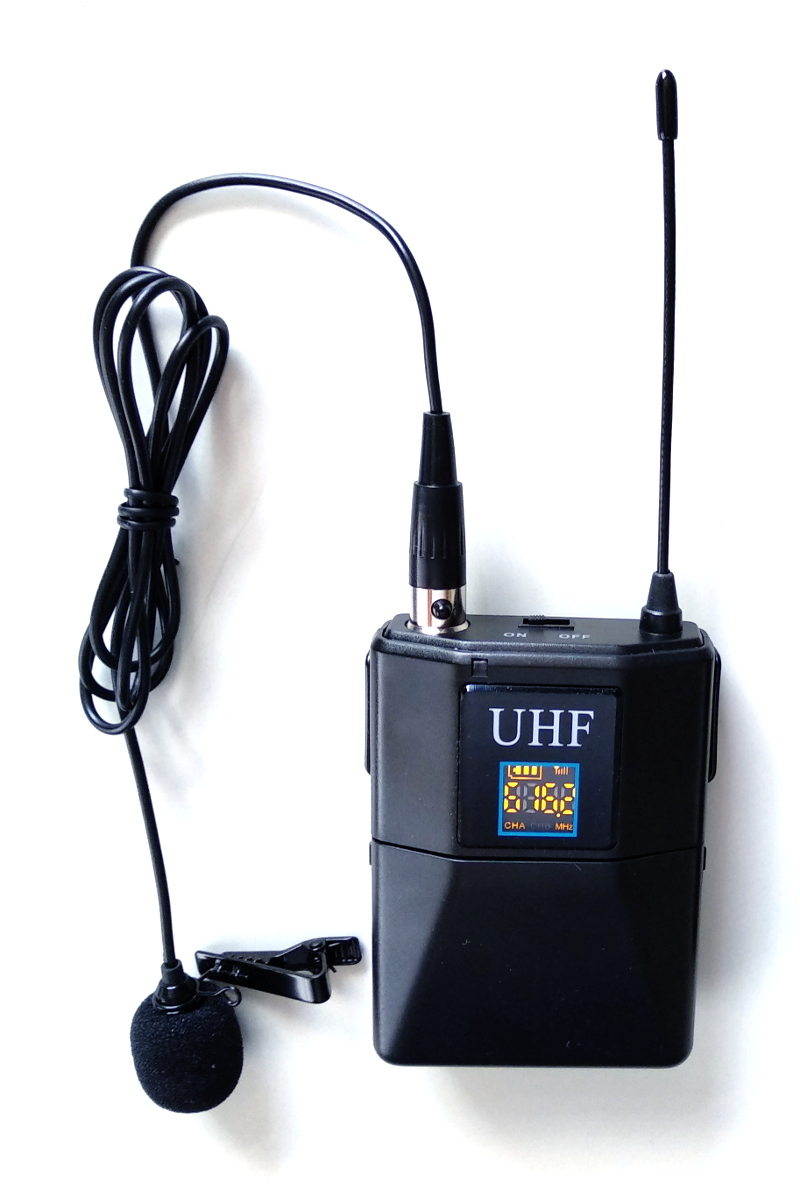
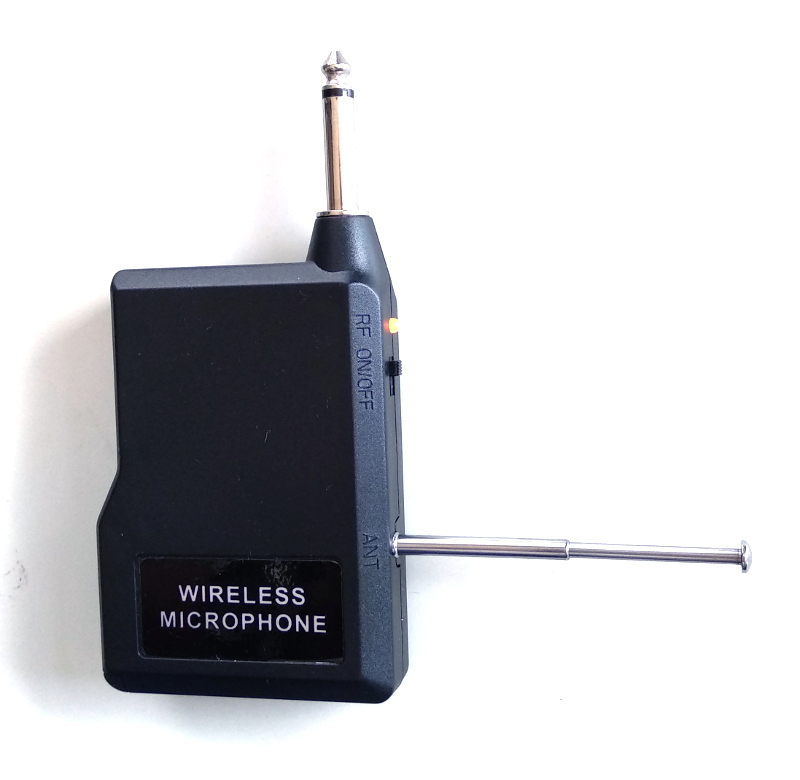
Wireless UHF microphone
We have purchased an UHF wireless microphone on Aliexpress.com for about 25 €. It is composed by:
- The transmitter powered by two AA batteries, featuring:
- A lavalier microphone on a clip.
- One small wire-antenna.
- Frequency range: 610-675 MHz (53 channels spaced by 1.25 MHz each).
- Modulation system: DQPSK
- Frequency response: 60-16000 Hz
- Transmitted power: 10 dBm
- Working current: <= 100 mA
- The receiver powered by two AAA batteries, featuring:
- A 1/4“ (6.35 mm) mono jack.
- One small telescopic antenna.
- Receiving sensitivity: -94 dBm
- Working current: <= 100 mA
To connect the UHF receiver to the Ugreen USB audio adapter, we built an adapter cable with this pinout:
| 1/4” TS female jack | Signal | 3.5 mm TRS male jack |
|---|---|---|
| Tip | Microphone | Tip |
| Not connected | Ring | |
| Sleeve | Ground | Sleeve |
The 2.6 volt current provided by the USB adapter on th jack ring will go nowhere (not connected). The 2.6 volt current provided on the jack tip is probably not required by the UHF receiver, but it should not harm. No infromation is available about microphone impedence expected by the USB adapter, on the other hand no information is available about the impedence of the mic interface of the UHF receiver.
Despite all this empirical approach, the voice registration is quite satisfying!
Audio Recording With Android
Recording audio using an external microphone connected to an Android device can be a real nightmare. We tried the hard way using a Chinese, no-brand, wireless UHF microphone!
We can group the problems you can face in three main categories:
- Physical connection
- Electrical compatibility and hardware autodetection
- Software capabilities and settings
Physical connection
 Most Android devices have a 3.5 mm jack accepting a TRRS connector in CTIA standard and every brand of mobile phones produces headsets with their own standard. The vast majority of solutions uses electret microphones requiring a bias current, but use some combinations of impedence to detect the insertion of the microphone and to handle the headset button (or buttons).
So, connecting an external microphone, can be as simple as making a cable that connects the ring and the sleve of the CTIA connector to (respectively) the ground and the microphone line of the microphone. The hard part is to guess, or empirically try, if the microphone requires a bias current, if the Android device is provinding such a current and if the microphone produces a sufficient output level (actually a voltage in the order of the millivolts) that can be used by the device.
Electrical compatibility and hardware autodetection
As stated above, the first problem is powering the microphone itself, because generally we will use an electret one. It is a common practice to provide the power on the same line of the microphone signal, so requiring just two wires for both power (from the device to the mic) and for signal (from the mic to the device). The power, also called bias current, is generally in the range of 2.5 to 5.0 volt.
On a Xiaomi Mi A1 smartphone, which has a TRRS 3.5 mm jack, CTIA standard, we measured a bias current of 2.19 volt between the microphone (sleeve) and the ground (ring).
Another parameter which should be considered is the impedence, but unfortunatelly it is generally impossibile to find documentation about what is expected by the smartphone and what is offered by the microphone.
Software capabilities and settings
Wishing to connect the UHF microphone to an Android smartphone, we prepared an adapter cable. From 3.5 mm jack TRRS male to 1/4“ jack TS female, with this pinout:
| 1/4” TS female jack | Signal | 3.5 mm TRRS male jack (CTIA) |
|---|---|---|
| Not connected | Tip | |
| Not connected | Ring | |
| Sleeve | Ground | Ring |
| Tip | Microphone | Sleeve |
The smartphone did not sensed the microphone, there is not much documentation about it, but it seems that the autodetection of the microphone is based upon the impedence of the mic itself, if it is too low, it is not detected.
Once completed the electrical connection and acknowledged that automatic detection of the external microphone does not work, I decided to use the Lesser AudioSwitch app, which allows switching between the internal speaker/microphone and the external headset/mic by a button tap.
To realize the electrical connection explained in the above table, I used a mic/headphone splitter cable: the CTIA 4-poles male jack goes into the smartphone, the headphone female jack is left unconnected, the mic female Jack is connected to a self-made adapter cable featuring a 3.5 mm TRS male jack and a 1/4“ TS female jack. Finally the UHF receiver is connected using the 1/4” jack.
To record audio I used the Audio Recorder v.3.3.11 app from the F-Droid repository (free software, GPLv3 license). Into the Settings menu I choosed the Unprocessed recording source instead of mic, this gives raw audio data, without automatic gain applied etc. (see Android MediaRecorder overview).
The resulting recording is quite good: a 48 kHz 16 bits file with good sound quality and low noise.